Thursday 27.02.20
GOT TO LOVE A CR VIDEO
The more and more I have watched Craig the more I like him. He’s seems a nice guy and down to earth at the same time as being pretty informative in a relaxed way. If you haven’t checked him out, then give this video a watch and then subscribe to his channel as he’s got some great content.
Fordy
 I was at work earlier this week and found myself demonstrating a resting squat; the ( unlucky!) person opposite me was in equal measures surprised and impressed but what I found shocking was their insistence that if they ‘ ever got down they would never get back up.’
Being of Asian origin and having travelled extensively I am comfortable with this position and indeed it has been imperative faced with squat toilet facilities but in the west it is considered neither particularly attractive nor necessary unless perhaps camping.
The science however is mounting up and the fact is that making time to regularly take up this position helps stretch out tight hip flexors, the lower back, engage the core, protect the pelvic floor and when used as part of a dynamic movement strengthens the quads – ie undoing the relentless damage we are doing to ourselves through modern lifestyle trends, occupations and choices.
Shawn Stevenson explains more in his excellent article , ‘ The Resting Squat – How Squatting Makes You More Human’ which I have taken the liberty of quoting below:
The science is stacking up, and word is out that sitting for prolonged periods is devastating to our health. Former NASA scientist, Dr. Joan Vernikos, has compared sitting in a chair for prolonged periods to being weightless in space. This is due to the fact that the muscles, bones, joints, and other tissues aren’t supporting themselves naturally any longer. This newly dubbed “Sitting Disease has been shown to impact your blood pressure, blood sugar, and your ability to burn fat.
It’s not that sitting is bad. It’s more so how we’re sitting that’s really smacking our health around right now. The human body was never designed to sit in an awkward 90 degree position with certain muscles completely shutting off, while others are being dramatically over-stressed.
Gluteus Minimus
Sitting triggers your butt muscles to do absolutely nothing. They completely shut off and get used to not “activating” normally. This deranges your ability to walk, run, jump, stand up, sit down, and pretty much any other activity you can think of. Your glute muscles become limp and no longer fire properly when they are deconditioned from sitting too much.
Nil Abs
Your abs will be closer to soft-serve ice cream than a well-defined washboard if you’re sitting too often. Your abdominals actually help to hold you upright, but when you sit back in a chair they no longer have to work, and the battle of the bulge can take place. Your abs will quickly lose their tone and strength if you totally take them out of the equation by sitting.
Tight Hips
Unlike Shakira, your hips will be lying to you and everyone else when you try to exert yourself. Hip mobility and functionality is critical to all basic human movement patterns. Your hips provide stability and balance, and lack of mobility here is one of the major causes of serious injury.
Thinning Bones
It’s now understood that the largest contributing factor to poor bone density is lack of activity. Your bones need resistance to drive nutrients into them to trigger development. Sitting too often will lead to bonier bones, plus at heightened risk of disease and injury.
Back strain
People who sit more often are at greater risk of herniating their lumbar spinal discs. Sitting in chairs is synonymous with having “shortened” hip flexors. A large muscle called the psoas is a major hip flexor muscle that runs through the abdominal cavity. When the psoas is short (or tightened) from sitting too much, it pulls the upper lumbar spine forward which puts you out of alignment. Your upper body now rests on your ischial tuberosity (sitting bones) instead of being distributed along the arch of the spine. This is a leading cause of back pain and overall loss of function.
Bowel dysfunction
Sohrabi et al in their article
(Middle East J Dig Dis. 2012 Jan; 4(1): 23–27, https://www.ncbi.nlm.nih.gov/pmc/articles/PMC4017696/)
state that’’ the usual way to pass a stool, even in Western countries until a century ago and still today in many places, involves a position where the thighs are pressed against the abdominal wall and this is believed to assist stool evacuation.” There is indeed scientific evidence that squatting results is faster and more complete defecation helping us understand how it could prevent bowel diseases such as diverticulosis.
Microbiologist Guilia Enders concurs in her book , Charming Bowels , that we can evacuate more efficiently when we squat
This is because the closure mechanism of the gut is not designed to “open the hatch completely” when we’re sitting down or standing up: it’s like a kinked hose. Squatting is far more natural and puts less pressure on our bottoms. She says: “1.2 billion people around the world who squat have almost no incidence of diverticulosis and fewer problems with piles. We in the west, on the other hand, squeeze our gut tissue until it comes out of our bottoms.” Piles. Lovely.
What is a resting squat and why is it important?
Conventional sitting puts your weight onto another object by placing your butt on it and turning many critical muscles off. A resting squat is a posture where you squat down fully, lowering your hips towards the ground and your weight is equally distributed and controlled by your body.
For countless ages throughout time, human beings have been able to crouch all the way down into a resting squat for relaxing, working, cooking, communing, and even for using the bathroom. For babies and children it is the most natural position to assume .
If you can’t get down into the full resting position of a flat-footed squat, it’s time that you start working on it. If you don’t, you are dramatically limiting your mobility and ability to function at an optimal level. Start slow and use something to support yourself as you lower down. Trainer Debbie Atkins at Rev5 showed me a brilliant trick whereby as you lower yourself back and down you wriggle your toes – don’t ask me why but it works.
Wednesday 26.02.20
OHS
Over Head Squat. Think of it as a check of your mobility rather than just a really difficult version of a squat. The video opposite is great to look at why everyone should pretty much start every workout with a basic OHS to check that your feeling your mobility before going into your session.
Fordy
PERFECTING THE OVERHEAD SQUAT
Prior to the turn of the century, the overhead squat was primarily used by competitive weightlifters. Olympic weightlifting coaches use the overhead squat as a teaching progression for novice athletes. The overhead squat is used to strengthen the bottom position of a barbell snatch.
Since the recent boom in CrossFit, the use of the overhead squat has become more wide spread. It has been transformed into a staple exercise for training for many sports and has even been used in competition.
In order to perform this lift correctly, an athlete must have a high level of coordination, balance and mobility.
BAR OR PVC PIPE?
For inexperienced athletes or young children first learning to overhead squat, a barbell may be too heavy. For this reason, a lightweight PVC pipe or a broomstick can be used in place.
To find a proper grip with a PVC pipe that has no markings, try this simple method. Stand tall and pull your elbows out to the side. Your arms should end up in a 90-degree “L” position. Measure the distance between your right and left hand. Now mark that distance on the PVC pipe. Place your index finger on this line when grasping the pipe during the overhead squat.

When transitioning to the bar, athletes will usually take their grip a few inches from the end of the bar. This will be the same grip taken for the barbell snatch lift. Athletes with longer arms may need to take a grip almost to the end of the barbell, near the collars. Those with shorter arms may only need to place their grip around the outer notch of the bar.
THE SET UP
To start, hold the barbell on your upper back. This will be the same starting position as the high-bar back squat. After un-racking the barbell properly, the weight will need to be hoisted to the overhead position. This can be done in a number of ways depending on the amount of weight on the barbell and the individual preference of the lifter.

When first learning how to perform the overhead squat most coaches will teach a simple push-press to hoist the barbell to the overhead position. Once the weight increases to a significant load, a push-jerk or split-jerk is recommended for experienced weightlifters.
To start the push-press, pull the your elbows underneath the bar. This will place your arms in an efficient position to drive the barbell upwards. The hands should be at a snatch-grip width.

Next, take and hold a large breath. Brace your core muscles as if about to receive a punch to the stomach. Stabilizing the core through proper breathing and bracing allows your body to generate tremendous power for the rest of the lift. The dip & drive movement is then used to push the barbell overhead.
Drop your hips straight down a few inches while keeping your torso in a vertical position. A cue that is often used to maintain this straight dip is to imagine the feeling of your back sliding down a wall. If the hips drive backwards during the dip it will cause the chest to push forward. This will set you up to push the barbell forward into a bad overhead position.

During the controlled dip, the knees should be kept in proper alignment with the feet. This will allow for an efficient transfer of power from the legs to the arms during the push. If the knees collapse inwards on the dip, you will limit the potential upward driving power you can create with your legs.
After the dip is performed, push the barbell straight up by extending the hips, knees, and ankles in a powerful motion. The barbell should end up in a stable overhead position just over the back of your neck.
Here’s a great demonstration of the dip and drive movement to position the bar into an overhead position from Catalyst Athletics.
Your head can be pushed forward slightly to allow for this stable position. Be careful not to push the head too far forward! This will cause the chest to lean forward excessively and throw you off balance.
To keep the barbell overhead in a firm position the elbows should be completely locked out. You will have a difficult time keeping the barbell from wavering around if the elbows are not completely straight.
In this overhead position, the barbell should rest in the center of the palm. The wrists should be slightly extended. This is a position of stability that will not cause too much stress to the wrist joint. Do NOT try and keep a neutral straight wrist during an overhead squat!

Make sure to gaze straight forward or slightly upward. This will place the neck in a neutral position and limit any unwanted stresses. Looking upwards excessively or down towards your feet can throw you off balance.
THE DESCENT
Once you have stabilized the bar overhead, it’s time to start the descent. Push your hips back slightly to engage the posterior chain. As you begin your squat, think about sitting your hips onto your heels. This cue helps limit a large hip hinge that can throw you off balance. Control the descent to full depth.

The bar should always remain aligned over the middle of your foot for balance and stability. Proper technique is critical as a missed lift can lead to injury. If at any time the lift becomes unstable, push the bar forward or backwards and dump the bar to the ground. Both are completely safe alternatives for missing a weight. I recommend using bumper plates whenever doing overhead squats. Be aware of your surroundings.
Here’s another example of an overhead squat from Catalyst Athletics.
THE BOTTOM POSITION
The knees should be allowed to translate forward over the toes at the deepest part of this squat. This will allow you to maintain the desired vertical trunk position to keep the bar overhead.

THE ASCENT
The hips and chest should rise at the same rate during the ascent of the squat. If the hips rise fast and the chest stays forward, the barbell will drift towards your toes likely causing you to drop the weight.
Once you’ve come to a stable standing position, slowly control the bar down to the “shelf” position on your upper back. Letting the bar drop too quickly can lead to serious injury to the neck. If the weight is heavy, a slight dip can lessen the intensity of receiving the bar.
OVERHEAD SQUAT SEQUENCE
- Establish a safe starting position. The barbell should be resting on the upper traps (as with the high-bar back squat) with the elbows pulled under the barbell.
- Create a rigid trunk by taking a big breath and holding it tight. (Verbal cue: big breath & core tight).
- Use a controlled dip & drive to push the bar into an overhead position (Verbal cue: slide your back down a wall and drive upwards with power)
- Stabilize the barbell (Verbal cue: drive your hands to the ceiling & lock your elbows out).
- Use a slight hip hinge to engage the posterior chain.
- Remain balanced by keeping the bar positioned over the mid-foot the entire squat.
- Hips & chest rise at the same rate on the ascent.
Tuesday 25.02.20
When is a box jump a box jump?
If you’re squatting, you’re probably squatting for a reason. Sometimes that reason is to get better at a sport, and that sport normally involved jumping. Basketball, you want to dunk. Rugby, it’s the line out. American Football, wide receivers, defensive backs all need a great vert. So how can squatting help your vertical? Find out more in the article below. And when it comes to jumping, especially box jumping, try doing them like the guy in the video, this will show you just how good (or bad) your vertical actually is.
Fordy
The Two Best Exercises For Increasing Your Vertical Jump

Ever since I can remember, I’ve wanted a higher vertical jump. Whether that was due to ad campaigns such as the “Like Mike” commercials or the luster of seeing an elite athlete throw down a monster dunk, having a high vertical has been always glamorized.
But how do you actually go about increasing your vertical? The answer is in two parts:
- Increased force output – How much strength or energy can be applied to the ground
- Increased rate of force development – How quickly force can be produced and applied
The combination of these two is what allows someone to propel him- or herself from the ground to as high as possible.
These two variables are the answers to the question you vertically challenged folks have been asking for years. Since our answer is in two parts, let’s take a look at both of these aspects separately and then bring them both together.
Increased Force Output
This sounds simple. It just means you should get stronger.
But strength acquisition is a topic that can be overly complicated and drawn out all on its own.
So we will look at the most simplified method. Given our goal of increasing vertical jump height, we will focus specifically on lower body strength.
When developing lower body strength, the king of exercises is the back squat.
Specifically, the back squat at a depth below parallel. Squatting below parallel with high loads has been shown to reap the most benefit in the vertical jump.
A 2012 study published in the Journal of Strength and Conditioning Research took 59 participants and placed them in a ten-week training group focusing on three variations of the squat: back squats, deep front squats, and partial range of motion back squats. Beginning the training program, each participant underwent a series of tests including vertical jump, one rep max (1RM), and rate of force development.
The participants placed in the deep front and deep back squat groups improved performance in the vertical jump by just over one inch.
The partial squat group showed no improvements at all.
In addition, each group tested the three squat variations for improvements in 1RM strength.
Results showed the deep squat groups demonstrated improvements in all three variations, but the partial squat group only improved in partial squats.
The last test, rate of force development, was not changed within the deep squat group, but was significantly decreased in the partial squat group.

Through this study we are able to see three important points:
- Deep squats improve vertical jump height
- Deep squats increase force output no matter the range of motion
- Partial squats actually decrease rate of force development
So, we now know how to develop variable number one – force output. The research shows squatting deep can increase vertical jump and force output.
Now, how do we go about increasing the second variable, the rate of force development? I want to increase my vertical more than one inch.
And I know if the force I can now produce is developed more rapidly, the amount of power produced increases dramatically.
Rate of Force Development
Simply squatting deep does not help with increasing the rate at which force is developed.
Deep squatting is primarily affecting the musculature, but in relation to power or rate of force development, we need to train the nervous system. This means we must focus on recruiting more of the high threshold units. These motor units are most easily recruited by increasing load while simultaneously trying to accelerate that load as quickly as possible.
Olympic lifts are commonly used to recruit these high threshold motor units are the Olympic lifts. However, since these lifts are more complex than many other exercises, technique can limit the progress made.
In order to avoid the technique issues, I suggest focusing on a simplified derivative of the clean – the mid-thigh pull.
The mid-thigh pull starts in the same position as the hang clean and requires triple extension of the ankles, knees, and hips, yet does not require the catch that a clean does.
Since it is so simple, you can focus strictly on adding weight to the bar, accelerating it upward as quickly as possible, and then letting the weight fall.
Some studies have even shown that in reference to our primary goal, increasing rate of force development, the mid-thigh pull is better than the power clean. A 2011 study published in the Journal of Strength and Conditioning Research compared the power clean, hang clean, mid-thigh pull, and mid-thigh power clean.
The comparison showed the mid-thigh pull to be the superior means of increasing rate of force development.
Putting It All Together
So we’ve found exactly the combo of movements we are looking for: the best method of increasing force output (deep back squat) and the best method of increasing rate of force development (mid-thigh pull).
In order to program these two exercises, we will use the concept of linear periodization, which also happened to be used in the squat depth study.
These exercises can be done up to twice a week. Any more than that starts to challenge recovery, which can negate any progress. They can also be done within any training program.
The only requirement is that these exercises be done early in your workout, since they require force and/or power and any fatigue will inhibit this program’s effectiveness.
Hypertrophy Phase:
- Mid-Thigh Pull 4 x 5
- Deep Back Squat 4 x 10
- Rest Break: 1.5 minutes
- Phase Duration: 4 weeks
Max Strength Phase:
- Mid-Thigh Pull 4 x 4
- Deep Back Squat 5 x 5
- Rest Break: 2.5 minutes
- Phase Duration: 6 weeks
Speed Strength Phase:
- Mid-Thigh Pull 4 x 3
- Deep Back Squat 5 x 3
- Rest Break: 3 minutes
- Phase Duration: 4 weeks
Power Phase:
In this phase, alternate one set of exercise one with one set of exercise two.
- Mid-Thigh Pull 5 x 3
- Deep Back Squat 5 x 3
- Rest Break: 3 minutes
- Phase Duration: 3 weeks
Monday 24.02.20

We’re so sorry but Fordy has messed up the site. He tried to update some bits and as a result crashed a few other bits instead, including the Leaderboard so we’ve have to fix it behind the scenes. Normal service will resume in the next 48 hours.
Fordy (My Bad)
Respect Greatness
Sometimes you learn a lot just by watching, and who better to watch than Lu Xiaojun. If you don’t think warming up is important then watch the video. If you think you’re to old to squat, then watch the video. If you don’t think that mobility is perhaps one of the most important aspects to your squat, then watch the video. In fact, just watch the video.
Sunday 23.02.20
SEEN THIS BEFORE
We’ve discussed quite a lot on Ankle Mobility and Range of motion, but, I love these videos and I think they allow you to see it in a different perspective. If you’re not working on ankle mobility then take today to go back over some of the older posts and start to look at it. It won’t just affect your squat mobility in the gym, it will also make everything easier in your everyday life. It’s five t ten minutes a day, just get it done.
Fordy
Four Telltale Signs That You’re An Athlete
Start the debate in 3,2………………………1
I used to think the athlete gene skipped me.
I grew up in a family that always prioritised sports and athletic activities. My mom always found time for exercise, and my dad is an endurance athlete and continues to do everything from skiing, to 50+ mile bike rides, to kiteboarding and more. Both my siblings excelled at sports in high school, and my brother even played college basketball.
I played sports in high school, and although I was never bad at basketball or soccer, it was also clear that neither was my calling. So when I went off to college I gave up all sports and anything even remotely athletically-related, resigned to thinking that I would be a weak, uncoordinated, non-athletic person for the rest of my life. And even when I got over that foolish belief and became a personal trainer while living in Amsterdam, I remained unconvinced of my athleticism and was constantly worried people would see through my facade and realise the fraud I really was.
Luckily, although it’s taken years longer than it should have, these days I finally believe deep down that I truly am an athlete.
In fact, I strongly believe that everyone is an athlete.
If you’re thinking, “no way Krista, I am definitely not an athlete,” trust me, I know how you feel—and I refuse to believe you. If you feel this way, you just haven’t discovered your potential as an athlete—yet.
But if you’re finding more and more that you’re actually enjoying your workouts and get excited to work on new skills like handstands, pull ups, or whatever your current fitness goal is, congratulations—you have officially embraced your inner athlete.
Here are four telltale signs you know you’ve finally embraced your inner athlete:
You Care About Performance More Than Appearance
When I used to only work out just to try and lose weight or work off last night’s pizza, my only focus was how my jeans fit and how small the number on the scale was. Sure, I always had somewhat of a competitive side and would always try to work harder than everyone at spin class or run faster than the other joggers around me, but ultimately what I really cared about was my appearance and health.
Yet as I got more into HIIT and became interested in sports like boxing, Krav Maga, and bodyweight training/calisthenics, something slowly started to shift. I began to work out not just to feel confident in my own body, but to get better at my sport. I became less concerned with the scale and more about how my workout would make me a stronger, better athlete.
So when you notice yourself caring more about how your workouts will affect your sport or fitness goals rather than how many calories you’ll burn, you’ll know you’ve officially embraced your inner athlete.
You Focus on Building Skills (Rather Than Just Getting Your Workout Over With)
Like most people, I used to absolutely dread my workouts (especially when running was my only form of exercise). At that time, my entire focus would be on getting my workout over with—the sooner I could be done with it, the better.
But as I started to have more and more athletic and fitness goals and began wanting to conquer cool exercises like handstands, pistols, and gymnastics skills, something changed. My workouts started to feel more like play time, a time to experiment and see all that my body could accomplish. They became less torture and more fun.
If this sounds crazy to you, just try and think about something you enjoy and how it seems to transport you to a space where it feels less like work and more like fun. It could be anything—dancing, ultimate frisbee, rock climbing, skiing, you name it. We’re all good at different things, so don’t limit yourself to the belief that you’re only an athlete if you’re good at traditional sports like football or basketball.
Because when you start wanting to build skills or get excited about working towards a cool fitness goal, no matter what your current level—you’re officially an athlete.
You Start Treating Food as Fuel
I’ll be the first to admit that I used to treat calories as the ultimate enemy. Back when I would work out just to lose weight, I had an extremely unhealthy mindset that the less I ate, the better. In my mind, food was evil, and the less calories I consumed, the better of a person I was.
Obviously, this is an extremely unhealthy take on food and I hope that all of you are smarter than me and have never had such a negative relationship with food. Yet the ironic thing is that once I started treating food as fuel for my workouts and life, not only did I actually get to eat more than ever, I was able to maintain a level of leanness I never could before.
So that moment that you start thinking of food and how it will affect your workouts, your mood, and your mental sharpness, that moment when you embrace food as the way to getting stronger, fitter, and more athletic—that’s the moment you know you’re an athlete.
You No longer Look Forward to Rest Days
Like most people, rest days used to be my favorite days of the week. I would look forward to not working out, being lazy, and pretty much not moving all day long.
But two things started to happen:
First, I started to actually get disappointed that I wouldn’t get to work on whatever skills I was currently focusing on. This was a completely new concept to me, that a person could actually look forward to their workouts and regret the days that they couldn’t work out.
Yet as I came to accept more and more that I really was an athlete, this began to make much more sense. When you have a goal and something to work towards, it’s much harder to take any time off (though it’s absolutely necessary, so don’t skip it).
Second, I started to miss the mental and physical benefits I got from my workouts. I realised that on days when I worked out I felt clearer headed, less anxious, and more confident. I felt like I could deal better with any tough thing that came my way, and nearly always felt less stressed and more energised after my workout than I did before it. I realised more and more that my workouts had become a sort of meditation for me, a chance for me to feel “in the zone” and forget about anything else I had been worrying about.
So when you start looking more forward to your workout days than your rest days, you’ve officially embraced your inner athlete.
You Are An Athlete
No matter what your current fitness level, you are an athlete.
If you move, you’re an athlete.
If you try, you’re an athlete.
If you think you’re an athlete, you are one.
“If you have a body, you are an athlete.” – Bill Bowerman, co-founder of Nike
https://www.12minuteathlete.com/you-are-an-athlete/
Saturday 22.02.20
Don’t force your fitness in 2020
With so much information now readily available about how short term fixes aren’t the best solution for your diet, and quick fixes like magic teas or restricting calories to super low levels don’t work, we are forever being advise to take on an approach that is sustainable in order to create or form new habits that could be with us for life and not just for periods of our lives. It does make me wonder though why we still do the exact same thing when it comes to our fitness, especially at this time of year. We get the urge to jump back into the gym or the buy into the latest trend by sitting on a bike in front of a screen smashing out a workout into every spare minute of the day we can find. This kind of dedication and determination is admirable until we spend the next 3-weeks of the month complaining about an injury we have picked up or the severe muscle soreness we are now experiencing every time we get up off the sofa or walk down the stairs. It’s then that we realise that this kind of intensity isn’t sustainable, it’s akin to the crash dieting that seemed like such a good idea at the time until a few days later when I’m moody, irritable, lacking in energy, tired all the time and hungry!
So why all of sudden are we ok to accept that playing the long game with our nutrition is ok, but not with our fitness. I have to laugh when I hear people ask about gym memberships and say things like, “I don’t want to be tied in for 12 months”, or “do you do 3-month memberships”. If you believe that you are going to go to the gym for 3-months, what are you going to do in the 4th? Or what about, “I’m buying into the 12-week challenge, I’m going to transform my body in the next 12 weeks”, what happens in week 13, 14, 15? Stop making the grand gesture that’s often empty and realise that ‘Consistency Trumps Short Term Intensity’ in pretty much everything you do. You need to start to realise that it doesn’t matter what you do, it’s going to be more about how long you do it for. Think about the people in the gym who have the physique that you are aspiring to, and then ask them how long they have been working out for, I’ll bet you the answer isn’t 12 weeks. On the odd occasion that they have been ‘cutting up’ for 12 weeks, they usually like to tell you that they have been training for years though to get like they do. It’s the same with anything in the gym, the person who’s slaying the rest of the spinning class just so happens to be there every time you are, consistency.
So, look at the long game, look at a way to keep you focused over a long period in order to give yourself the time to create a habit out of the gym without the pressure and stress of diving into a high intensity short fix routine. And if you can’t go for some reason or you miss a class, so what. The world isn’t suddenly going to end and you’re not going to lose all you gains either. Create an environment that is always changing, even die-hard athletes fall out of love with the ‘game’ due to the repetitive nature of doing the same thing over and over. I guarantee that the threshold for an everyday athlete like you and I is way less than what theirs is, so sitting on your bike in front of the TV screen maybe be great for 3 months, 6 months, but what is that experience going to be like in 12, 18 months, are you still going to be ready to strap yourself into the pedals? Some will, but a lot wont.
Molly Galbraith put it perfectly, “It doesn’t matter if you don’t get to the gym today, it really doesn’t even matter if you get there tomorrow. What matters is that you’re still in the gym 20 years from now”
2020 should be about finding your fitness and not putting stress on yourself to overly commit. Consistency will come, just don’t force it.
Fordy
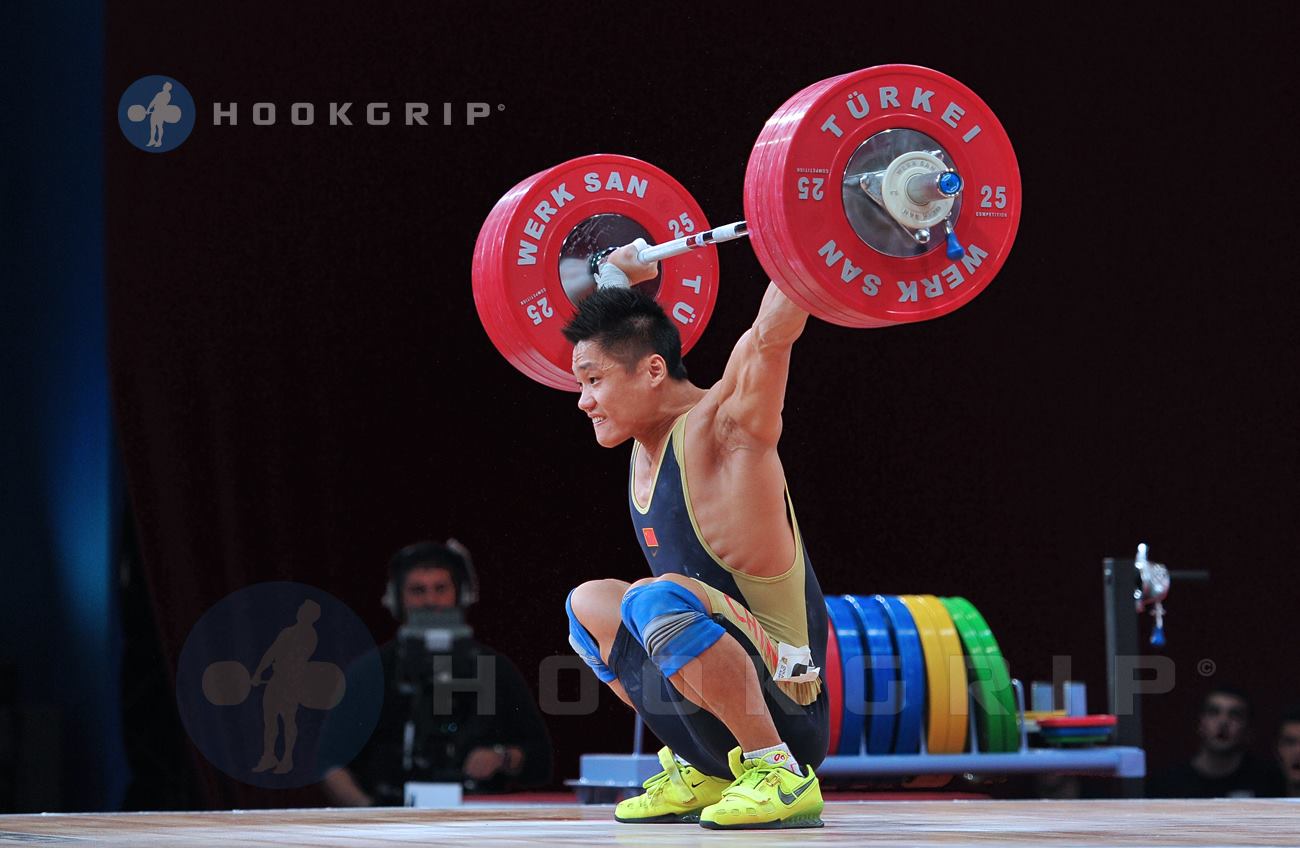
MUSCLES, LEG MUSCLES EVERYWHERE
In this last article on the squat, we will look at how different depths, foot position, and bar position affects muscle activity of the lower limb. To determine what muscles are active during the squat or for any exercise for that matter, researchers use a device known as “Electromyography” or EMG. EMG evaluates and records the electrical activity of skeletal muscles. The squat is a highly versatile exercise that can target specific muscles groups for both performance and rehabilitation purposes. Having a knowledge of how squat variants, affect muscle recruitment patterns, can assist FTI instructors to modify the squat, to target specific muscles during both rehabilitation and strengthening programs.
Calf muscle
EMG research which has investigated calf muscle activity and force during a squat has observed a moderate amount of calf muscle activity during the squat. Calf muscle activity (Gastrocnemius) increasing as the knee progressively flexes more on the way down; and decreases during on the way up, as knee extension increases (Escamilla 1998). Calf (Gastrocnemius) activity appears to peak between 60 to 90 degrees of knee flexion; to eccentrically control the rate of ankle dorsiflexion during the descent (Escamilla 1998). Finally, positioning the feet directly under the hips during a wall slide squat has been shown to increase calf muscle activity (Blanpied 1999).
Quadriceps
During a squat, the quadriceps are the prime movers, particularly the vasti muscles, which show significantly higher activity than the rectus femoris. Peak quadriceps activity occurs at 80-90 degrees of a squat, with no further increases with greater knee flexion (Escamilla 2001). This data indicates, half squats (to 90 degrees of knee flexion) will maximize quadriceps activity. Descending beyond 90 degrees of knee flexion, which is near the parallel squat position, may not enhance quadriceps development (Escamilla 2001). Finally, when compared to wall squats with scapular support, appears to increase quadriceps activity (Blanpied 1999).
Vastus medial Obliquus (VMO)
The vastus medial obliquus muscle is the most distal segment of the vastus medial muscle. Its specific training plays a major role in maintaining patella position and limiting injuries to the knee. Weakness, timing, and dysfunction of the VMO causes mal-tracking of the patella and subsequent damage to surrounding structures which leads to increased forces on the knees, often resulting in injuries (Lefebvre 2006). Furthermore, imbalances between vastus lateral and VMO enhances the risk for patellofemoral pain (Karst & Willit, 1995). This data demonstrates the importance of early VMO training following a knee injury. Research on VMO activity during a squat shows the VMO contributes 30.88% to the activity of the thigh during the partial squat; yet, it contributes only 18.85 and 20.23% during the parallel and full squats (Caterisano et al., 2002). Other research (Anderson et al., 1998) has investigated if widening the foot position during the squat; affects VMO activity relative to VL activity (VMO: VL ratio). The researchers found a wider foot position did not increase VMO activity. However VMO was more active throughout a 90° range, and increasing knee flexion angles can increase the activity of the VMO relative to the VL. Taken together, these findings suggest squatting to no greater than 90 degrees of knee flexion; may be the optimal squat depth for VMO.
Hamstrings
The hamstrings due to their biarticular nature (crossing both the hip and knee) act eccentrically during the descent, and concentrically during the ascent. However as the knee flexes during the descent, the hip flexes, the length of the hamstrings is maintained throughout the squat; resulting in minimal change to hamstring length. This may increases the length-tension relationship in favor of force production (Escamilla 2001). Research suggests hamstring activity is greatest during the ascent phase of a squat and is strongly related to weight lifted (Wilk et al., 1996). In contrast, during a bodyweight squat, hamstring activity is minimal, and not significant until loads of 12 RM loads are used, presumably to enhance knee stability. Hamstring activity during a squat; reaches peak activity between 50 – 70 degrees of knee flexion. Finally, researchers (Blanpied 1999) observed a significant increase in hamstring activity when squats are performed in a squat hack machine and when performing a wall squat with scapular support with the feet position forward of center mass. Interestingly, both deep squats and half squats appear to stimulate hamstring activity equally. Taken together, these results indicate that the hack squat, the wall squat with scapula support, and both deep and half squats effectively stimulate hamstring activity.
Glute Activity
Research which has investigated the effects of squat depth on gluteus maximus activity have found that gluteus maximus activity increases with depth (Caterisano et al., 2002). However, these results appear to vary with different loads (% of 1RM). Other researchers have found Gluteus maximus recruitment may increase with increases in squat stance width. Finally, Aspe and Swinton, (2014) analyzed the back squat and the overhead squat and found; the back squat elicited greater gluteus maximus activity than the overhead squat. Interestingly, when compared to the front, full, or parallel squats, squatting at full range, did not elicit greater Gluteus maximus activation, suggesting either front, full, or parallel squats are equally effective exercises for Glut development (Contreras et al., 2016).
In conclusion, the results from these studies suggest the squat is an excellent exercise to strengthen the musculature of lower limbs. Also, muscle activity during a squat can be affected foot position, depth, support, and load. Notwithstanding any limitations from these studies, including differences in prescribed training loads, the following generalizations about muscle activity during the squat can be made:
- To maximize calf muscle activity prescribe squats to the parallel thigh position and position the feet directly under the hips.
- To target the quadriceps during a squat, prescribe squats to the parallel thigh position, for rehabilitation prescribe wall squats with a support pad placed at hip level.
- When targeting the VMO, prescribe squats to the parallel thigh position.
- When targeting the hamstrings, prescribe either deep squats or squats to the parallel thigh position with a minimum of 12 RM loads to equally stimulate the hamstrings. When prescribing a body weight squat, prescribe a wall squat with a support pad placed on the scapula and with the feet forward of center mass.
- When targeting the Gluteal muscle group, it is equally effective to prescribing a squat to the parallel thigh position or full range. For variation, front squats to the full range can also be used to stimulate gluteal muscle activity.
- Dispite differences in muscle activity, full range of motion squats are still an affective variation of the squat for general strengthening and athletic development.
https://
Friday 21.02.20
“When the standard changes, So does the performance”
I’ll be honest, I kind of needed this video today. Yes, it’s a little motivational for my liking. Yes, it’s often heard and then often forgotten. But the one line I loved in it was “when the standard changes, so does the performance”. And that is exactly what I want the Bracket to be known for. So many people train, but train with no real intent and when someone suddenly asks you to do something different from the ‘standard’ their performance has to change. I love that sentiment and we want to keep changing the standard so that your performance has to change as well. If we succeed in doing that, then I will have succeeded in my goal as well.
Fordy
What the best do better than everyone else
Success is made in the mud, it’s in the dirt. It’s the grimy work that no one else wants to do for countless hours that leads to success. When the world looks at success they see the small percentage of the effort and workload that has gone before to create it. Think about this, 95% of the work you do will never be seen but you will need to do it if you want to succeed. A footballer will train everyday each week, spending countless hours learning to bend a free kick over a wall time and time again. In the match on Sunday he gets put into a position, when in a single stirke of the ball he will have to use all the skills he has spent countless hours cultivating but what the crowd will see is the 2 or 3 seconds as the ball leaves his foot and hits the back of the net. Here’s another example from a great book called ‘Training Camp’ by John Gordon. What is the difference between a baseball hitter that has a 350 average and a 250 average over the course of a season? Apart from millions of dollars in wages and endorsements and the fact that one would be seen as an elite player while the other just a member of the team, when you break it down into the number of games played it equates to an extra 1.6 hits per week. That’s it! 1.6 extra hits a week. That’s what the best do better than anyone else.
A lot of people say that being average isn’t an option for them but in reality spend their life being average or good at something as they never strive to become great. The reason for this isn’t exactly complicated; in fact it’s very simple. To be great or the best you have to have a willingness to be uncomfortable. If you’re always striving to get better then your always growing, and if you’re growing then you’re not comfortable. You need to embrace this as part of a much larger process, you need to be willing to pay the price of success and for some the price is just too high.
When asked, what’s the secret to their success? Some of the most successful people in the world give an unexpected answer. We want to hear that there is some magical formula, a secret recipe, when in reality most simply say that they work hard, focus on the fundamentals, stay positive and had the desire to succeed and make an impact in their given area of work. It is these characteristics that are shared by some of the very best athletes and businessmen/women in the world, and allows them to become the best of the best.
There is though a formula to success and over the next few blogs I am going to be sharing it with you. Bit by bit we will create the formula that leads to success, which in itself is predictable, repeatable and understandable.
Mountain Top Moment

Someone will have paved the way already in your area of expertise someone has already shown you what success looks like. It could be someone you know, a complete stranger or someone who is already regarded as being the best in your industry. Most of these people have been doing something that they love for a long time and then had a moment when they realised they could actually become great at it. Others had settled for mediocrity, they have settled for something they were good at, written down goals because they had been told this was the way to achieve greatness but actually had nothing to do with what they truly wanted. When you see what you want and even how difficult the journey is to get there you will have the commitment, passion and energy to fuel you through your journey to pay the price and overcome the challenges to realise your goal.
The best of the best don’t only know what they want; they want it more than anyone else. They have more desire to succeed. How can you measure desire though? It takes more than thoughts and wishes, you can wish for something 24 hours a day, 7 days a week but if you’re not taking the initiative to make it happen then it doesn’t matter how much you wish for something. Desire is measured by actions. If you ask anyone right now if they want to be great the answer will always be yes. The difference is that the best don’t just think about their desire to be great, they act on it. They have a high capacity for work, they do things that other people wont do in order to succeed and they spend more time doing it. When everyone else is sleeping the best are busy improving by thinking and practicing.
Everyone has a calling in life and whatever that calling is, you should do your best to be the very best at it. To deny being your best was to deny the gift you were meant to give others.
The best want it more.
Wednesday 19.02.20
HOW TO SQUAT PROPERLY TO GROW YOUR BUTT!
I literally have NO words. I’m just going to let you watch the video and then make your own mind up.
Fordy
SPREAD THE GROUND
I love this simple little cue that coaches would do well to use for a lot of their clients when it comes to squatting. The engagement of the nervous system via cueing makes a huge impact on the muscular system especially during the squat. Remember, we train our mind in the gym as the mind ultimately controls the body. Give it a try.
Guide in maintaining tension in the hips and glutes during a squat
Movement-Rx movement coach and resident video guy is also a member of the CrossFit L1 Trainer Seminar staff as well as the CrossFit Weightlifting staff. Here’s a great cue to make sure you’re maintaining tension in the hips and glutes as you squat.
For those of you who lose tension in the hole, this one is for you!
We often hear powerlifters use the cue “spread the ground!” For me, this cue from Ingrid made much more sense to explain what we are going for.
One of the best exercises that you can try whether you are trying to lose weight or build muscles is squat. It is one of those exercises that is hard to do properly but the results are going to be amazing once done correctly.
In the squat, it’s super important to keep the glutes engaged. Yes, that’s true! This cue has worked wonders for a bunch of my lifters and hopefully it will help you, too.
Step 1: Set your feet by pressing your big toe into the ground. This will help keep your feet rooted throughout the whole foot.
Step 2: Imagine pulling the heads of your femurs sideways out of your pelvis. If you do this correctly you should feel the side of your butt firing.
Step 3: Initiate the squat by continuing to spread your hips sideways and sit straight down. If you are pulling sideways, your butt will automatically sit down and back. Remember we don’t want to send our butt excessively back as we’ll lose our upright torso.
Step 4: Maintain tension all the way into the hole and accelerate back up.
Give it a try. You should feel much more solid and will be recruiting more musculature… and hopefully move more weight!
Tuesday 18.02.20
INTENSITY
One of the biggest mistakes we see all the time is when people mix up volume and intensity. They think that the more they do in terms of the number of reps the higher the intensity of the workout becomes. This has been due to the rise in ‘High Intensity’ classes and training formats that mistake the length of a WOD or workout with the level of intensity. Jumping once onto a really high box using maximum effort is high intensity, even if I do nothing else afterward. Training balls out for an 20 minutes though on a WOD, although ‘intense’ isn’t necessarily at high ‘intensity’. So to clear this up once and for all here is a great video by the beardy man again and a great article from Barbend. If you’re still confused after this, then read it again and watch it again until you’re not.
Fordy
There is a maxim in the coaching world; you can train long or you can train hard, but you can’t train both. There are strongman coaches in both camps, and I will attempt to show you the difference and help you pick the right style for your body and schedule. I will begin by clarifying what each style means.
Training for Volume
When an athlete trains for volume, they attempt to do as many sets and reps of an exercise or muscle group as they can in a training session. These sessions generally take a minimum of 90 minutes and can go on for two or three hours. An example of this type of session would be:
- 10 sets of 3 rep squats
- 10 sets of 10 stiff leg deadlifts
- 10 sets of walking lunges
- 3 sets of tire flips
- Sled drag
- Plyometric jumps
As the amount of sets and reps add up, the ability of the body to perform at its peak diminishes. By the end of a workout like this you will exhaust every muscle fiber in your lower body and barely be able to walk out the door. You can crawl out of the gym and declare, “EPIC leg session! Killed them!!!!!” It will take the full 72 hours for recovery and often the athlete will not do another leg session that week.
The principal behind this style of training operates on the notion of breaking down the entire muscle group and letting it build back up over time. Being in the gym for long hours, they get out their frustrations, love the feeling they get, and have all their bases covered when it comes to training a muscle group. Many bodybuilders follow this style of training as it can be effective for muscle building, especially in trainees who have increased recovery ability.
If you only have a few days during the week to train, but a good amount of time to train on those days, you may want to consider a high volume program.
Training for Intensity
Conversely, when an athlete trains for intensity, sessions will be brief and near a max all of the time. An athlete may only do a few work sets in a session but train every day, even multiple times per day. This idea (started by Eastern European coaches) focus on the body adapting to the work in a few hours and becoming wired to do exactly the same thing every day. After a brief warm up, a sample session may look like this:
- Squat 2×1
- Jerk 2×3
- Farmers walk 1x75ft.
Session B:
- Good Morning 3×3
- RDL 3×2
- Box Jump 3×2
To understand this program completely, you would see a very similar day two, three, and so on. For a set period of time the athlete works on achieving a PR nearly every day. The athlete should never be exhausted after a session, but instead feel the effects of a few short heavy sets. The recovery time is cut to hours instead of days for this training. Your schedule must allow you to train every day, and multiple times per day is actually preferred.
What is the main difference in the simplest terms?
Recovery and optimizing your down time is at play here. Intensity plays off of the idea that a muscle is either recovering or tearing down. It is rarely ever at stasis. It does just enough to stimulate growth and then stimulation is reapplied as soon as recovery is repeated. Volume is more forgiving in what happens to a muscle. Allowing more recovery time to heal from greater damage, it seeks to do more at once. That is, volume digs a hole with a shovel and intensity digs with a spade.
If you have the time for multiple short sessions per week, it would be wise to go with intensity. The quality of all the reps will be better and you should make more significant long term gains. You also have an advantage of truly getting comfortable with max weights. This decreases the chance of misses.
Volume disciples can’t be in the gym every day. You would be so worn down that you never fully recover. Often times, a Monday squatter with presses on Wednesday will be working off spongy legs yet, and lose a bit off their power in a press. Many times though, they do not have a choice. Hitting a low volume program just three days a week will not provide enough stimulation to provide consistent progress. Sometimes a mix of the two may work for you. A 12 week program of such can be found here.
Make sure the amount of work you do matches what your body and schedule can work with. Serious athletes often rearrange their work lives to make sure they can hit the gym daily. It comes down to priorities. No matter what style of training you pursue, make sure you use proper technique and work to the best of your ability.
Monday 17.02.20
FRONT VS BACK
Just because it’s squat month, and by that we mean back squat, it doesn’t mean you probably won’t be doing other variations of squatting as well. The most common one is the Front Squat. But why is it that you can lift more weight on the back squat that you can on the front squat? The guys at Squat University explain all in the video. Let us know if you know anyone who has the reverse.
Fordy
Sunday 16.02.20
I A Peeeeeeeeeeeee
That stands for INTRA ABDOMINAL PRESSURE. This is a foundation when it comes to good squatting. The guys at JTS in the video go through it in a really informative manner with some simple, great cueing to make sure you get that mid section tight in order to get your squat right.
Fordy
BREATHING IS NOT BRACING
Video Transcript:
All right. Thanks, everyone. I do appreciate you guys taking the time to come in today to listen to this piece. It is an important piece and it needs to touch on because I see this Facebook and there’s somebody with an article or usually a video talking about, and almost some time I’ve seen it labeled Breathing is Bracing, Breathing is Bracing. It is not bracing, so we need to kind of understand that there’s three functions to the diaphragm. We’ve got respiration function, we’ve got stabilization function and we’ve got my favorite, the sphincter function. We’re not going to touch on that one today, unless I have some really profound gas and you can all hear it. Outside of that, we’re not going to touch on it.
They are integrating together. When we talk about integration of those today, now I’m not saying breathing isn’t important. Breathing is a fundamental piece where you start. If you have respiration dysfunction, you will continue to need to go back and deal with issues. They’re going to come up. They’re going to pop around different places in your body. It is a fact that you will continue to have issues. You will have power loss. It is important that if you have breathing dysfunction, you must deal with it, and so that’s why we talk about the diaphragmatic breathing strategies. We’re not going to go in to that today. We’re going to say that’s taken care of. What we’re going to talk about, what is the difference between diaphragmatic breathing, proper breathing and the stabilization function that the diaphragm also has and how those integrate together. They are not the same thing.
Unless you guys want to talk about sphincter function, we can spend time talking about that. It would be fun. I know [Brandon asked it 00:02:28]. Before you do bracing, we got to talk about posture, so you cannot have proper bracing without having proper posture to begin with. It simply won’t happen. We must have the diaphragm right here, this cone-shaped muscle that hooks to the rib cage here and it drives down, working in opposition to the pelvic floor. These two have to be aligned, and we’ll get into why here in a minute, but this is why our flared rib cage position is a big issue. I used to walk around with this actually.
You’ll find my rib cage actually used to be flared outward and almost raised up until I started doing a lot of this work and it physically changed. That was something that was with me. I remember it like in high school because I would be like, “Man, I could never compete in bodybuilding. I’ll never have the physique because I got this weird jacked-up rib cage.” My rib cage changed in my mid-30s when I started doing this stuff. That is freaking crazy.
The other is this right here, and I’m one that has to deal with that. I’ve got some anterior pelvic tilt there and we’ve got to deal with cleaning that up. A lot of our larger muscle vectors will be in that position, but you’ve got to be able to fix that first because if we don’t have those two working perfectly in opposition to each other we’ve got this opened up here what happens if we fill it. We’re going to pressurize like you’re breathing. You’re going to fill it with air, so I’m going to push out towards the front and we need it to be equally pressurized all the way around.
Any deviation here is going to cause an issue. See this quite a bit like in squatting where people have either shoulder mobility issues or this tilt that just kind of start in this unhinged position right here in the squat. Guess what? They’re just going to over exaggerate, got some tilt, pressurize, definitely I followed all your stuff and I went in to the hole in the bottom of the squat and I went right in the butt wink just because you need to start here. Now, I can pressurize. That’s the beginning.
Any time, and let’s just call it an open scissor, we have that. We have to fix those deficits. Where do we start? We start with assessing breathing. You got breathing dysfunction? You’re going to have dysfunction in your body. You’re going to have energy loss. You’re going to have issues because if the diaphragm doesn’t know how to breathe properly, its other functions are not going to be working well as well. Next, then you go to posture. You got to deal to postural deficits.
This one here, when we talk about why is it important that it’s all the way around it uneven. This is where we start getting in to bracing functions and what does that mean. The difference between breathing and bracing. Breathing, you’re just filling with air, oxygen, so you can fill your body. Bracing, we’re using all the structure all the way around is an outer sheath and it needs to become rigid and resist. Then, we’re going to push against it and those forces need to be equal in all directions all the way around. That’s another complaint I’ve got because a lot of people say, “Yep, I’ve got that. I go to yoga. I really got this breathing function down. Got this big belly breast, big belly breast. I’m a master of it.” When we do some testing and they have a significant dysfunction.
Why? It’s all going this way, right here. We need to be inflating all the way around into the pera-spinal. You get pain in your deadlift right off that floor a lot of times. People aren’t inflating in that para-spinal region. Right back in here, we need to be pushing out. This is where the belt is a good cue to fill that up. There’s issue, I think, last year I helped Stan Efferding a lot with on his deadlift. He has experienced a lot of back pain and we did some quick fixes, focused on filling those areas up. Pain dropped down immediately. Power output went up.
This is an area how we find those deficits. You need to check around and find where am I soft at. This is something, like I said, that a lot of areas if we go back to class school stuff, I think yoga is probably right if we go way back. It’s just the way that some teachers, some instructors, so it’s not a job at yoga in general. It’s just an example of what I’ve seen with some people, which is not indicative of the whole.
We get back into, if we go into fighting. A lot of our classical sports like Muay Thai, jiu-jitsu, stuff like that, they have a lot of content on basically breathing and bracing type issues and that’s why it’s really important because that’s where, again, we wan to talk about that, one, both our posture and the fact that we need to be rigid. You need to be able to throw a punch. If I’m going to do something, you’re always going to be in this position. They’re going to be in, I’m going to get into great bench press position. That’s where I get the most pressing power with this fist. I’ll fight you all day long. That’s not the best position for power transfer.
Simply put, you know it. Let’s get to fight, come on. You’re ready to take a punch. Some pretty important pieces there to understand. We talked about it. I’ve got a little example here. The hot water balloon. We got the strong and blown it up. It’s a tight, constrictive vessel and we’re working against that. If you’re not, we can just bend you up and wrap you up like a little play toy, which what do you want to be in your core, your center. Something that we can just sit up and twist up. It doesn’t have a tight, rigid outer sheath. This is the difference. This is bracing. Right there, you can’t tie that baby up. Really important thing to understand.
Look at your skeletal system. We have Halloween coming up, so we see skeletons all over the place. Take a look at them. Huge mass of structural bones. All this stuff everywhere. Right here in the middle portion, there’s nothing – just a thin bone connecting the top to the bottom. Where does that force to create stability come from? It all comes from right in here, in the torso.
I’ve recently, I’m going to leave the names out, but over the last few months I’ve been interviewed by several well-known fitness publication magazines and they call me up. “Chris, we need to talk, you’re the breathing guy. We’ve got some articles that we want to put together. Follow all your work.” I get on the phone. All right, been watching all your stuff. I’ve been a big fan for a long time.
The question is, do you breathe in on the way down on a squat or do you breathe out? I don’t know. Give me some context. It depends. Do you breathe in between reps and then hold? How many reps do you hold before you breathe? I don’t know. It depends because we’re using the diaphragm for both respiration and bracing.
Think about it as a dial. If you’re going to run marathon, you’re going to need a lot of damn oxygen. Bracing isn’t going to be that critical. You’re going to crave for that dial down and you’re going to be using very little of the stabilization function. You start doing a MetCon. You’re in CrossFit. You don’t see MetCon. There’s going to be some requirement for stabilization, less for breathing but still a fair bet.
Do a 120 rep around squats. You’re going to be needing to breathe like pretty frequently, but you still need to brace, so you might be holding it for different pieces of that. Doing a 5 rep max or a 3 rep max. You might hold your breath for like two or three reps then catch your breath. Do a max single, you’re going to breathe once. Do a max double, you might still just breathe once. Let’s say you’re doing some intensive kettleball swings. You might be breathing on both functions just because the amount of oxygen intake. You might have to learn to mix those strategies.
Where you at? Well, me, I’m Chris Duffin so mine goes to 11. I don’t know. Those dial is messed up, 10 for all you. I crank it to 11. That’s where you are at. It depends. We’re using both functions, but this is why… I brought up the MetCon as an example. This is why we don’t want to do basic core loaded human movements to fatigue failure. It’s simple. You want to use up the breathing respiration function and your diaphragm is fatigued. What’s going to happen to your bracing? What’s going to happen to your back? Because you’re in a heavy loaded core movement. We don’t want to mix those two. You want to make sure that we’re not doing that type of movement when we’re going to be failing on the respirations front.
That’s what we talked about integrating those two functions together. There is no answer. I can’t tell you if you’re going to do a 5 rep squat, what that looks like for you. If you understand that it is a spectrum and where you need to fit on that spectrum to get those bracing functions align, that’s what we need to do.
I’m going to digress and jump a little back into bracing function again for a couple other reasons. When we talk about that rigid outer sheath, let’s talk about a training perspective. Like I said, we need to train that. Does that mean we need to do ab work to develop that outer sheath? No, it doesn’t. It actually means we might need to use the difference. One of the ways that we do assessment, I’m looking at that structure, is to get in a brace function and look to see if we got any [inaudible 00:14:29], any lines, big tight standing obliques. The hour-glass shape, the classical hour-glass shape. We do not want to see.
We want to see nice, smooth, rigid conformed. I’ve got those beautiful looking nice obliques and pointing down to the goods, we don’t want that showing up and being as prevalent. We don’t want those ab lines unless you’re like super… There’s going to be there because they’re muscle when you’re lean. There’s a difference between that and having that show when it shouldn’t be showing and having because that’s what is called. I’ve got a broomstick lying here in the background. How do we treat this function with hypertonic muscle? We’ve got to get it to relax. If we’re holding tension in these areas all the time, we got issues. We’ve got dysfunction.
I’m not a big lever in doing our typical flexion work for ab development. It is not just from the [inaudible 00:15:29] school of saying, well, that’s bad for loaded spinal flexion. Let’s not talk about that piece at all. Let’s talk about the piece of we’re training those two systems independently. Just like my big issue with doing hip, too heavy of hip thrusts is we get into some anterior tilt too much. We’re not able to get full hip extension. We’re still training to glut. We build a nice, big booty that it is in the integrated into the system core. We don’t have that athletic carryover because we’re not training the neuropatterns for this to work with a stabilized core. It would be grounded to the floor and transferring that power out.
Same thing if you’re doing loaded work. How’s the diaphragm actually working to inflate. It’s not. Again, this is why a plank, a rollout, stir the pack, but again a lot of people could be doing that strictly just ab based. You want to get in to that piece where you’re focused on making that rigid, your breathing into it, pushing against.
What did we have in that last slide? Pushing against our hot water balloon, that big outer. We want to make that outer sheath rigid and hard, but we need to be filling it with air. We need to be working both. On top of that, and I see this is a big issue in power lifting. People just want to work on the air side and I think that’s bracing. I think I get on the topic why that isn’t, but just creating a big flowy full of air. The biggest air possible in that bracing. You got one piece but not the other. Learn to work both together as a system. Then, once you’ve got that, figure out where you’re at on the dial.
Takeaways. Here’s what we need to focus on. Breathing dysfunction. If you’ve got it, fix it. Nothing else matters until you do. You will continue to have issues. Two, posture. You must have the correct posture before you brace. Bracing, we need to integrate both that outer sheath with having the correct posture. We already said filling with air working against it. Then, lastly, understand where you’re at, where you’re at on the dial. Breathing is not bracing. They are integrated. You must know how to do both for performance aspect and safety aspect.
Saturday 15.02.20
JOE ROGAN
I love this explanation by Joe Rogan about workout motivation (video). I think it depicts the way a lot of people feel about exercise and fitness and in general just working out. I also like the way that it has the images attached as I think lot of people will identify with what is being said and how it is being said in terms of their own relationship with working out.
Give it a watch and see what you think and if it relates to you or the other people around you.
Fordy
CONSISTENCY OVER INTENSITY?
With more and more people just training hard for the sake of it and WOD’s becoming increasingly more difficult, often for the sake of it sometimes it’s good to look at how consistent your training is rather than how intense it is. This is a great article courtesy of Joe Rinaldi (https://joerinaldi.blog/2018/03/07/consistency-over-intensity/) which covers it nicely.
I’ll be the first to admit – sometimes life seems tough, and that’s because it is. As I discussed in an earlier blog post the road to success is never linear.

“As a human being, I realize how important it is to understand that the road to success, no matter what the goal, is a rocky one. There will be bumps, there will be obstacles, and you may even trip and fall once or twice (or a hundred times), but as long as you never stop moving forward, you’re making progress and things WILL turn around. You may not see results day to day, week to week, or even month to month, but with persistence, perseverance, grit and a little bit of faith, progress is inevitable.”
This post is about how to stay the course when life gets tough and I’ll do my best to explain why I think it pretty much comes down to one word: consistency.
Before I continue I should note that while I discuss “bad days” in this blog, I am using that term to denote literal bad days as well as anything in life that is tough (adversity, obstacles, set-backs, mistakes, slumps, ruts, etc.).
I think most of us have an intuitive sense of what it means to be consistent. However, for the sake of being thorough, let’s define “being consistent” as adhering to something (principles, behaviors, etc.) over time (i.e. acting or doing something in a similar manner over time).
For some reason consistency seems to take a backseat to intensity in modern society and I can see why; consistency isn’t glamorous, consistency isn’t exciting and consistency sure as heck isn’t easy.
But, consistency is what gets results.
As a borderline gym addict, I feel that exercise is beautiful example of why consistency trumps intensity.
Let’s say it’s been a while and you decide that you want to get back in shape so you go to the gym for the first time in a while. You grab your gym clothes, head over to the gym, blast some – insert favorite music here – and put yourself through the most intense workout you’ve ever endured.
You gave it your all – you’re exhausted.
You get home from the gym, walk into the bathroom, take your shirt off and look in the mirror… and…. nothing – you look exactly the same as before your workout.
A bit discouraged you decide to stick with it and you crush another workout the next day. Again, you rush home to check for progress in the mirror and again… nothing – you look exactly the same.
You repeat this process for couple more days and still don’t see any results. Discouraged, frustrated and upset you conclude that exercise must not work for you – even though deep down you know that it does. Can you point out the flaw in this logic?
Exercise, like most things in life takes time and consistency to reap rewards.
The lesson here is twofold and applies to all areas of life, not just the gym.
- Intensity isn’t the answer. It’s consistency that gets us to where we want to be, whether it is in the gym, in the workplace, in school and anywhere else in life.
- Don’t give up when you don’t see progress. Change takes time and its imperative that you have faith, stay the course and keep grinding.
I think Simon Sinek does an excellent job of putting consistency into perspective in an interview with Tom Bilyeu of Impact Theory.
“It’s not about intensity, it’s about consistency…. if all you do is go to the dentist twice a year, your teeth will fall out. You have to brush your teeth twice a day for two minutes…”
– Simon Sinek
If you’re interested in hearing the rest of Simon’s interview, I would highly suggest checking it out here.
If the importance of being consistent still hasn’t quite clicked, I’m hopeful that this math analogy will make some sense. Don’t worry, I promise this is some pretty basic math that everyone can appreciate.
On a graph with a lot of data points (days), we can see that some days will be better than other and that over time, we can create a line that best matches the overall trend of our days.

If we take a close look, we can see that the line is an average of all the data points (days). In other words, the overall trend is affected by the sum of all of the data points (days) not just one by itself.
If you haven’t gotten the point yet, let me be about as straightforward as I can.
One point can’t define the slope of a line.


Using the line analogy, we can put bad days into perspective. We all have bad days. We all make mistakes. We all face obstacles.

But, those bad days don’t define us. What defines us is what we do in response to those tough days. What defines us is what we do day-in and day-out. What defines us is our action over time. So no matter what happens. No matter how bad of a day you had. No matter what you’re dealing with.
Keep moving forward, accumulate those “good days” and trend upward.
While I know this is all easier said than done, here are some things I’ve found helpful for shaking off a tough day.
- Know that growth, change and results take time. Understanding that progress and change take time is one way to help put a single bad day (or even string of bad days or weeks or even months) into perspective – we are defined over the course of an entire lifetime – don’t let a few bad days, weeks or even months hold you down.
- Believe in what you’re doing. If you truly believe that what you’re striving for is worthwhile, commit yourself and stay the course. Have faith and trust the process (shout out to the 76er’s).
- There are only two things we have complete control over in this life: attitude and effort. Wake up each morning knowing that you get to make a conscious decision about your attitude and your effort. Choose to have a good day. Choose to see the best in people. Choose to run the day and give your absolute best effort to everything you do.
- Use your support system; ask for help, its ok. Trust me, I’ve been there. I’ve been down in the dumps and I’ve felt like I was alone in my struggle and suffering. No matter how small or large the issue, problem, setback, etc., don’t be afraid to lean on your support network for a little or big pick-me-up; there is absolutely zero shame in that.
- On that note, if anyone out there (whether I know you or not) needs someone to talk to, or any encouragement, please feel free to reach out to me – I’d be honored and more than happy to help in any way I can!
Before closing, I feel that I should also point out that not only is consistency effective for making change, but consistency is admirable.
On the surface, being consistent seems pretty straightforward. However, beneath the surface, it becomes obvious that being consistent encompasses a host of other admirable traits – effort, commitment, dedication, accountability and perseverance just to name a few. Because of the deep-seated roots of what it takes to be consistent;
Consistency is comforting – people who are consistent are dependable and people like that.
Being consistent will not only earn you results but it will also earn you trust and respect. Being consistent is effective, admirable and as about straightforward as it gets as long as you’re willing to put in the work.
Being consistent is the simplest and surest way to get what you want. Whether it’s pursuing a concrete goal, trying to make a life change or just trying to be a better person, consistency over time is more powerful than anything else out there.
Having lived in Philadelphia for the past 18 months I feel obligated to incorporate at least one Rocky quote into a blog and there feels like no better time than now.
“Let me tell you something you already know. The world ain’t all sunshine and rainbows. It’s a very mean and nasty place and I don’t care how tough you are it will beat you to your knees and keep you there permanently if you let it. You, me, or nobody is gonna hit as hard as life. But it ain’t about how hard ya hit. It’s about how hard you can get hit and keep moving forward. How much you can take and keep moving forward. That’s how winning is done!” ― Sylvester Stallone, Rocky Balboa
It’s not always going to be easy.
You’re going to get knocked down.
Get back up. Be relentless. Be consistent.
You will come out stronger on the other side.
Friday 14.02.20
MEET MR. MOVEMENT
If you haven’t heard of Ido Portal before, now’s your chance. He’s a master of movement, if you watch a couple of his videos, your first thought is often, ‘How the (expletive) does he do that?’ or ‘I’m pretty sure if I could do that, getting out of bed in the morning would be so much easier’. He has dedicated his life to moving better and as such he make the very difficult look effortless. Your aim should be to get close to the sort of movements he can do and practice them. Practice them a lot. Every joint will thank you for it (eventually) and you will soon be moving a little bit more like a ninja than you were before, and who doesn’t want to move like a ninja? No one right.
Fordy
MOVEMENT
This is a huge article, so apologies for that, but give is a read. It covers so many interesting trends in the industry that have forged fitness in the last 40 years or so. There is so much you will learn, so grab a beverage of choice and enjoy.
Bro, what kind of muscles you have?” asks Ido Portal in a short video introducing his philosophy. He’s barefoot and shirtless, his long hair pulled back as he tumbles across the frame and does handstand push-ups in the rain. “No—bro, what kind of patterns you have? Can you flip? Can you invert? Can you crawl?”
Portal has spent the past few decades honing a physical credo and method that’s now practiced by thousands of people all over the world—from office workers, to former CrossFitters, to NBA players, to the ever-controversial UFC titan Conor McGregor. Known as The Ido Portal Method, or simply “movement,” his approach purports to take the “most potent” parts from a range of physical disciplines by shedding the dogmas that often accompany them. As he puts it: “I want the contents, not the container.”
Videos of Portal in motion began circulating in certain physical circles in the mid-2000s—entrancing clips in which he flows along the floor like liquid, playfully combining capoeira-inspired flips, hand-balancing, and animalistic movements. But it’s only in the past few years (in no small part thanks to McGregor’s influence) that his profile has exploded, his following has expanded, and his business has revved up.
“Most people don’t have the user manual to their own machinery,” Portal told me emphatically when we connected over Skype. “Your being is a physical being. You brush your teeth everyday, you need to move everyday. It doesn’t take five minutes, and it does take a certain education.”
Portal seems like the the right guy to be dispensing such an education. He appears in control of every vertebrae and muscle fiber, he’s charismatic, and he looks the part. (“Why do all these movement teachers look like Jesus?” comedian, MMA commentator, and member of the Intellectual Dark Web Joe Rogan once joked.) For years, Portal tied his hair in a topknot and was so jacked he says he was once asked to shed muscle for a photoshoot. These days he’s ponytail-less and a bit less buff—he told me his muscles were getting in the way of evolving his movement practice in certain directions—but his body-fat percentage still hovers in the single digits and he can bust out a one-arm handstand or helicopter at will. The only clear sign he’s aging are the flecks of gray in his dark-brown beard. (Portal is, incidentally, notoriously elusive about his age. His PR team initially told me he was 47, but later said, “No one really knows.”)*
Some 700 people have joined the school since it opened in late 2014, he said. Throughout the day, you’ll find muscular men and women bouncing a tennis ball against a wall with their fists, working on inversions, experimenting with different kinds of squats, or slowly swinging a dowel while a partner evades it using spinal waves and soft acrobatics. Or, to hear Portal tell it, in each session students “step into the cloud of movement and attack a subject” by doing drills or challenges, “maybe it’s coordination, or speed … ” Training in “movement” might look or sound frivolous to outsiders, but Portal and his tribe are nothing if not serious about it. “It’s not some hippie concept as many people make it out to be,” he said. “I am a radical person, for the good and the bad.” He and his “inner tribe” train from six to ten hours a day.
Portal lizard-crawled into the popular consciousness in 2015, when he was recruited as the “movement coach” of soon-to-be UFC “champ champ” Conor McGregor. The brash Dubliner was just beginning his rapid rise from little-known fighter to the UFC’s most-bankable star when, in 2013, he tore his ACL. While recovering, he started to look at training through a new lens: He discarded his more-conventional workouts, he studied footage of predators hunting their prey (and he got the ink to match—his sprawling chest tattoo depicts a crowned gorilla devouring a human heart). “I learned a lot more about how important balance is, how important control of the body is,” he told Esquire. McGregor came across videos of Portal in motion and, fascinated, sought out the Israeli.
As McGregor racked up wins with Portal in his corner—most memorably knocking out longtime champ Jose Aldo in a record 13 seconds—Portal says he was inundated with coaching requests. “I got some NBA players, some NFL players reaching out,” he told SBNation. “Tony Robbins reached out.”
“Whatever you do, don’t call him a guru or a master of movement,” a couple of his students told me seriously. “He hates that.” When we spoke, Portal emphasized that movement can’t be mastered—it’s too encompassing. “When people say ‘I’ve got it,’ I think, you’ve got nothing; you didn’t get shit,” he once put it, ”That only shows me how much they didn’t get it.”
Portal may shun the “movement guru” title, but his narrative about how movement culture came to be only bolsters this image. As he tells it, his method was born of a personal quest of sorts. Growing up in the beachy city of Haifa, he was an active kid, practicing kung fu. At 15, he took up the Afro-Brazilian martial art of capoeira. Skeptical of the dance and drumming aspects of the discipline, he was dragged to his first class by a friend but quickly became hooked. “I was living it, training night and day,” he told me—not just mastering the techniques, but dressing the part and learning Portuguese. Within a couple of years, he’d earned himself the nickname “The Missionary” for his radical dedication, and had started an academy in the basement of his family home.
Portal’s old blog recounts stints training with former U.S. junior national gymnastics team coach Christopher Sommer, balance expert Claude Victoria, and circus performer Yuval Ayalon, as well as a “crazy year” spent working as a physical theater performer in Bangkok and Berlin. He has cited as influences “strength sensei” Charles Poliquin and paleo patriarch Robb Wolf (who, Portal told me, sent him money to keep his capoeira school afloat when funds were tight). Over the years, he’s practiced boxing, jiu jitsu, and yoga; learned from parkourists, dancers, and osteopaths. All the while, he read voraciously—about speed, coordination, “the riddle of the fight”—and documented his evolving method on a blog and, later, on Facebook and Instagram.
In the mid-2000s, Portal founded a new training space in Haifa where he and his devoted capoeira students began experimenting with movement outside of the martial art. He built a “special-ops unit” of movers, he told me, doubling the gym fees and “eliminating all the unnecessary … the people who weren’t willing to train many hours a day, six or seven days a week.” When he began traveling frequently to teach hand-balancing workshops and perform physical theater, he closed the school. But his students weren’t content to stop training; one of his closest students, Odelia Goldschmidt, started a small training group in a local park called “The Freaks.” Shortly thereafter, with Portal’s blessing, her brother Roye opened the movement facility in Tel Aviv, and Portal started a mentorship program to pass on his methods. (Each of the 40 mentees check in with Portal regularly, receive personalized programming, and attend a couple week-long camps each year.)
A forceful countercurrent to this image mania emerged in the 2000s, led by CrossFit. Within a decade, thousands of mirrorless “boxes” had spread across the country, whose trainers touted “functional fitness” through daily workout challenges drawing from gymnastics, Olympic lifting, and sprinting. Soon, freerunning and parkour gyms began cropping up, and a number of more-traditional gyms traded machines for floor space and some battle ropes, to allow for more bodyweight work. Tough Mudders, Spartan Races, and their ilk made a take on Le Corre’s favored training format—the outdoor obstacle course—more accessible, and continued an emphasis on a more versatile body.
In just move, a 2017 documentary about movement culture, one of Portal’s students says the community aims “to bring movement and life and everything we do out there to as many people as possible.” And in the past couple of years, his inner tribe has begun to fulfill this prophecy. Movement schools have cropped up around the world—in Boulder, New York City, Miami; in Europe, Hong Kong, Brazil, and Australia—mostly started by the students of the Ido Portal mentorship program.
But such personal transformations aren’t accessible to just anyone. Portal makes no bones about the fact that involvement in the community requires a significant investment of both time and money. In a 2013 Facebook post, he wrote that his movement camps were for the “got money and a ton of motivation and willing to travel kind of person” (for the “no-money, little motivation, want to fuck around kind of person” he recommended Zumba). In 2015, he lost fans in the parkour world and beyond when he announced he wouldn’t train vegans, saying they wouldn’t be able to keep up with his meat-eating “tribe.” The dozen or so movement schools that have cropped up in these past few years have made Portal’s methods more readily available. But even now, those wishing to take part in one of his camps are required to sign non-disclosure agreements and fork over between $600 and $1000 for two to three days.
When we spoke, Portal kept emphasizing that his approach has to be experienced, not just described. “It sounds very vague because there is nothing that I can say beyond these descriptive words,” he said. Maybe Portal’s elusiveness is just a way to convince outsiders he’s offering something new and revolutionary, as some have argued. Maybe movement just another cultish fitness fad with a short shelf life. Maybe you could achieve similar results, and the promised “paradigm shift,” training some other discipline multiple hours per day—like dance or martial arts.
All of these “maybes” are good for business: How will you know, Portal and his followers insist, unless you try it?
https://www.theatlantic.com/health/archive/2018/08/ido-portal-the-player/566687/
Thursday 13.02.20
TIME TO BELT UP PEOPLE (OR IS IT?)
So yesterday we looked at Lifters, so today we are going to look at belts. Should you wear one, if so why. How to wear one, which one is best and more importantly before you even put one on, how to breath. I love this video, I’m not sure which I love more, the information in it, or his beard (both are impressive). So before you go and buy a belt, watch this video, read the article and then make an informed decision about whether you need one and if you do, which one would be the best to buy.
Fordy
BELT OR NO BELT, THAT IS THE QUESTION
While belts are highly beneficial (and recommended) during powerlifting, strongman, and weightlifting competitions, many athletes neglect the body’s natural ability to create intra-abdominal tension, stabilize the pelvis, and develop a stronger core to increase maximal strength.
In this article, we will discuss five key benefits of beltless training, making the case for all athletes to perform their warm-up sets, volume training, and even entire squat cycles without the usage of a weightlifting belt to maximize performance.
A Brief Disclaimer
Personally, I agree with many high level athletes and coaches who suggest belts to be worn for near-maximal and maximal lift attempts as they have been shown to increase intra-abdominal pressure, stabilize the spine, and generally increase performance when used correctly.
That said, many athletes place too much dependency upon belts ( I too am guilty of this) during moderate to heavy squats, deadlifts, clean and jerks, etc (most lifts under 90% of 1RM of so), which can impair their ability to maximally recruit, train, and develop deep control and stabilizing structures necessary to squat heavier and healthier..
Why Train Beltless?
Below are five key reasons why all athletes should perform more beltless squats during warm-up sets, high volume training days, moderate to heavy loading sessions, and even entire squat cycles.
1. Increase Demands on Pelvic Stability
Belt training is very effective at increasing intra-abdominal pressure and stabilizing the spine during heavier lifts. While beneficial, some lifters may be neglecting their own ability to promote intra-abdominal pressure via strong muscular contractions and bracing strategies, ultimately underachieving their fullest potential. When using a belt, lifters may compensate for less than optimal core bracing and tension due to the belts natural ability to increase pressure, which if left unaddressed can result in sub-optimal performance and potentially injury. With that said, lifters can simply train beltless and focus on bracing hard and increasing pressure during moderate to heavy training sessions. The payoff: As one fully develops that capacity, they will be able to tap into additional tension and pressure when they go back to heavy training with a belt.
2. Enhanced Focus During a Lift
When we slap on a belt, we often find ourselves in a fight or flight mode, as we seek out moving near-maximal weights. The aggression and focus during these times is often directed towards the gross movement pattern rather than finite control of bracing and stabilizing structures. Beltless training forces lifters to become more conscious of their pelvic tilt, abdominal and lower back tightness, and tracking of the ankles, knees, and hips throughout the squat. The decreased dependency on the belt for rigidity and stabilization forces a lifters to be methodical in his/her approach, setup, and lift; all of which when done correctly can become automatic, and in turn unleashed onto a maximally loaded belted barbell lift in the future.
3. Maximal Bracing and Breathing
Without a belt, many lifters will be forced to be extremely conscious and focused on breathing and bracing during the approach, setup, and throughout the lift. While belts can improve performance, training beltless will increase a lifter’s natural ability to create and harness intra-abdominal pressure, which will only make belted training that much better.
4. Lower Intensities Drive Increased Training Volume
If you are an athlete who relies upon a belt no matter how light or heavy the loads are, you are be doing yourself a gross disservice. Many lifters (beginners and all the way up to advanced levels) need to establish a better foundation of squat patterning (myself included), bracing, and pelvic stability without the use of weightlifting belts to develop the intra-abdominal structures, hip flexors, and other pelvic stabilizers to prevent potential injury (if left unaddressed) and enhance squatting performance.
Additionally, belted training is often reserved for higher intensity (near-maximal loads) lifts, for the purpose of offering maximal tension (weightlifting belts can increase one’s natural ability to create intra-abdominal pressure). By training beltless, however,, you will allow your squat training to be done at more manageable intensities (60-85%) and in higher volumes, both of which are vital to long-term strength and muscular development.
5. Less Dependency on External Factors
This is an anecdotal reason, however one that I have found very true (as well as when talking with other athletes). The reliance upon external equipment and tools (such as; weightlifting belts, knee sleeves, music, etc) can mentally start to alter one’s confidence and approach during times they do not have those same conditions. As athletes, an increased dependency on external factors can result in decreased personal performance. The solution to this issue is to establish focus, confidence, and internal control without the usage of external tools (such as weightlifting belts) or dependency on specific environments so that when we are in a heightened state (competition and/or max outs) we can fully harness the additional support provided by those supplemental training tools.
Final Words
While many this may not solve to ongoing debate of belt vs beltless training, I find it very helpful to address both sides, as each can and should be used (belts vs. beltless) at specific times and serve specific purposes. In general, I feel many athletes (myself included) place too much emphasis and depencency upon belted training so that they can train with heavier loads instead of educating and developing their own natural ability to brace, create active pelvic stability, and have sound movement patterning in the squat. With that said, I do recommend that athletes who are training above 90-95% of 1RM (which if programmed correctly should be seldom, mainly reserved for peaking or testing environments) belts can be a very beneficial training tool, and should be used. Coaches and athletes should spend time acclimating to belted training prior to competitions to further increase readiness and performance.
This article is thanks to Barbend, find the original article at
Wednesday 12.02.20
ALL THE GEAR, ABSOLUTELY NO IDEA
Whilst your Yeezy’s will look cool, they won’t do much for your squat. This is where a good pair of lifters will come in, they help you to gain a stable base in order to drive the weight back into a standing position. But you still want to look good right? So check out todays video for a quick review on some of the best lifters on the market. They aren’t the only ones but it will give you a good insight into getting started.
Personally, I love my Adi Powers, they are a cheeky bit narrow though so wide feet people need not apply.
Happy Lifting People
Fordy
IF THE SHOE FITS AND ALL THAT
Fun fact: I own almost two dozen pairs of lifting shoes. In fact, you might say I’m a bit of an expert on the subject – and I get a lot of questions about how I choose which pair to wear when I lift.
If you follow me on Instagram, you already know that I favor the Reebok Lite TRs for all three lifts, but that’s just because they fit my body well. Everyone is different, and if you’re trying to find the right pair for you, here are some questions to ask yourself.
[Check out our lifting shoe round-up to view the best lifting shoes on the market.]
Are You Strong Enough to Need Squat Shoes?
This is a bit of a trick question. A lot of people tell me they don’t think they’re strong enough to justify buying a pair of shoes that might cost a couple hundred bucks. It’s usually not about the money, but about avoiding “imposter syndrome” – the idea that you don’t really fit in until you’ve made it.
I don’t really agree with that logic. If you would benefit from them, I think it makes sense to invest in a pair of lifting shoes sooner rather than later, because more effective training means faster progress. Here’s the catch: when you’re just starting out, you probably won’t know what kind of shoes you need. Until you figure that out, you’re fine sticking with whatever athletic shoes you happen to have available.
Should You Use Heels or Flats?
On the flip side, I really don’t agree with the people who decide they’re gonna start lifting, and immediately run out and buy a pair of squat shoes with an elevated heel. Many people make that decision almost reflexively: they see other people wearing heeled shoes, and figure that they need some, too. That’s a terrible call. In fact, in my opinion, far too many powerlifters wear heeled shoes.
Proponents of the practice claim that the elevated heels make it easier to hit depth. They’re referring to the reduced ankle flexibility required to push the knees forward without coming up on the toes when squatting. And that is a benefit of wearing heels. But there are drawbacks, too. For example, an elevated heel tends to make balance more difficult. Heels can push your weight forward on your feet, towards your toes – exactly the problem they’re supposed to prevent. You’re essentially trading a flexibility requirement for a balance requirement. And, in my experience, it’s much easier to develop sufficient flexibility for squatting than balance.
So, instead of thinking about ankle flexibility, take a look a leverages and squatting style. This video does a fantastic job of explaining why elevating a heel doesn’t often make it easier to hit depth – just different.
Essentially, a raised heel will tend to shift the emphasis on a squat from your hips to your legs. That doesn’t mean it will take the hips out of play – just that, relative to squatting without heels, you’ll tend to use them a bit less. Is that a good thing? Well, it depends: what are your goals? If you want to lift the most weight, you should put the emphasis on your strongest muscles (which probably means wearing heels if you have stronger legs, and ditching them if you have stronger hips). If your goal is muscular development, or bringing up weak points, you’d probably want to put the emphasis on your weakest muscle groups.
It’s worth noting that under heavy weight, your body is probably going to default to using your strongest muscles regardless of whether you’re wearing heels or flats. Because of that, I prefer to use the shoes that fit my strong points, not my weak ones. I then use assistance movements to bring up the weak points. This just fits my mentality better – one approach is not better than the other.
Finally, note that on some exercises – particularly front squats, the Olympic lifts, and overhead press – virtually everyone is better off with heeled shoes. That’s because when the weight is held in the front of your body, the heel acts as a mechanical counterbalance, helping to keep your center of gravity more neutral. However, unless you plan to compete in those lifts, it’s not strictly necessary to wear squat shoes while performing them. And on some exercises, like deadlifts, you always should wear flat shoes, unless you are intentionally performing a variation that calls for raised heels. On bench, I’ve found that for most people (except those very lacking in dorsiflexion), heels seem to make almost no noticeable difference.
Do You Have Good Feet?
To heel or not to heel is the hardest question, but even after you’ve answered it, there are some more details you should consider before you shell out any of your hard-earned cash on a new pair of kicks.
First: do you have strong arches? Flattened arches will often lead to knee caving on heavy squats and deadlifts, which can both cause injury and decrease the amount of weight you’ll be able to handle. While you should always try to address flat feet with strengthening exercises, that process can take a while, and in my experience, if you’ve got structural issues like that, they’re always going to exist at some level. For that reason, I suggest choosing shoes with either good arch support or with removable shoe inserts, so that you can use your own third-party orthotics. Note that you might not need this arch support on every lift, and you should really only use it when you do. I use orthotics when I squat, but remove them before benching and deadlifting.
Next, how wide are your feet? Those with narrow feet will have more shoe options than lifters with wider feet, but it’s important that you choose a shoe that’s wide enough for you to push your feet out against the sidewall comfortably. Chances are, if your shoes are too narrow, you’re going to struggle to do that, and, as a result, struggle to properly recruit your posterior chain on compound movements. I increased my sumo deadlift fairly significantly just by switching to wider-sized shoes.
My Recommendations
I know you were waiting for this part, so I hope it’s not too disappointing when I tell you that my all-time favorite shoe, the Reebok CrossFit Lite TR, is no longer produced and only available at very high prices from third-party resellers. I have heard some rumors that Reebok is developing a new version of that shoe, so keep your fingers crossed!
That said, I do have some experience with other shoes, and here are my thoughts on them:
Flats
- Chuck Taylors: probably the best “default” option if you want flat shoes and don’t want to spend a lot of money. These don’t hold up well, and they don’t have great traction, but they’re definitely adequate for most people.
- Wrestling shoes: obviously, there’s a huge variety of wrestling shoes, but in general, they’re going to be about as thin-soled as Chucks with better traction, but also a narrower footbed. For people with wide feet, this might be a problem. The
- Sabo deadlift shoes are essentially wrestling shoes with an added metatarsal strap, which is beneficial, especially for those with flat arches.
- Metal squat shoes: very expensive, but also very well-made, powerlifting-specific shoes. I have a pair that has lasted over a decade and is still fully functional, although the original laces frayed through. These shoes have unbelievable traction, and the leather upper is designed to limit movement of your shin (which can be a positive or negative depending on your ideal positioning and what you’re using them for). They’re a tad on the narrow side, but not too bad; and they do have a metatarsal strap, which is a nice bonus.
Heels
- Nike Romaleos: I have worn all three versions of the Romaleos, and as far as powerlifting goes, the original version is my favorite. The originals are virtually identical to the version 2, but they’re heavier – which may be a drawback for Olympic weightlifting, but provides a nice sense of stability for heavy back squats. The 2s offer excellent arch support, a fairly wide footbed, two metatarsal straps, and are my recommendation if you want heeled shoes.
- Adidas Adipower: Very similar to the Romaleos, both in design and price point. Some people say the Adipower runs slightly narrower than the Romaleos, but this one essentially comes down to personal preference.
- Adidas Powerlift: Adidas also makes a cheaper version of their weightlifting shoe with a slightly smaller effective heel height. I actually really, really like this shoe, especially for people who want a heel but don’t feel entirely comfortable in the Romaleos or Adipowers. The heel on these shoes does have a bit of give, but in my experience, even under very heavy weights, that does not create any significant stability issues.
Wrapping Up
Hopefully this article has helped shed some light on both your squat and your shoe choice. If you’ve already been through the decision-making process, and have some tips that can make it easier for others to do the same, share them in the comments below!
Courtesy of
https://barbend.com/flat-vs-heel-lifting-shoes/
Tuesday 11.02.20
WHEN YOU NEED TO MAKE A STANCE
I love this article by the guys at Squat University. I won’t spoil it but I love how they say that a Squat is a movement first and then when you pick up a barbell it becomes an exercise. I think a lot of things that we do in the gym should be viewed in the same way. Most of the so called exercises that we do in the gym are meant to replicate a loaded version of something that we do in everyday life (what some people like to call ‘functional’). If you take this stance and you make sure that you get the movement right first the exercise after will be so much ore efficient. Remember, if at any point in your life your mechanics broke down and you couldn’t sit down and stand back up again then you would do everything in your power to correct it as you would feel that it would have such a detrimental impact upon your life. But you don’t put this sort of importance on the exercises you do.
You’ll never be good at an exercise unless you move well, stop looking at the people that do and wishing you could do it. Movement isn’t a right, learned and it doesn’t matter at what stage of your training journey you are, you still have the ability to learn.
This is why we are trying to give you as much information on these pages as possible in order for you to not have to go looking for the information in a million different places, when it’s all here for you, everyday.
Please share the link to the page with your friends, colleagues or clients, not only will we appreciate it, we’re pretty sure they will thank you for it as well.
Fordy Out (drops laptop, not literally of course)
TOES FORWARD OR ANGLED OUT WHEN YOU SQUAT?
Thanks to Squat University for this one
You can find them here
During a recent Squat University seminar, I was approached by an athlete who wondered why I had asked everyone to show me his or her squat with their toes straightforward. This was definitely not the first time I’ve been asked this question. There’s a lot of controversy in the fitness world today when it comes to recommended foot position during the squat. Some experts say our feet should be straightforward all the time. Others advocate the toes should turn out at an angle. So who is correct?
This is actually a trick question. The answer is both. Let me explain.
ARGUMENT FOR TOES FORWARD
The squat is a movement first and an exercise second. When I screen a new athlete, I want to see their ability to squat with shoes off and toes facing forward. My goal is to assess their MOVEMENT. This method allows me to see any weak links with the athlete.
Squatting with your feet straightforward is more difficult than with the toes pointed slightly outward. I don’t think many would argue with that notion. However, that is the point of the screen.

In order to squat to full depth with the toes straightforward, an athlete must have adequate ankle and hip mobility and sufficient pelvic/core control. They must also have acceptable coordination and balance. By turning the toes out at an angle, it allows a majority of people to achieve a full depth squat with a more upright chest position. There will always be a few individuals who are simply unable to get into a deep squat position due to abnormal anatomical reasons. Some people are born with genetic abnormalities. With that said, most athletes should be able to reach ass to grass with a squat.
The bodyweight squat sets the movement foundation for other athletic actions such as jumping and landing. Many knee injuries occur when you land with your foot pointing out and with the knee caving in. Players who have to jump and cut will tear their ACL when the knee caves in and rotates. My goal is for athletes to land and jump with good mechanics therefore decreasing their lack of season-ending injuries.
ARGUMENT FOR TOES OUT
As soon as you pick up a barbell, the squat now becomes an exercise. For this reason, there are slight changes in the movement pattern that are more “sport specific”. This includes turning the toes out slightly. Doing so creates a mechanical advantage for the squat. Not only does it give us a slightly wider base of support, but it does not challenge our pelvic control and mobility to the fullest extent (1).

This is why some athletes can squat deeper when they turn their toes out. By externally rotating the hips we can usually achieve a deeper and better-looking squat.
When our hips externally rotate, the adductor muscles on the inside of our legs are lengthened. As we squat these muscles are put in a better position to produce force (length-tension relationship). This simply means the adductors are turned on and recruited to a greater degree during the squat if you turn your toes out slightly (2). The adductor magnus specifically has been shown to help produce hip extension (the action of standing up from a squat) (4). More help from the adductors means a stronger and more efficient way to move the barbell.

The Adductor Magnus
Turning the toes out, however, only changes the activation of the adductor muscle group. The glutes and quads (the main movers in the squat) are not significantly activated to a greater extent (3). Research has shown that turning the toes out more than 30-degree is less effective (2). For this reason, you should perform barbell squats with your feet turned out anywhere from 10-30 degrees. Always use a position that is most comfortable for your body. Remember, no two squats will look exactly the same. It’s normal and expected for you and your friend to have different squat stances while lifting the barbell.
FINAL THOUGHTS
The argument is simple. I believe we should have the capability to perform a bodyweight squat with the toes relatively straightforward. If you cannot, more than likely there are some things you need to work on. I recommend turning your toes out when you squat with a barbell for optimal performance.

This is the difference between training and screening. Screening should point out and illuminate limitations in how we move. Training should reinforce and strengthen our current movement capabilities. When coaching athletes, it’s your job to know the difference between screening and training.
Monday 10.02.20
MONDAY MOVEMENT PREP
One of the things I don’t do very well is invest in the time before the main event. I tend to think that as long as the main bit goes well, then the stuff before and after aren’t as important. But the older I get the more I realise that actually, the bit before and after dictate the main event. If you don’t get those right then your risk of injury increases, whilst your chances of a PB decrease. I now think of it like cooking, before I used to just hash everything together and it would come out ok and I would just sit back and admire the result. But prepping better, spending the time getting the best ingredients will always, always result in a better meal than just hashing it together with the leftovers from the fridge.
So now treat each workout as a meal, get the best ingredients possible, make sure you do the preparation right, and the success will taste much sweeter. And then when you’ve PB’s go and get some actual food to celebrate, but let someone else do the cooking, you’ve done enough.
Fordy
High Bar vs Low Bar Back Squats. What’s the Difference?

Everyone loves squatting and with good reason. The back squat in particular is arguably the most renowned weightlifting exercise in fitness, and a staple in the programming of powerlifters, Olympians, CrossFitters and countless other athletes. As renowned author and former powerlifter Mark Rippetoe notes, “The back squat is the only exercise in the weight room that trains the recruitment of the entire posterior chain in a way that is progressively improvable, and that is one of the things that makes the squat the best exercise you can do with barbells and, by extension, the best strength exercise there is.”
Needless to say, we love the back squat—and the back squat loves us. However, there is trouble in paradise. Or rather, debate. There has been a ‘heated’ discussion for some time over what the most optimal bar position is to use during the squat. What? There’s more than one? There is indeed, and if you weren’t previously aware, then read on to learn more about high bar and low bar positioning during the back squat.
Why bar position matters
Before we dive into the two techniques, it would be useful to understand why bar position matters in the first place. Simply put, having a balanced bar/lifter system, whereby the bar is positioned directly over the foot, prevents you from falling on your ass or your face—unless the weight is very light. But even if the weight is light if the athlete is still in a bad position, valuable energy is being expended to keep them from falling—energy that could otherwise be used to help bring the bar up. As the weight increases, this principle of holding a balanced bar position becomes all the more important. Essentially, the placement of the bar during a back squat affects the joint angles involved and thereby influences how force is applied to the low back, legs and hip musculature. So depending on whether you are using the low bar or high bar form, the placement of the bar will change the lifter’s necessary positioning to maintain the bar/mid-foot relationship and affect which muscles are used.
So what do the two possible bar positions look like?
High Bar and Low Bar Positioning
In the high bar squat (pictured left in the above image), the bar is positioned to sit on the traps, the lifter is leaning forward slightly but remains vertical to keep the bar over the mid-foot. In the low bar squat (pictured right in the above image), the bar is moved down to sit on the rear deltoids, right above the spine of the scapula. In this position the lifter has to tilt his torso forward more than in the high bar position in order to keep the bar over the mid-foot.
Analyzing the High Bar Squat
The high bar squat is probably the most commonly used form of squatting, which makes sense as it’s a comfortable place to hold the bar and it’s easier to squat with as there’s less to think about. As I mentioned, a high bar squat requires a vertical back (i.e. torso), and this creates a domino effect. The hip angle must become more open if the back angle is more vertical, and the knee angle must become more acute if the hip angle is more open as the knees get pushed forward. Having an acute knee angle means that the hamstrings – which cross the knee and hip joints—are contracted and slackened, which means they won’t be able to contract any further to help extend the hips out of the ‘hole’. This means that there is more emphasis placed on the quads and glutes as the primary movers to compensate for the lack of involvement from the hamstrings—though the hamstrings do receive slight tension once the knee angle opens up during the ascent of the squat.
Positives
As has been highlighted, the high bar back squat is great for developing strength in the quadriceps, glutes and therefore the Olympic lifts as well. Squatting with high bar form mechanically mimics the receiving position in the snatch and the clean, as you ideally want to your torso to be as vertical as possible to prevent the weight from falling forward and you’ll be recruiting your glutes and quads to help you drive out of the hole. Therefore it won’t come as much of a surprise to learn that high bar squatting is a typical favorite for Olympic weightlifters, and because it’s relatively easy to learn, it’s popular among the general population of fitness enthusiasts.
Negatives
The more vertical position enforced by utilizing high-bar technique means that you won’t be able to squat as much weight as you would with a low-bar position. A vertical position in the squat takes pressure away from the spinal erectors and allows for a deeper position than one would achieve in the low bar squat. But doing so sacrifices the amount of weight you could lift, as you are unable to utilize your hamstrings – and thereby the full posterior chain—to its fullest. Lastly, if an athlete has pathology in in their knee, then high bar squats may provide too much anterior force and result in knee pain.
Analyzing the Low Bar Squat
A low bar squat requires an athlete to have a more horizontal position in regards to their torso, which produces a more acute hip angle so that the hamstrings will be under tension at the bottom of the squat. Doing so allows for the hamstrings to contribute as much as possible to the extension of the hip during the ascent. At this phase of the lift the quads are brought in to action to help extend the knees, but they are also relied upon to help create balance around the knee so that the force of the hip extension doesn’t tip the torso forward.
Positives
First off, in contrast to the high bar position in which the bar can roll onto your neck if you lean forward too much, low bar is a very stable position. Though technique does come into play, during a low bar squat you are limited by strength, not torso angle. Since you are leaning forward more than you would be in a high bar squat, your knees don’t travel forward as much, thus shortening your range of motion. This style of squatting also puts a premium on working the posterior chain rather than the anterior. For these combined reasons, an athlete is generally able to lift more weight with a low bar squat technique, which makes it popular with powerlifters.
In addition, squatting with low bar form can help with the second pull in Olympic lifts the posterior chain is responsible for the fast extension of the hips in the clean or snatch. However, it must be noted that the low bar squat is not productive for teaching and ingraining proper receiving position in the snatch or clean.
Finally, using low bar form helps to balance the force around the knee because the hamstrings are pulling back on the tibia, which will obviously be beneficial for athletes with knee issues.
Negatives
Low bar squatting is tricky to execute well, as Justin Lasceck of 70’s Big explains: “Since this style of squatting is dependent on the hamstrings, the body’s positioning — particularly the knees — is much more important. If the knees shift forward at the bottom, then hamstring tension will decrease and will result in no bounce whatsoever.” Another element to consider is a lack of flexibility in an athlete’s shoulders which would prevent them from putting the bar in the right position, potentially resulting in shoulder, wrist or elbow pain.
Conclusion
As with most things in life, selecting a bar position to use in your back squats should coincide with your personal goals. If you are more interested in moving big weight, then a low bar squat may be your best choice. If you want to increase your strength with regards to Olympic lifting. Fortunately, since we all do CrossFit, the answer is pretty obvious. Use both. That way, you’ll be able to reap the full benefits from each technique and target your weaknesses, which is what our sport is all about anyway.
Courtesy of Boxlife Magazine
Find them here
Sunday 09.02.20
SUNDAY FUNDAY
Sunday is a day of rest right? Well it depends. It depends on what you’ve been doing all week. If you’ve done 5 training sessions, a couple of PB’s and climbed your way 5 places on the Bracket then feel free to kick back, relax and have a piece of pizza or 10.
But, it this week hasn’t quite gone to plan, then Sunday is the new Monday. Grab your kit, go to the gym and get moving. It doesn’t matter what you do, just move, and perhaps more importantly, move well.
Oh and while you’re there, enjoy a little squat fail video opposite, I even have a story that I might share with you guys one day this week, it’s a kind of ‘Don’t do that at home moment’.
Fordy
SUNDAY MOVEMENT
If you haven’t got anything else planned then go to the gym and follow this.
The squat is one of the most fundamental movements a human needs to be able to perform both in life and in sports. In life we use the squat to sit down and stand up from chairs or going down to the floor to reach for objects. In sport we use squat movements when preparing to jump and land, as well as when getting into an athletic position. The squat is also used in the strength training realm as it has tremendous carry over to all other aspects of sport.
With that being said, the squat is a complex movement, as it requires considerable strength and mobility out of three major joints in the leg, the hip, knee and ankle. From a mobility aspect, the squat requires flexion and extension of the hip, knee and ankle as well as some rotation from the hip. From a strength perspective, the squat requires the use of the quadriceps, hamstrings and glutes as well as the rotators of the hip in order to help control any medial or lateral movement of the knee. Being that the squat is such a complex movement, it is best to warm up properly for the squat when improving strength and mobility for everyday life movements or in preparation for a strength training session.
- If you are currently experiencing any lower back, hip, knee or ankle pain, you should have this evaluated prior to attempting these exercises.
Goblet Squat Dorsiflexion Stretch
Begin the squat movement by rotating your hips out and pushing your hips back to hinge at the hips and maintaining a flat back position. Slowly lower down into the squat position and rest your forearms on your thighs in order to increase the flexion of the ankle joints. Try to keep your toes pointed forward as much as possible. Rock back and forth a few time and then stand back up. Perform four sets of five reps.
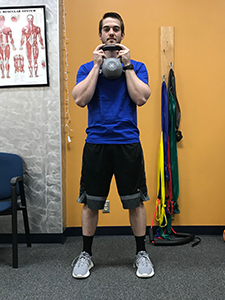
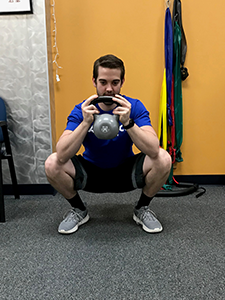
Squat with External Rotation Stretch
Begin the squat movement by rotating your hips out and pushing back to hinge at the hips while maintaining a flat back position. Slowly lower down into the squat position, once in the bottom of the squat position, slowly rotation your right knee outward and return to a neutral position. Repeat on the left side. Perform two sets of 10 reps.
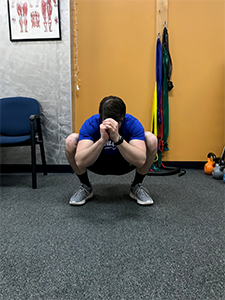
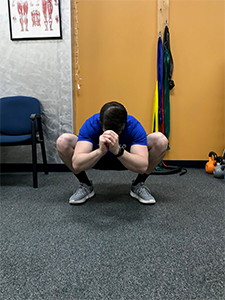
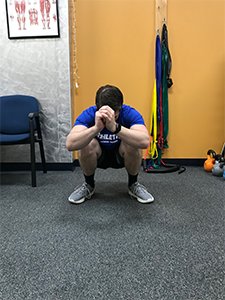
Wall Squat
Begin by facing a wall with your feet about 6-8 inches away from the wall and your arms in an overhead position. Begin the squat movement by rotating your hips out and pushing back to hinge at the hips while maintaining a flat back position. Attempt to squat as low as possible while keeping your hands away from the wall and your weight evening distributed in your feet. Perform two sets of 10 reps.
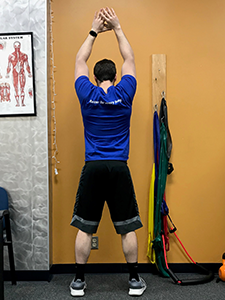
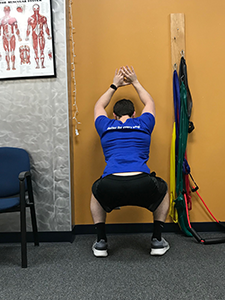
Dowel Good Morning
This exercise is great for learning how to proper posteriorly hip hinge while maintaining a neutral back position. Begin by holding the dowel along your spine and maintaining three points of contact – the back of the head, between the shoulder blades and lower back. Begin the movement by pushing your hips backward and maintaining the points of contact. Continue this movement until you feel a good stretch in the hamstrings and then return to the starting position. Perform two sets of 10 reps.
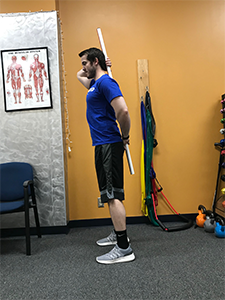
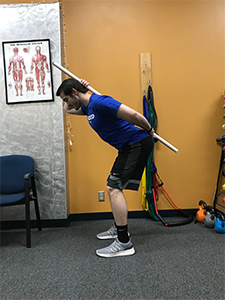
Band Walks
Begin with a band around your legs at just below knee level and in an athletic position with your chest up. Take steps sideways but do not let your feet touch. Keep your toes pointed forward and don’t drag your feet.
For the next type of band walk, stay in the same position but face forward this time. Begin by taking a step forward at a 45 degree angle and bring your other foot next to it and repeat the same forward 45 degree step with the other foot. Once you complete a lap going forward, return to the starting position by going backward.
Complete two sets of 25 feet of each band walk.
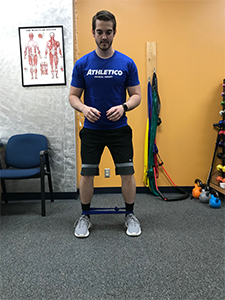
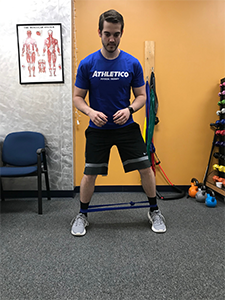
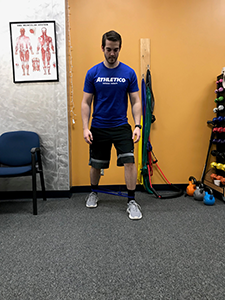
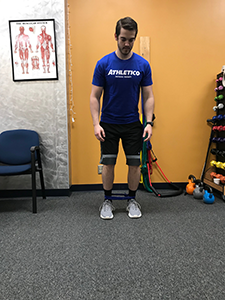
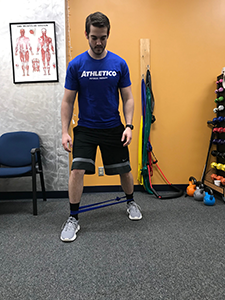
Lunges
Lunges are a great way to prep the quads and hamstrings for a complex movement such as squatting, while helping the gluteal muscles prep to stabilize the legs. Begin by having your feet shoulder width apart and step one leg 12-18 inches in front of the other. Then lower your body down until the back knee contacts the floor and maintain an upright chest. Stand back up to the starting position. Perform two sets of 10 reps for each leg.
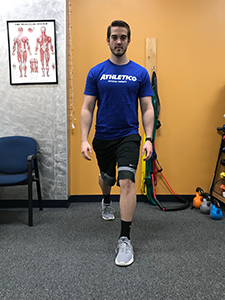
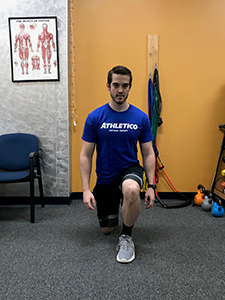
Courtesy of Athletico Physical Therapy
Check them out here
Saturday 08.02.20
SCIENCEY (SO NOT A WORD) SATURDAY
So we’ve attacked the ankles, we’ve looked at the hips and now it’s time to assess that Butt Wink. What I hear you cry, whats’s a Butt Wink. Well, there is a lot of information out there and a lot of Personal Trainers and Strength and Conditioning Coaches will have their own thoughts and theories into what causes it and how to cure it. But this is where we, as a collective need to be a bit sciencey (still not a word). The human body is a very complex machine and so we need to understand it as much as possible so that when we position load onto it via weight training, we know that structurally it can cope and that we aren’t going to risk high levels of injury. So take some time out today if you can to look through the article underneath and the video in order to understand the Butt Wink. We’re going to be doing loads over the coming weeks and months so it’s now that you need to make sure that your body is ready to take on whatever is coming throughout the 2020 Bracket.
So go and grab a coffee, tea, water or beverage of choice and have good old fashioned read
Fordy
What really causes butt wink?
By Daniel Mee, S&C Research guest writer
Butt wink is a very controversial issue in strength and conditioning.
In fact, the way you hear some strength coaches talk about it, you would expect there to be a wealth of evidence showing it to have large negative effects, either in terms of performance or injury risk.
In reality, butt wink (or buttwink) has received very little attention in the literature.
In this article, I am going to explain what butt wink is, outline the current theories regarding why it happens in some individuals (and not others), detail the training and performance implications of butt wink, comment on whether butt wink could increase the risk of injury, and finally hypothesise about whether we can even reduce the amount of butt wink we observe, at any given squat depth.
What is butt wink?
Butt wink is a posterior rotation of the pelvis as an individual flexes at the knee and the hip, which happens during a squat. In some individuals, the pelvis will begin to rotate posteriorly as the lifter moves past the parallel position, however in other lifters it can occur even earlier.
This posterior rotation of the pelvis coincides with movement of the lumbar spine into a flexed position, as pelvic position is closely linked to that of the lumbar spine (Levine & Whittle, 1996).
The image below shows a slightly exaggerated example of butt wink. On the left, Adam has his pelvis rotated posteriorly and his lumbar spine moved into a flexed position. On the right, he is demonstrating a slightly lordotic lumbar spine, coupled with a more anteriorly-tilted pelvic position.

Adam demonstrating barbell squats, with and without butt wink
Surprisingly, little is known about butt wink when squatting. McKean et al. (2010) did refer to it in their study of lumbar and sacrum position in the back squat, commenting that it is a natural part of the squat motion in some individuals.
What causes butt wink?
Exactly what causes butt wink is unclear.
There are two main theories (as well as a couple of minor ones), which are the structural theory, and the flexibility theory. Within the flexibility theory, there are several possible contributors to the lack of flexibility, some of which are more logical than others.
Theory #1: the structural theory of butt wink
The structural theory of butt wink is that, as the lifter descends into the squat, the femoral neck (ball) at some point comes into contact with the superior rim of the acetabulum (socket).
If the lifter continues to descend after this point, the pelvis will need to rotate posteriorly upon the head of the femur in order to allow further motion to occur. As the pelvic position is closely linked to that of the lumbar spine, this posterior rotation of the pelvis leads to a loss of the lordotic position of the lumbar spine, and a movement into lumbar flexion.
There are numerous anatomical factors which have been argued to influence hip flexion range of motion (ROM). In the literature, the main two are femoral anteversion angle and acetabular anteversion angle.
Femoral anteversion angle
Femoral anteversion angle is defined as the angle between two lines drawn while looking (axially) downwards from directly above a person: the axis of the knee, and the femoral neck axis, as shown below:

Rough sketch of femoral anteversion angle
To understand this picture, you have to imagine you are looking directly down on top of someone, while they are standing upright. The axis of the knee is a line broadly in the frontal plane, between the medial and lateral posterior condyles of the femur at the knee. The axis of the femoral neck is a line drawn from the center of the femoral head to the center of the base of the femur (Kim et al. 2000; Cibulka, 2004).
In one study, D’Lima et al. (2000) modelled the effects of both femoral anteversion angle and acetabular anteversion angle. They found that that increasing femoral anteversion increases hip flexion range of motion, but decreases hip extension range of motion.
There is large inter-individual variation (Zalawadia et al. 2010) and even within-individual variation (Higgins et al. 2014) in femoral anteversion angle. This suggests that some individuals will experience more difficulty with this anatomical feature than others.
Acetabular anteversion angle
Acetabular anteversion angle is also defined as an angle between two lines drawn while looking (axially) downwards from directly above a person: a line between the anterior and posterior edges of the acetabulum (the acetabular line), and the sagittal plane (Maheshwari et al. 2010), as shown below:

Rough sketch of acetabular anteversion angle
Acetabular anteversion usually measures around 15 degrees, but can vary widely.
In acetabular anteversion, the acetabular opening lies anteverted to the sagittal plane. Anteversion means rotated towards the front of the body, so the acetabular angle as drawn above is larger. In acetabular retroversion, the acetabular opening lies retroverted to the sagittal plane (Reynolds et al. 1999). Retroversion means rotated towards the rear of the body, so the acetabular angle is smaller or even negative.
As noted above, D’Lima et al. (2000) modelled the effects of changing acetabular anteversion angle. They found that that increasing acetabular anteversion increases hip flexion and decreases hip extension, in varying amounts (depending also on the angle of acetabular abduction).
They found that hip flexion ROM could be as low as 75 degrees with 0 degrees of both acetabular anteversion or femoral anteversion, but as high as 155 degrees, with 30 degrees of both acetabular anteversion or femoral anteversion. An increase in femoral neck diameter of as little as 2mm was able to reduce hip flexion range by 1.5 – 8.5 degrees, depending on the direction of motion.
Theory #2: the muscular flexibility theory
The other theory of butt wink is that as the lifter descends into the squat, tight or restricted musculature does not allow for the maintenance of anterior pelvic tilt, leading to the pelvis rotating posteriorly. In some cases, it might also be argued that tight muscles pull the pelvis posteriorly.
Indeed, in his review paper, Schoenfeld (2010) refers to this, stating ‘although some lifters attempt to increase hip flexion by using posterior pelvic movement during squat descent, this can heighten lumbar stress and is thus not advisable. Flexibility training specific to the hip musculature can help to increase hip mobility and facilitate better squat performance’.
But which muscles need to be flexible?
Hamstrings flexibility
Tightness in the hamstrings is often suggested as a cause of butt wink. The idea is that as the lifter descends into the squat the hamstrings are stretched, and at some will reach their maximum length. To continue to descend further the hamstrings will apply force to their attachment on the pelvis, which will pull the pelvis into posterior pelvic tilt. However, this theory does not match with the basic anatomical structure of the hamstrings.
The hamstring muscles, with the exception of the short head of biceps femoris, originate at the ischial tuberosity and attach to the tibia and fibula, and are bi-articular, producing both hip extension and knee flexion.
So during many types of squat, hamstrings length stays fairly constant (although a powerlifting-style squat will cause slightly more elongation than a more narrow-stance, upright squat). So when the muscle is being stretched at the hip by hip flexion it is also being shortened at the knee by knee flexion (Schoenfeld, 2010). This may explain why the hamstrings are only moderately active in squats compared to other hip-domiant or knee flexion exercises such as leg curls or stiff leg deadlifts (Wright et al. 1999).
Hip muscles
Tightness in the hip joint muscles has been argued to be a potential cause of butt wink, including the gluteals, piriformis, adductors, or even the hip flexors. Yet, even though there is extremely high variability between individuals in terms of both hip flexion and hip extension range of motion (Elson & Aspinall, 2008), there is no clear mechanism as to how these muscles might cause butt wink.
In most cases, proponents of this theory simply state that tightness in these muscles will pull the pelvis into posterior tilt at some point in the descent, without explaining exactly why.
Calf muscles (ankle dorsiflexion)
Calf muscle tightness could reduce ankle dorsiflexion ROM, which could impact on lumbar movement during the squat. In reality, ankle dorsiflexion ROM could be limited by soft tissue flexibility or by ankle structure, but either way it deserves consideration.
Ankle dorsiflexion range does seem to play an important role in squat mechanics, especially in relation to how much pelvic tilt is seen during deep squats. Kim et al. (2015) showed that ankle dorsiflexion ROM plays an important role in squatting in their study, which investigated the factors associated with deep squatting in healthy subjects. Ankle dorsiflexion ROM with a flexed knee and hip flexion were important factors for deep squatting in males, and dorsiflexion with an extended knee and dorsiflexor strength were important factors in females.
Additionally, List et al. (2013) compared motion at the leg, trunk and spine during either restricted squats, where the knees were not allowed to move past the toes, and unrestricted squats, where the knees were allowed to travel freely past the toes. In restricted squats, there was a greater increase in thoracic spine ROM compared to the unrestricted condition. Restricting the amount of ankle dorsiflexion ROM led to an increase in thoracic spine rounding during the squat. Similar results were observed in the lumbar spine, but they did not reach statistical significance.
Building on this research by List et al. (2013), Campos et al. (2016) analyzed the motion of the lumbar spine during restricted and unrestricted barbell half squats (knees to 90 degrees). The lumbar spine flexed at the bottom of the half squat in both conditions, but the lumbar flexion was less in the unrestricted squats compared to the restricted squats. Restricting ankle dorsiflexion ROM increases lumbar spinal flexion in the squat.
Unfortunately, there is no research to date assessing the motion specifically at the pelvis during restricted and unrestricted squats. However, as we have already discussed the motion at the pelvis and lumbar spine are closely related, meaning that an increase in lumbar spinal flexion will result in an increase in posterior pelvic tilt.
Does butt wink affect muscle activation?
Erector spinae
Given that the low back appears to be more flexed during squats with butt wink, it may affect erector spine EMG amplitude. Unfortunately, there is currently no published research exploring the erector spinae EMG amplitude during squats with or without butt wink. However, some research has looked at the effect of varying lumbar spine posture on erector spinae EMG amplitude during squat lifts.
The lumbar erector spinae muscles consistently show higher EMG amplitude during squat lifts with a lordotic lumbar spine position, compared to with a kyphotic position (Delitto et al. 1987; Hart, Stobbe & Jaraiedi, 1987; Holmes et al. 1992; Vakos et al. 1994). This increased erector spinae activation could be beneficial in increasing spinal stability, and probably also reduces segmental shear forces.
However, the extent to which we can extrapolate this to barbell squats is unclear. This research was conducted using squat lifts, where the subjects pick up the object, usually a crate, from the floor out in front of the body. This does not represent the typical loading pattern for squats in resistance training, where the load is not lifted from the floor.
Quadriceps
It has been suggested that butt wink could be advantageous for training the quadriceps in the squat, as it appears to lead to greater knee flexion ROM, which might increase muscle activation, particularly of the vastus medialis.
Even so, squat depth does not always seem to affect quadriceps activation, when using comparable relative loads (Contreras et al. 2015).
And there is a huge amount of evidence that vastus medialis activation does not differ from vastus lateralis activation at any point during the squat.
However, Choi (2015) compared the EMG amplitude of the vastus medialis and vastus lateralis during a sit-to-stand procedure with two pelvic positions; anterior pelvic tilt and neutral pelvic tilt. Subjects increased vastus medialis and vastus lateralis EMG amplitude in the neutral pelvic tilt condition compared with the anterior pelvic tilt position, suggesting that maintaining a neutral pelvis position does increase activation of the quadriceps. Even so, just as expected, there was no difference in the ratio of vastus medialis-to-vastus lateralis activation between the two conditions.
Does butt wink increase the risk of injury?
One of the main concerns surrounding butt wink is that it could potentially increase the risk of injury. To date however, there is no research in this area, and therefore no evidence that it increases the risk of injury.
Even so, many strength coaches suggest that butt wink could increase the risk of lumbar disc injury, as the lumbar spine goes through a flexion-extension cycle. This argument does seem to have a strong theoretical basis from the research on lumbar disc injuries. In vitro research has implicated lumbar flexion as the primary mechanism of disc herniation and prolapse (Callaghan & McGill, 2001; Drake & Callaghan, 2009; Veres et al. 2009). Although the extent to which the same mechanism applies in living humans is less clear (Contreras & Schoenfeld, 2011).
Not only is the lumbar spine taken through a flexion-extension cycle, but in the case of loaded squats there are also significant compressive forces through this cycle. Cappozzo et al. (1985) revealed that half squats with between 0.8 – 1.6 times bodyweight as additional load produced compressive forces at the L3-4 spinal segment of 6 – 10 times bodyweight, which is close to the suggested maximum compressive strength of the spine in young adults of 7,800N (Adams et al. 2000).
To reconcile this apparent discrepancy, Schoenfeld (2010) has suggested that as spinal failure obviously does not occur in the majority of cases, some adaptations must take place in order to deal with the mechanical stress, and to increase the compressive load tolerance of the spine. Indeed, there is good evidence to suppose that strength training does benefit bone density and structural strength.
Can we stop or reduce butt wink (part 1)?
So can we stop or reduce butt wink? Unfortunately, we do not have any research to help guide us in this yet, so whether or not we can change the amount of butt wink is very much up for debate.
I believe the answer to this question is probably no. I tend towards the structural theory of butt wink, as I believe butt wink is due to variations in individual’s hip socket depth, anteversion angle of the acetabulum or femoral neck, and diameter of the femoral neck. These are structural factors, which no amount of mobility, warm up or stretching is going to change.
Those who fall into the “flexibility camp” will often prescribe extensive stretching and mobility routines to help alleviate butt wink. The idea here being that if we can increase the range of motion around the hip join, or increase mobility, we can help the athlete achieve a ‘better’ squat, or reduce the amount of butt wink.
In my own experience, this does not tend to lead to any noticeable changes in the amount of butt wink an individual shows when squatting (editor’s note: Bret Contreras believes that some individuals can achieve noticeable changes, and that while structural factors are clearly very important, they are not always the cause of butt wink). That is not to say that it is pointless trying a mobility routine where there are signs of butt wink. But I think it is worth realizing that if you still have butt wink after plenty of stretching and mobility, then it is likely caused by the structural components of your hip and pelvis.
Can we stop or reduce butt wink (part 2)?
Although the structural factors are probably most important, the ankle joint perhaps does warrant some stretching or mobility work, in the presence of butt wink.
Recent research shows that the ankle joint motion affects squat mechanics (List et al. 2013; Kim et al. 2015; Campos et al. 2016). Increasing ankle dorsiflexion ROM may therefore reduce the amount of lumbar spinal flexion that occurs during squats.
And in fact, we can be certain that stretching does improve ankle dorsiflexion ROM. In a systematic review and meta-analysis, Young et al. (2013) showed that stretching increased ankle joint dorsiflexion. Therefore, it is certainly worth attempting a stretching programme to improve ankle dorsiflexion ROM to attempt to alleviate signs of butt wink.
Alternatively, elevating the heels using an Olympic weightlifting shoe or weight plates under the heels may help. This allows for greater vertical displacement for the same amount of ankle dorsiflexion, which you could argue based on the current research would lead to a less flexed lumbar spine.
Conclusions
Butt wink is a widely discussed topic in the field of S&C, and a highly controversial area, with almost no research on it to date. The exact mechanism of butt wink is unclear, with both anatomical differences and lack of flexibility being proposed. However, the anatomical model of butt wink does seem to have greater support at the moment, and most evidence based strength coaches are now opting for this explanation.
Based on the current research, the most effective methods for reducing buttwink that is not caused by structural factors are likely elevating the heels or attempting to increase ankle dorsiflexion ROM through stretching or other mobility methods. However, if the heels are elevated and butt wink still occurs, then the chances are the “issue” lies further up the kinetic chain.
Friday 07.02.20
HIPPY FRIDAY PEOPLE
Most of us have tight hips, we spend way to much time sitting down at work, home, watching Netflix, you name it there are loads of reasons why you might have some form of hip tightness or restriction. I spend so much time last summer on my bike doing some pretty big rides that it would have inevitably had a negative impact on my hip flexors as well as my hamstrings. So sometimes we can develop tightness and restriction as a form of compensation by getting better at something else. And this is at the centre of what Archon are trying to achieve, we want you to be functionally good at most things and even when you are trying to get really good at one thing in particular, it’s important not to neglect the other areas of your body, because one day you might need them and they won’t be there when you do.
So learn to love even the things you don’t like the most about fitness, mainly mobility and flexibility. Time invested in both with reap massive dividends further down the line.
Fordy
FIX THOSE HIPS – THE BASICS
Lower Body Mobility
When discussing lower body mobility, reference is made to the hip joint and pelvic girdle, the knee joint, and finally the ankle joint. Our previous section covered the movement of the pelvis and the trunk muscles that controlled it. Therefore, this next section briefly covers mobility and stability of the hip, knee, and ankle joints.
Basics of Hip Joint
The hip joint, or acetabular femoral joint, is a sphenoid or ball and socket joint formed by the articulation of the acetabulum of the pelvis with the head of the femur. It is a relatively stable joint due to its bony architecture (deep socket) along with its strong ligaments and strong supportive muscles

Mobility/ROM and Movements
There is much variance in hip ROM due to individual differences; therefore, there is some disagreement about the exact possible ROM of each movement associated with the hip joint. The ranges are:
- Flexion: 0 to 130 degrees
- Extension: 0 to 30 degrees
- Abduction: 0 to 35 degrees
- Adduction: 0 to 45 degrees

Basics of the Pelvis
The pelvic girdle consists of a right and left pelvic bone joined together posteriorly by the sacrum. The sacrum can be considered an extension of the spinal column with five fused vertebrae. Extending inferior to the sacrum is the coccyx. The pelvic bone consists of three bones: the ilium, the ischium, and the pubis.

Movements of the Pelvic Girdle
The pelvic girdle moves back and forth within three planes of motion for a total of six different movements:
- Sagittal plane: anterior and posterior tilt
- Frontal plane: lateral rotation (left and right)
- Transverse: left and right rotation
Quads, Hip Flexors, Hamstrings (passive and dynamic)
Hip Flexor Test
This first test is commonly called the Thomas Test and used for testing hip flexor length. The muscles associated with hip flexion are:
- Iliopsoas
- Action: hip flexion
- Length test: hip extension, with the knee in extension
- Rectus Femoris
- Action: hip flexion and knee extension
- Length test: hip extension and knee flexion
- Tensor Fascia Latae (not specifically tested here – Ober Test used to test this and not included in Wexford’s overall assessments)
- Action: hip abduction, flexion, and internal rotation as well as knee extension
- Length test: N/A
- Sartorius
- Action: hip flexion, abduction, and external rotation as well as knee flexion
- Length test: hip extension, adduction, and internal rotation as well as knee extension.
As noted many of these muscles perform hip flexion and knee extension along with their specific actions. The purpose here is to perform the basic tests for hip flexion and knee extension to identify any straightforward deficit.
Starting position
Subject/trainee sits at the end of the testing table, with the thigh almost completely on the table surface. The subject being testing lies down (supine position) on the testing table with the lower leg hanging off the end of the table. The subject then holds the thigh, pulling the knee toward the chest only enough to flatten the low back and sacrum on the testing surface.
Test Movement
If the right knee is flexed toward the chest, the left thigh is allowed to drop toward, with the left knee flexed over the end of the table. With four muscles involved in this length test, variations will likely ensue requiring numerous interpretations based on what is normal, slight, moderate, or marked. The tester is to view if the posterior thigh stays flat on the testing surface, low back flat, and if the lower leg hangs straight down or to a minimum of 80 degrees flexion. This measures the two joint hip flexors (cross hip and knee) specifically the rectus femoris. If thigh rises, it is an indication of both one and two joint hip flexor muscles have issues (shortness).

Hip Flexors Normal. Thigh flat on the testing surface. The angle at knee should be approximately 80 or more degrees.
Passive Straight-Leg Raise
Starting Position
Supine with legs extended and the low back and sacrum flat on the testing surface. With the low back and sacrum fixed, the tester will instruct the subject to fully relax the leg then lift the leg upward. The tester will continue to lift leg until tester feels a pulling or tightness in the hamstrings. Note the angle of both legs (use goniometer if available or a movement analysis system used in the demonstration picture)

Passive hamstring length test. Normal is >80 degrees. Right is normal with left considered slight < 80 degrees.
One the passive leg raise is complete, from the end passive position, have subject flex quadriceps (thigh) muscles and dynamically pull the leg back further under their own power until the pelvis begins to posteriorly tilt. This is the end position of the dynamic portion of the hamstring length test to test the hamstring length in a dynamic condition. An angle greater than 80 degrees is considered a good test.

Both tests >90 degrees indicating a good test
Back Flexibility and Hamstring Length (Sit and Reach Test)
Starting Position: Sitting with legs extended (long-sitting) and feet, at, or slightly below right angles
Test Movement: Reach forward, with knees straight, and attempt to touch the toes with the fingertips (base of big toe) or beyond this point, reaching as far as the ROM of the muscle length permits.
Normal Range of Motion in Forward Bending: Normal hamstring length permits the pelvis to flex forward toward the thigh permitting the angle between the sacrum and the testing surface to be approximately 80 degrees. Normal flexion of the lumbar spine allows the spine to flatten. Normal flexion of the thoracic spine allows an increase in the posterior convex shape which is seen as a smooth, continuous curve in this area. The average adult should be able to touch their toes in forward bending with the knees straight depending on the flexibility of the back and length of the hamstrings.

The Knee Joint
The knee joint is the largest diarthrodial (synovial) joint in the body. It is primarily a hinge joint *
(modified Ginglymus), however, this joint also performs slight flexion (lateral and medial) as well as slight rotation. The combined functions of weight-bearing and locomotion induce (place or produce) considerable stress, strain, compression, and torsion on this joint. Powerful knee joint extensors and flexor muscles, combined with a strong ligamentous structure, provide a strong functioning joint in most instances.

Knee ROM
Basic knee ROM varies (based on the reporting textbook/manual, etc.; however the standard range of motion is:
- Extension – 0 degrees (do not want hyperextension)
- Flexion – up to 140 degrees
- Range – 0 to 140 degrees
Ankle Joint
The ankle joint is commonly referred to as the talocrural joint and is considered a hinge or ginglymus-type joint. Specifically, it is comprised of the talus, the distal tibia, and the distal fibula. The typical range of motion is:
- Plantar flexion (pointing the toes) – 45 -50 degrees
- Dorsi-flexion (pulling the toes toward the lower leg or dorsum) – 15 to 20 degrees
- Range – 65 degrees total for both combined

Dorsi/Plantar Flexion ROM

Testing for Ankle Movements
One-joint Plantar Flexors (Soleus and Popliteus)
Starting position: sitting, with hip and knee flexed
Test Movement: with the knee flexed 90 degrees or more to make the two-joint gastrocnemius and plantaris slack over the knee joint, dorsiflex the foot. Sit forward in a chair with knees bent and feet pulled back toward the chair enough to raise heels from the floor. Press down on the thigh to help force heel to the ground.

Two-joint Plantar Flexors (Gastrocnemius and Plantaris)
Starting Position: standing position with knees extended (unless hamstring tightness cause the knee to flex)
Test Movement: Stand erect on a board inclined approximately 10 degrees, with feel approximately 8 t0 10 degrees of out-toeing, with the knee in extension to elongate the gastrocnemius and plantaris over the knee joint, dorsiflex the foot.

Thursday 06.02.20
KEEP THE BALL MOVING
There is a saying in the NFL, “just keep the ball moving, don’t worry about getting a touchdown, just keep the ball moving and eventually you’ll find yourself in the endzone“. I love this so much as it’s very similar to how all of us should view fitness. Try not to worry about the ned result. We’ve bought in the 5 Rep Max Squat for February but that doesn’t mean that in the next couple of weeks you need to be squatting 200kg (unless you can already squat 200kg of course). What you need to be thinking is ‘just keep the ball moving‘. Keep getting to the gym, keep chipping away at the movement, get your mobility right, groove the movement pattern and the rest will take care of itself.
So today we are going to start talking about DEPTH. How low is low enough?
Let’s have a look shall we
Fordy
LET’S START LOW AND WORK OUR WAY UP FROM THERE
DO YOU NEED TO IMPROVE YOUR ANKLE DORSIFLEXION?
Before hammering away at your ankle mobility range of motion, let’s test if this is something you actually need to work on. Place your big toe one hand-width away from a wall. While in a half kneeling position as shown below, see if you can touch your knee to the wall without you heel rising off the ground, foot rotating, and keeping your thigh pointed forward. If you pass this test then no need to keep working on your ankles. If you fail, start working the following exercises!
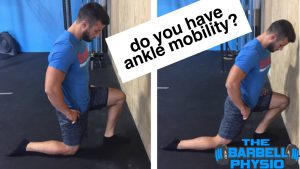
Eccentric Calf Raises
Eccentrics have been shown in research to help change the structural make up of muscles for improved flexibility and are very high on my list of ankle mobility musts. The athlete should start on a box on one leg with their knee straight, raised up onto the ball of his or her feet. Then I have the athlete lower down into a deep stretch followed by unlocking the knee and pushing the knee forward. This results in both the gastrocnemius and soleus muscles being eccentrically loaded. Then place the other foot down and return to upright.
Dorsiflexion PAILS/RAILS
The Functional Range Conditioning crew has some great mobility movements and their PAILS / RAILS (Progression & Regressive Angular Isometric Loading) can rapidly improve dorsiflexion. Using these principles for improving range of motion is a great one!
Goblet squats with forward weight shift
Goblet squats are great for correcting many squat faults. And by performing them with a focus on pushing the knees forward to work on ankle dorsiflexion mobility can be a great way to help athletes squat with a more upright torso (as is needed for front and overhead squats).
Band mobilization
Banded ankle mobilizations are great for those that feel their ankle dorsiflexion mobility is limited more by a pinching or a block in the anterior ankle…but they’re often done with the band positioned incorrectly. See the video for the proper way!
Lateral tibial glide
I’ve written about lateral tibial glide in the past as it is a great way to make RAPID changes in ankle mobility when this movement is restricted. If you’ve been trying to improve your ankle mobility for a while and not making progress then test this NOW!
Courtesy of the guys at Barbell Physio
Check them out here, you’ll be glad you did
Wednesday 05.02.20
GETTING THE BASICS RIGHT
To start Squat month you need to look at the basics, get those right and the rest will take care of itself. Remember, you have a LOOOOOOONNNNNGGGGG time before the lockdown and so you have time to go right back to the start if you need to and get the foundations of your squat right before you start adding serious load. Thats’s exactly what I am doing.
You will need to look at every part of you for the squat, it’s fundamental that you understand your body and how it reacts to certain movement patterns. Everyone tends to think that the squat is easy, its a natural movement right? It’s actually one of the hardest movement patterns to get right as it involves so many joints in the body that are often tight (ankle being a particularly overlook one). Time invested will bring the greatest rewards, time spent on mobility will often brings as many early PB’s as the ability of increasing the load and will also reduce the risk of injury.
To help you out check out the video from the Barbell Collective, we love them as they break everything down for you and give you loads of hints and tips on how to get the very best out of your squat.
You can find them here on line here
https://shruggedcollective.com/
You’re welcome
Fordy
Use These 6 Simple Tests to Find Your Perfect Squat
We can all agree that the Squat is a foundational movement. It can be used to develop strength, power and muscle mass. Being able to Squat without pain can also help keep you healthy over the long haul.
However, many people struggle to find a Squat they can perform comfortably and consistently. Staying healthy is one of the biggest keys to continual development in not only the Squat, but also in the overall development of your sport and life activities. The person that stays healthy will be the one who can train longer and harder.
So, how do you go about finding the perfect Squat for your body type and skill level? Using several different movements, we can identify what parts of your Squat need additional work and find the absolute best Squat exercise for your current state. Use these insights to find your perfect Squat and you’ll be on your way to becoming stronger and healthier than ever before.
Find Your Squat Foot and Leg Placement
When it comes to figuring out the optimal foot and leg placement for a Squat, I like to use a quick test called the Squeeze and Waddle:
The test can be broken down into a few key steps:
- Stand with feet together
- Squeeze your glutes as hard as you can
- Rock your weight side to side as shown above
- Let your feet turn out as they naturally want to and your legs go where they desire
- Make note of where your feet are now pointing. This is likely your optimal foot and hip placement for the Squat
From there, squat down. This should feel like a nice comfortable squat. If not, play around with your leg width. Try a little wider or closer in. Once you find your preferred foot and hip placement as well as leg width, make a mental note of it. This will likely be your most comfortable squatting position.
Find Your Squat Depth
Being able to squat hips to heels is not a requirement for squatting. Rather, being able to squat so your hips are slightly below your knees is a good sign of sufficient mobility.
The first thing you will do is perform a regular Bodyweight Squat. If you can easily get to just below parallel with no heels lifting off the ground or knees caving in towards the middle, then you can move right on to progressions. However, if you find yourself experiencing any of the following issues during a bodyweight Squat, you’ll need to do some more work:
- Not being able to get to a depth where your thighs are parallel to the ground
- Heels coming up off the ground as you squat
- Knees caving in as you squat
- Discomfort in the movement
Let’s troubleshoot what might be causing some of these Squat issues.
First, let’s check your mobility. You may simply not have the mobility to get to the Squat depth that we desire. The first test to check for this is a Door Knob Squat. This will show us how deep we can get in a Squat passively, meaning using some assistance to get the required range of motion.
If you can get to the desired depth with a Door Knob Squat, your issue is most likely stability, not mobility. Also, make note of how far you can get down before your hips tuck under yourself. That will be your max Squat depth.
Now that you know your Squat depth max, let’s see why you might not be able to get there without assistance. Ankle mobility is a common limitation, so let’s look there first. The Squat with Heel Lift can help us identify if the ankles are indeed the issue:
The heel lift creates an artificial range of motion in the ankles. If this cleans up your Squat, you should continue squatting in this fashion while also adding some ankle mobility drills to your routine. Kneeling Ankle Rocks are a great drill for increasing ankle mobility:
If you can get to a good depth in the Squat with Heel Lift but still see your knees caving in or feel your hips moving a lot, you may have some stability issues that need addressing.
Stability is the ability to maintain a stable joint movement through coordination of the surrounding muscles at the right time. With the Squat, stability problems will typically manifest up in two areas: the core and the hips.
Lack of hip stability will show itself as wobbly knees and knees caving in during the Squat. A lack of core stability will show in a lack of depth during the Squat.
Anteriorly loading the Squat, such as is done during a Goblet Squat, can help increase your core engagement during the Squat movement.
If adding a weight to the front side of your body, anteriorly, helps get you deeper into your squat, then you should stick with variations like the the Goblet Squat, Kettlebell Front Squat, Sandbag Bear Squat, and Barbell Front Squat until your core stability significantly increases.
If loading the squat anteriorly helps but there is still some unwanted knee movement or a lack of depth, then we’ll look at the hips as possible point of weakness.
Simply adding a light resistance band around your knees during the Squat will force your glutes to turn on, which greatly aids in hip function during the movement.
If adding a band to your Squat helps you get more depth or you just feel more stable in the hips, then you need to work more on glute strength and engagement. Doing exercises like Squats with a Band, Glute Bridges and Clam Shells can help with this.
At this point, you should have a good idea of what your ideal foot position is and what assistance, if any, you will need during your Squat.
Find The Best Way to Load Your Squat
There are two primary ways to load the Squat—anteriorly (Front Squat and Goblet Squat) and posteriorly (Back Squat). If you have a lower-back problem or have insufficient external rotation of the shoulders, back squatting will not be your best choice.
Since the Back Squat directly loads the spine, this can put excessive stress on the low back. If you have low-back problems, you’ll likely find find the Front Squat and Goblet Squat variations to be the superior choice.
As for shoulder mobility, if you’re not able to get your elbows tucked down so they’re pointing to the ground, then you will not be able to safely place a bar on your back without flaring the elbows (pointing them toward the wall behind you). This will either put stress on the front of the shoulder joint or force you to artificially gain range of motion by excessively arching your lower back. Excessive arching of the back will lead to possible low back pain down the road, so neither of those outcomes are desirable.
You can use Lying Shoulder Slides to test if you have the needed shoulder mobility for Back Squats:
If you are able to keep your elbows and wrists on the ground throughout the movement and your lower back flat against the ground, then you should be fine to Back Squat.
If you can’t keep your elbows and wrists on the ground, here are some drill to help you get that shoulder mobility back.
The Right Way to Progress Your Squat
The previous tests should be enough to help you find the right Squat for you today. But as your strength, mobility and stability increase, you’ll be able to progress to more demanding variations. Below is a recommended order of progression for different Squat movements. You can add different assistance as needed for each stage, such as a Kettlebell Front Squat to Box or a Barbell Front Squat with a Band around the knees.
The general Squat progression, from least to most demanding:
- Goblet Squat
- Sandbag Bear Hug Squat
- Kettlebell Front Squat
- Barbell Front Squat
- Barbell Back Squat
When it comes to finding your perfect Squat, it all starts with finding the right base for you. From there, you have to pick the right variation of the Squat for you. That will be the variation that you can do safely and effectively. Whether or not you decide to progress from there depends on what your goals and desires are.
Courtesy of Stack
https://www.stack.com/a/6-simple-tests-that-will-help-you-find-your-perfect-squat
Tuesday 04.02.20
WHAT’S YOUR SQUAT BRO?
We all know that everyone in the gym is secretly competitive, whether thats with those around you or with yourself. It’s human nature to want to be better at something than someone else but when we compare ourselves in everyday life we tend to use a little thing called context. I understand that if someone is trained in something, and I’m not then the likelihood of me getting the better of them is pretty slim. But for some reason when someone asks me what my squat is in the gym, I feel like mine should be better than theirs is and context goes out the window. We have said a million times before, that whatever you lift, only a part of it is about the weight on the bar. The rest and perhaps the biggest factors that go into a lift are things like, your weight, age, gender and physical make up.
If it were just about how much weight you can move, then it will come as no surprise that the ones that lift the most are also some of the heaviest. Weight after all moves weight, science determines that. In fact you will find that they will most often be within the 120-150kg range in weight.
So we need to look at power to weight, how much can you lift for your bodyweight. Is your bodyweight good weight or bad weight? In other words is your weight helping you or hindering you when it comes to lifting. How old are you? We know that you peak in performance at certain ages and therefore how likely is it that you can lift the same at 24 years old when you are 44? You then need to look at your gender, males are normally heavier and have a higher degree of natural muscle mass, which ultimately means that, all things being equal will lift more than a female counterpart. All these things place a major part when it comes to assessing your strength and so the next time someone in the gym asks you, hey bro, what’s your squat? The answer they get will be very different to the one they were expecting.
Fordy
MY ‘BETTER’ IS BETTER THAN YOUR BETTER
Before we start we need to look at exactly what relative strength is within fitness and why it’s so important to take it into account when analysing someone’s level of strength. Traditionally we have a tendency to measure strength by the total amount of weight in kilos or pounds that can be lifted in any given movement. In other words, how many plates you put onto the bar, ultimately determines how you and everyone else in the gym views your level of strength.
Before we start we need to look at exactly what relative strength is and why it’s so important to take it into account when analysing someone’s level of strength. Traditionally we have a tendency to measure strength by the total amount of weight in kilos or pounds that can be lifted in any given movement. In other words, how many plates you put onto the bar, ultimately determines how you and everyone else in the gym views your level of strength.
Why is it then that in other sports we recognise this kind of evaluation as ‘flawed’, yet we still can’t get past it in the gym environment? The first question when you get talking to someone in the gym is normally ‘what’s your bench?’ or ‘how much are you squatting these days?’ The response everyone wants is what we refer to as Total Load Lifted [TLL], because it normally sounds more impressive. We have ingrained, imaginary benchmarks that we believe are to be considered acceptable. 2 plates on a bench press is universally greeted by a nod of the head or a ‘that’s a good bench’ comment from the gym fraternity for no other reason than it has been passed down by generations of lifters as the weight that determines how worthy you are to be on the bench in the first place.
When we talk about boxers, we talk about who is the best pound for pound as it would be stupid to try and compare the likes of Mayweather and Tyson in a straight up comparison. But by just looking at the total weight lifted on a bar, and disregarding what the person lifting it looks like, we are only getting a fraction of the information we need to decide if that person is strong or not. You’ll get the occasional remark like, ‘that’s a good lift for someone of your size’, or ‘I’d have thought a big lad like you would be lifting more than that’. This shows that underneath all of the bravado they actually understand the concept of relative strength, it’s just that they aren’t applying it in the right context like they would in other scenarios or sports.
We back this understanding up further with ‘well of course he/she is going to run faster than I do because look at them’. This is making reference to what someone looks like in order to evaluate how good he or she is going to be. What they are really saying is, that person is bigger, smaller or thinner than I am and therefore it only makes sense that they would be able to do the thing we are doing better than I can.
They say that things said in jest often contain elements of truth, and non-more so than when people say things like this. If we’re talking about shifting load then the bigger you are the more you will probably be able to move. If we’re talking about running, then the lighter you are the better your chances of moving that weight across a surface in a faster time. ‘I’m twice his age so of course he will be better than me’ is another one. We intuitively recognise this to be the case, and in most cases it is actually true but we can’t take it as gospel, we need to take a bit more of a scientific approach to truly determine who’s ‘better’ is actually better.
So we now know that you can’t determine someone’s strength on just load lifted, nor can their performance be solely judged on size, mass or age. To get a true representation we must take all of these factors into account and only then can we then start to understand if someone is strong or not.
Relative strength is actually a very easy concept, it’s purely the Total Load Lifted [TLL] divided by the weight of the person lifting it, in order to give you a ratio. An example would be someone weighing 75kg that lifts 115kg, is lifting at a ratio of 1.53 times his or her own bodyweight (75/115).
This is the first step (of many) to determine a person’s strength profile.
STRENGTH TEST
In order to determine someone’s true strength, the first thing you need to do is find out how much someone can in fact lift, but this initial assessments needs to be done under a certain set of criteria. This criteria needs to be designed in such a way that every time you assess your capability you will do it in the same way each time in order to become repeatable, valid and produce reliable results. Without criteria an assessment is useless and the information you receive is unreliable and therefore of no real use when it comes to evaluating strength.
And then comes the performance of the actual assessment(s), this needs to be at maximum effort. There should be no reps in reserve and therefore it’s important to use a spotter whenever possible for safety.
Once you’re benched, squatted, deadlifted or snatched your best weights – this is when the fun part begins. Remember, at this point the total amount of weight lifted is purely used as part of a bigger calculation.
Below we show an example to create a comparison and highlight just how different looking at total load lifted [TTL] can be when comparing it to relative strength.
Person A
Person B
Weighs 65kg and benches 73kg for their one rep max
On the surface Person A is the strongest as they are lifting 15kg more than Person B. But using the relative strength calculation we create a very different outcome. Person A is lifting at a ratio of 1.11 whereas Person B, even though they are lifting less total weight, is lifting at a ratio of 1.12. This therefore means that Person B is actually stronger, as they are lifting at a higher proportion of their bodyweight.
Now this is only part of the story. We then need to dig a little deeper. We need to know a bit more about Person A & B and we find out that Person A, is Male and Person B is Female and both 31 years old. So how does this change, or indeed, does it change the result?
FLOORS AND CEILINGS
Everyone, regardless of gender, age, height or weight has what we call ‘a floor and a ceiling’ to their ability in any given activity. We often refer to it as potential, this person has a greater potential than that person, but it’s often predicated on theories rather than facts. But we can apply facts to this scenario to see if Person A or Person B has the greater potential, and if so who out of the two is better situated between their floor and ceiling in the bench press. This would indicate a higher level of performance and therefore better result.
As part of the Archon Combine system we undertook mass data research in order to assess Floors and Ceilings for all combinations of age, gender, height, weight and wingspan to ensure we had the parameters for every individual’s scenario.
By checking against the parameters outlined within our system, in this example each person’s floor to ceiling ratios calculate as follows:
Person A
Their floor in terms of relative strength for a bench press is 0.47, and their ceiling stands at 1.62
Person B
Their floor in terms of relative strength for a bench press is 0.33, and their ceiling stands at 1.18
Now when you look at their respective bench ratios of 1.11 and 1.12, it now looks even further in favour of Person B, as they are right up close to their ceiling where as Person A still has a way to go. But this also means that Person A has the higher potential whilst Person B has the better current performance level.
Then there’s body mass, not body weight. This is how much fat you have on your body in relation to fat-free mass. Relative strength is highly affected by body mass over TLL. Adding load to increase your ratio is a slow process, good lifters could only see a 5kg increase over a 12-month period, which would only improve their ratio by a very small amount. However, if you have excess body fat, which you can decrease by improving your nutrition and taking a more holistic look at your performance, can have a huge impact on your relative strength ratio.
PERSONAL BESTS
When it comes to personal bests it’s going to be much easier to create them if you look at relative strength ratios rather than TTL. Motivation and adherence to training is often directly proportionate to how much progress you make, the more progress you see the more motivation and adherence to continue. So if you want all the personal bests that you can and keep yourself motivated then it’s time to change the emphasis of your training.
Being better is the best thing you can do and we want to show you how much better you can become. Archon Combine software allows you to do the basics whilst we do the dirty work. We’ve sorted out your criteria with some of the best in the world, we’ve created a valid, reliable, and repeatable testing protocol that allows you to just go and do your thing in the gym – go and lift, run, row, jump, cycle and more and get all the PB’s you deserve.
Monday 03.02.20
FEBRUARY EVENT – THE 5 REP MAX SQUAT
Here is what you need to know in short. Over the coming days we will be examining it in more and more detail but for now, here is a quick rundown. You’ll notice that we are not going to say not in this section. So take it that if it doesn’t fit to exactly whats said below, then it won’t count. In other words, if it was a low bar back squat, we would say it’s a low bar back squat.
- It’s a 5 repetition maximum back squat
- The bar height is below C7
- The hips must drop below the level of the knee
- A minimum stance of ASIS over 2nd toe is to be used
- No excessive anterior or posterior tilt
- The hips need to be fully extended at the top part of the movement
- The knees need to be fully extended at the top part of the movement
- Once you remove the bar from the rack, it cannot be replaced until the completion of the final repetition
- There is NO assistance throughout the lift
- A controlled decent must be used, no bouncing out the bottom position
- You will have 5 seconds upon the completion of one rep in order to engage into the next
Good Luck
Fordy
HOW DID FORDY GET ON?
Not very well to tell you the truth. I hit 80kg for 5 reps at 80kg bodyweight current body weight. Now I was going to tell you that only about 18 months ago I ruptured my left LCL, and 12 months ago, I pretty badly hurt my back.
But you know what?
None of that really matters.
What matters is that I have taken the bull by the horns, given it a go, have a benchmark to start from, committed to following the programming as part of the Bracket and so the only way is UP
I looked like this at the end
Although, I did manage to do this straight after which I was not expecting (if you want to know exactly what it is then just ping me a message)
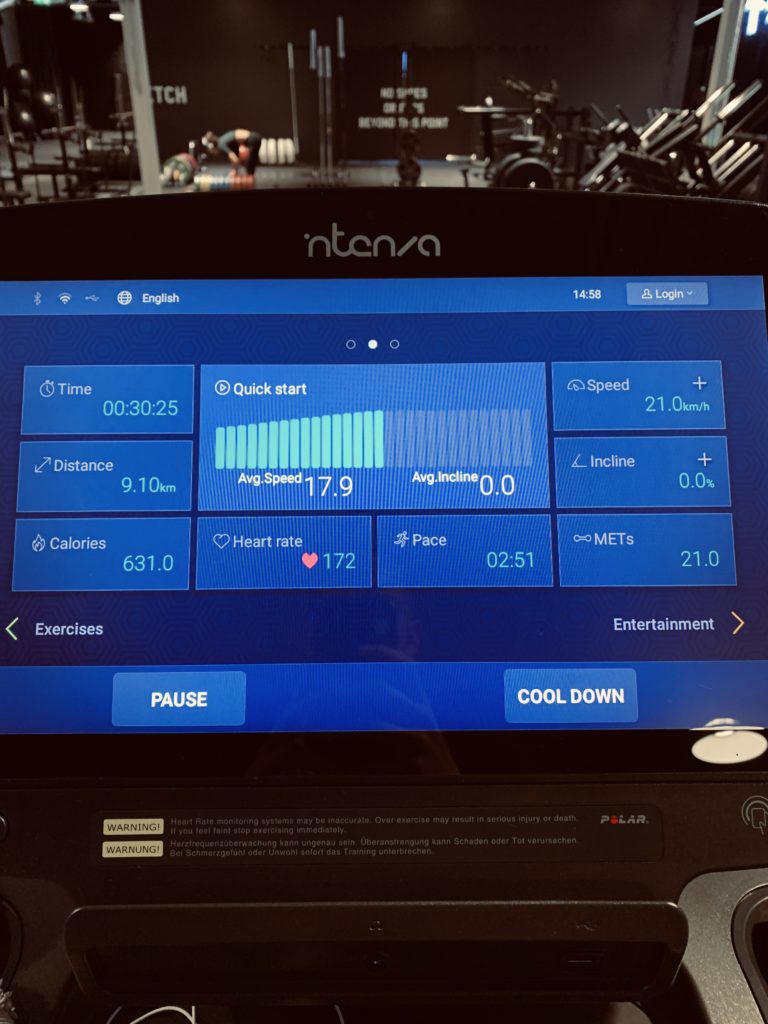
And lastly I thought it would be a good idea to line myself up here, and every metre do 5 deadlifts with 50kg followed by 5 burpees. It didn’t go well to be honest. Can’t walk today!
Tomorrow is all about the Squat. Tune in for massive hints, tips, mobility tekkers and more.
Sunday 02.02.20
DON”T EXPECT MUCH FROM THE DAILY FEED TODAY< IT”S SUPERBOWL SUNDAY
Hey everyone, so if you haven’t seen it, we’ve posted the highlights of the Superbowl. Grab yourself a beverage of your choice, some pizza, settle back and enjoy some of the worlds best athletes battle it out for the Lombardi Trophy.
Fordy
HERE COMES THE 5 REP SQUAT
All the information coming tomorrow for your next event. I’ll even let you know how I got on!!!!!!!
Saturday 01.02.20
TODAY IS THE DAY YOU’VE BEEN WAITING FOR

So today we announce the 2nd event as part of the Bracket. If you’re not already you need to keep your eyes peeled on social media as I will be posting it live this afternoon.
The best thing to find it on is Instagram, you need to search for
thebracket_official
Let’s see who’s going to be the first to log their attempts, and PLEASE can you video them and send them over to us as so we can share them with the rest of the Bracket community.
Fordy
FOLLOW MY JOURNEY
This particular part of the Bracket is going to be difficult for me and so I’m going to be sharing a tonne of content for you to follow and share. I hope it inspires others to see that even when you know you really aren’t very good at something, it’s then that you need to find that discipline and dedication. It’s going to be a fun 4 weeks, just two more words for you