Thursday 19.03.20
HOMEWORK OUT, SMART WOD AND SUBWAY
So we’re at home. You want to work out. Here is C Rich (Craig Richey) with a workout you can do at home, using the all to familiar Tabata timing (via the Smart WOD app) all with zero equipment. Whilst it’s not going to get you jacked, it will keep you mobile and give you a bit of motivation to keep training ready for when the gym doors open back up. I also love some of Craigs other videos, he has a relaxed nature about him which make it easy watching, oh and some cool music as well in the editing process. A lot of trainers should take note of what a good video looks (and sounds) like.
Oh and while we are at it, Tabata has been around a LONG time, it’s not a new thing. So to give you some extra info we’ve included an article below so you know what it is and why it’s become so popular in the past 5 years or so.
Enjoy
Fordy
What Is Tabata Training And Why You Should Try It
Get ready for the toughest four minutes of your life

Back in 1996 if you mentioned HIIT most people would probably have assumed you were talking about an Oasis record rather than an exercise style, but it happens to have been the year one of the most well-known branches of HIIT was born: Tabata training.
What Is Tabata Training?
Tabata is named after Professor Izumi Tabata, who conducted a study into the effects of HIIT on aerobic and anaerobic fitness, and how it compared to steady-state training.
The original study used highly trained athletes, divided into two groups. One did five sessions of steady-state training a week, while the other did four HIIT workouts plus one steady-state workout.
The HIIT involved 20-second bursts of very intense exercise followed by ten seconds of rest, repeated eight times for a total of four minutes. This four-minute blast was preceded by a five-minute warm-up and followed by a two-minute warm-down, with all the exercise done on a stationary bike. During the intense sections the athletes had to maintain a pace of over 85RPM or they were disqualified.
At the end of the study, both groups saw rises in their VO2 max (basically, how efficiently the body can use oxygen), but those who had used the Tabata protocol also improved their anaerobic fitness.
Since then Tabata training has come to mean any workout which is broken up into 20 seconds work and ten seconds of rest, repeated for four minutes. From there people often add in more rounds, building up the workout in four-minute blocks.
It’s also used today as an effective way to burn fat (but not lose weight, this isn’t a protocol for beginners, remember). Why? Because just ten seconds of recovery after 20 seconds of lung-busting effort isn’t enough time to completely get your breath back, so your heart rate stays high and the accumulated fatigue quickly adds up to shock your body into freeing up the energy supplies tucked away in your fat cells. This means that while you may not burn that many calories during the actual four minutes of training, you body will continue to burn calories at a higher rate at rest during the following hours. Some studies indicate your metabolism is boosted for up to 24 hours after a HIIT session.
How To Do Tabata Training
Tabata is not a workout for fitness beginners, because it’s vital that the 20-second bursts of work are done at maximum intensity. In theory, it can be applied to all forms of exercise – you can do Tabata running, cycling, bodyweight exercises, weight training or anything else. However, it’s best done with exercises that allow you to increase the intensity quickly and safely. So start with work on a cardio machine or simple bodyweight moves like press-ups or unweighted squats.
To stress the most important point again, if you’re doing Tabata right it will feel like absolute torture for four minutes. You shouldn’t be able to talk during the intense bursts.
You can build workouts around the Tabata principle in four-minute blocks, changing the exercise after each four-minute stint. For example you could do four minutes on the rower, four of press-ups, four of jump squats and four on a stationary bike.
You don’t want to make the overall workout too long, though, because this will probably mean you’re unable to maintain the intensity. It’s also important to make sure you warm up before your first 20-second stint at max intensity.
20-Minute Full-Body Tabata Workout
If you’re ready to try some Tabata, this 20-minute workout from Maximuscle training expert Dan Lambert that targets muscles all over the body is a great place to start.
“When I use Tabata I like to bounce between two compound exercises – one upper body and one lower body – to increase heart rate, distribute blood around the whole body and increase lactate production in the large muscle groups,” says Lambert.
Complete 20 seconds of exercise A, rest for ten seconds, then complete 20 seconds of exercise B and rest for ten seconds. Repeat this pattern four times for one full Tabata and then move on to the next pair of exercises. Complete five rounds with five different pairs of exercises in total.
1A Burpee
Stand with feet shoulder-width apart. Drop and place your hands on the floor just outside of your feet. Keeping your core engaged, quickly jump your feet back so you end up in the press-up position, then jump your feet back to between your hands. Jump up explosively and clap your hands overhead.
1B Heavy medicine ball slam
Stand with your feet shoulder-width apart with a heavy medicine ball between and slightly in front of your feet. Squat down to pick up the medicine ball, keeping your back straight and holding the medicine ball at the sides so your palms are facing each other. Return to standing, then bring the ball above your head. Squeeze your glutes for extra force and, hinging at the hips, slam the ball into the ground with all your might.
2A Weighted walking lunge
Hold a dumbbell in each hand by your sides with palms facing inward. Keeping your back straight and chest up, step forwards and slowly lower your body until your knees are bent at 90°, keeping your torso upright. Hold this position for 1-2sec and squeeze your glutes. Step forwards with the other foot and repeat the move. Ensure your knees don’t go too far forwards beyond your toes because this can damage the joint.
2B Dumbbell thruster
Hold a dumbbell in each hand above your shoulders with palms facing inward (a neutral grip). Squat down until your hamstrings are parallel to the floor, keeping your back straight and the dumbbells in position. Push through your heels to return to standing and press the dumbbells overhead.
3A Press-up
Assume a face-down position on a gym mat. Place your hands on the floor in line with your shoulders but slightly more than shoulder-width apart. Without flaring your elbows outward, lower your body until your chest is almost touching the floor, then press back up to the start, again without flaring your elbows. Keep your glutes squeezed and your hips in line with your torso and shoulders.
3B Jump squat
Stand with your feet shoulder-width apart and place your hands behind your head. Squat down until your legs are parallel with the floor, squeezing your glutes at the bottom. Explode back up and off the ground by driving through your heels. Keep your chest elevated and back straight throughout.
4A Assisted pull-up
This can be performed either on an machine-assisted station or with a strong resistance band tied around a pull-up bar. Hold the pull-up bar with a overhand (pronated) grip just wider than shoulder-width. Place both knees on the seat or band until your body is at full length. Contract your lats and pull your body up until your chin reaches the level of the bar.
4B Kettlebell swing
Stand with your feet slightly wider than shoulder-width apart. Hold a kettlebell in front of you with both hands using an overhand grip. Hinge at your hip, bringing your glutes back while keeping the back straight. Explode forward to swing the kettlebell up until it reaches chest height, keeping your arms outstretched.
5A Renegade row with press-up
Adopt the top press-up position, gripping two dumbbells that are resting on the floor. Perform a press-up, then lift one dumbbell straight up into your midriff, lower it and then row the other dumbbell up in a similar fashion, ensuring your hips remain in line with your torso.
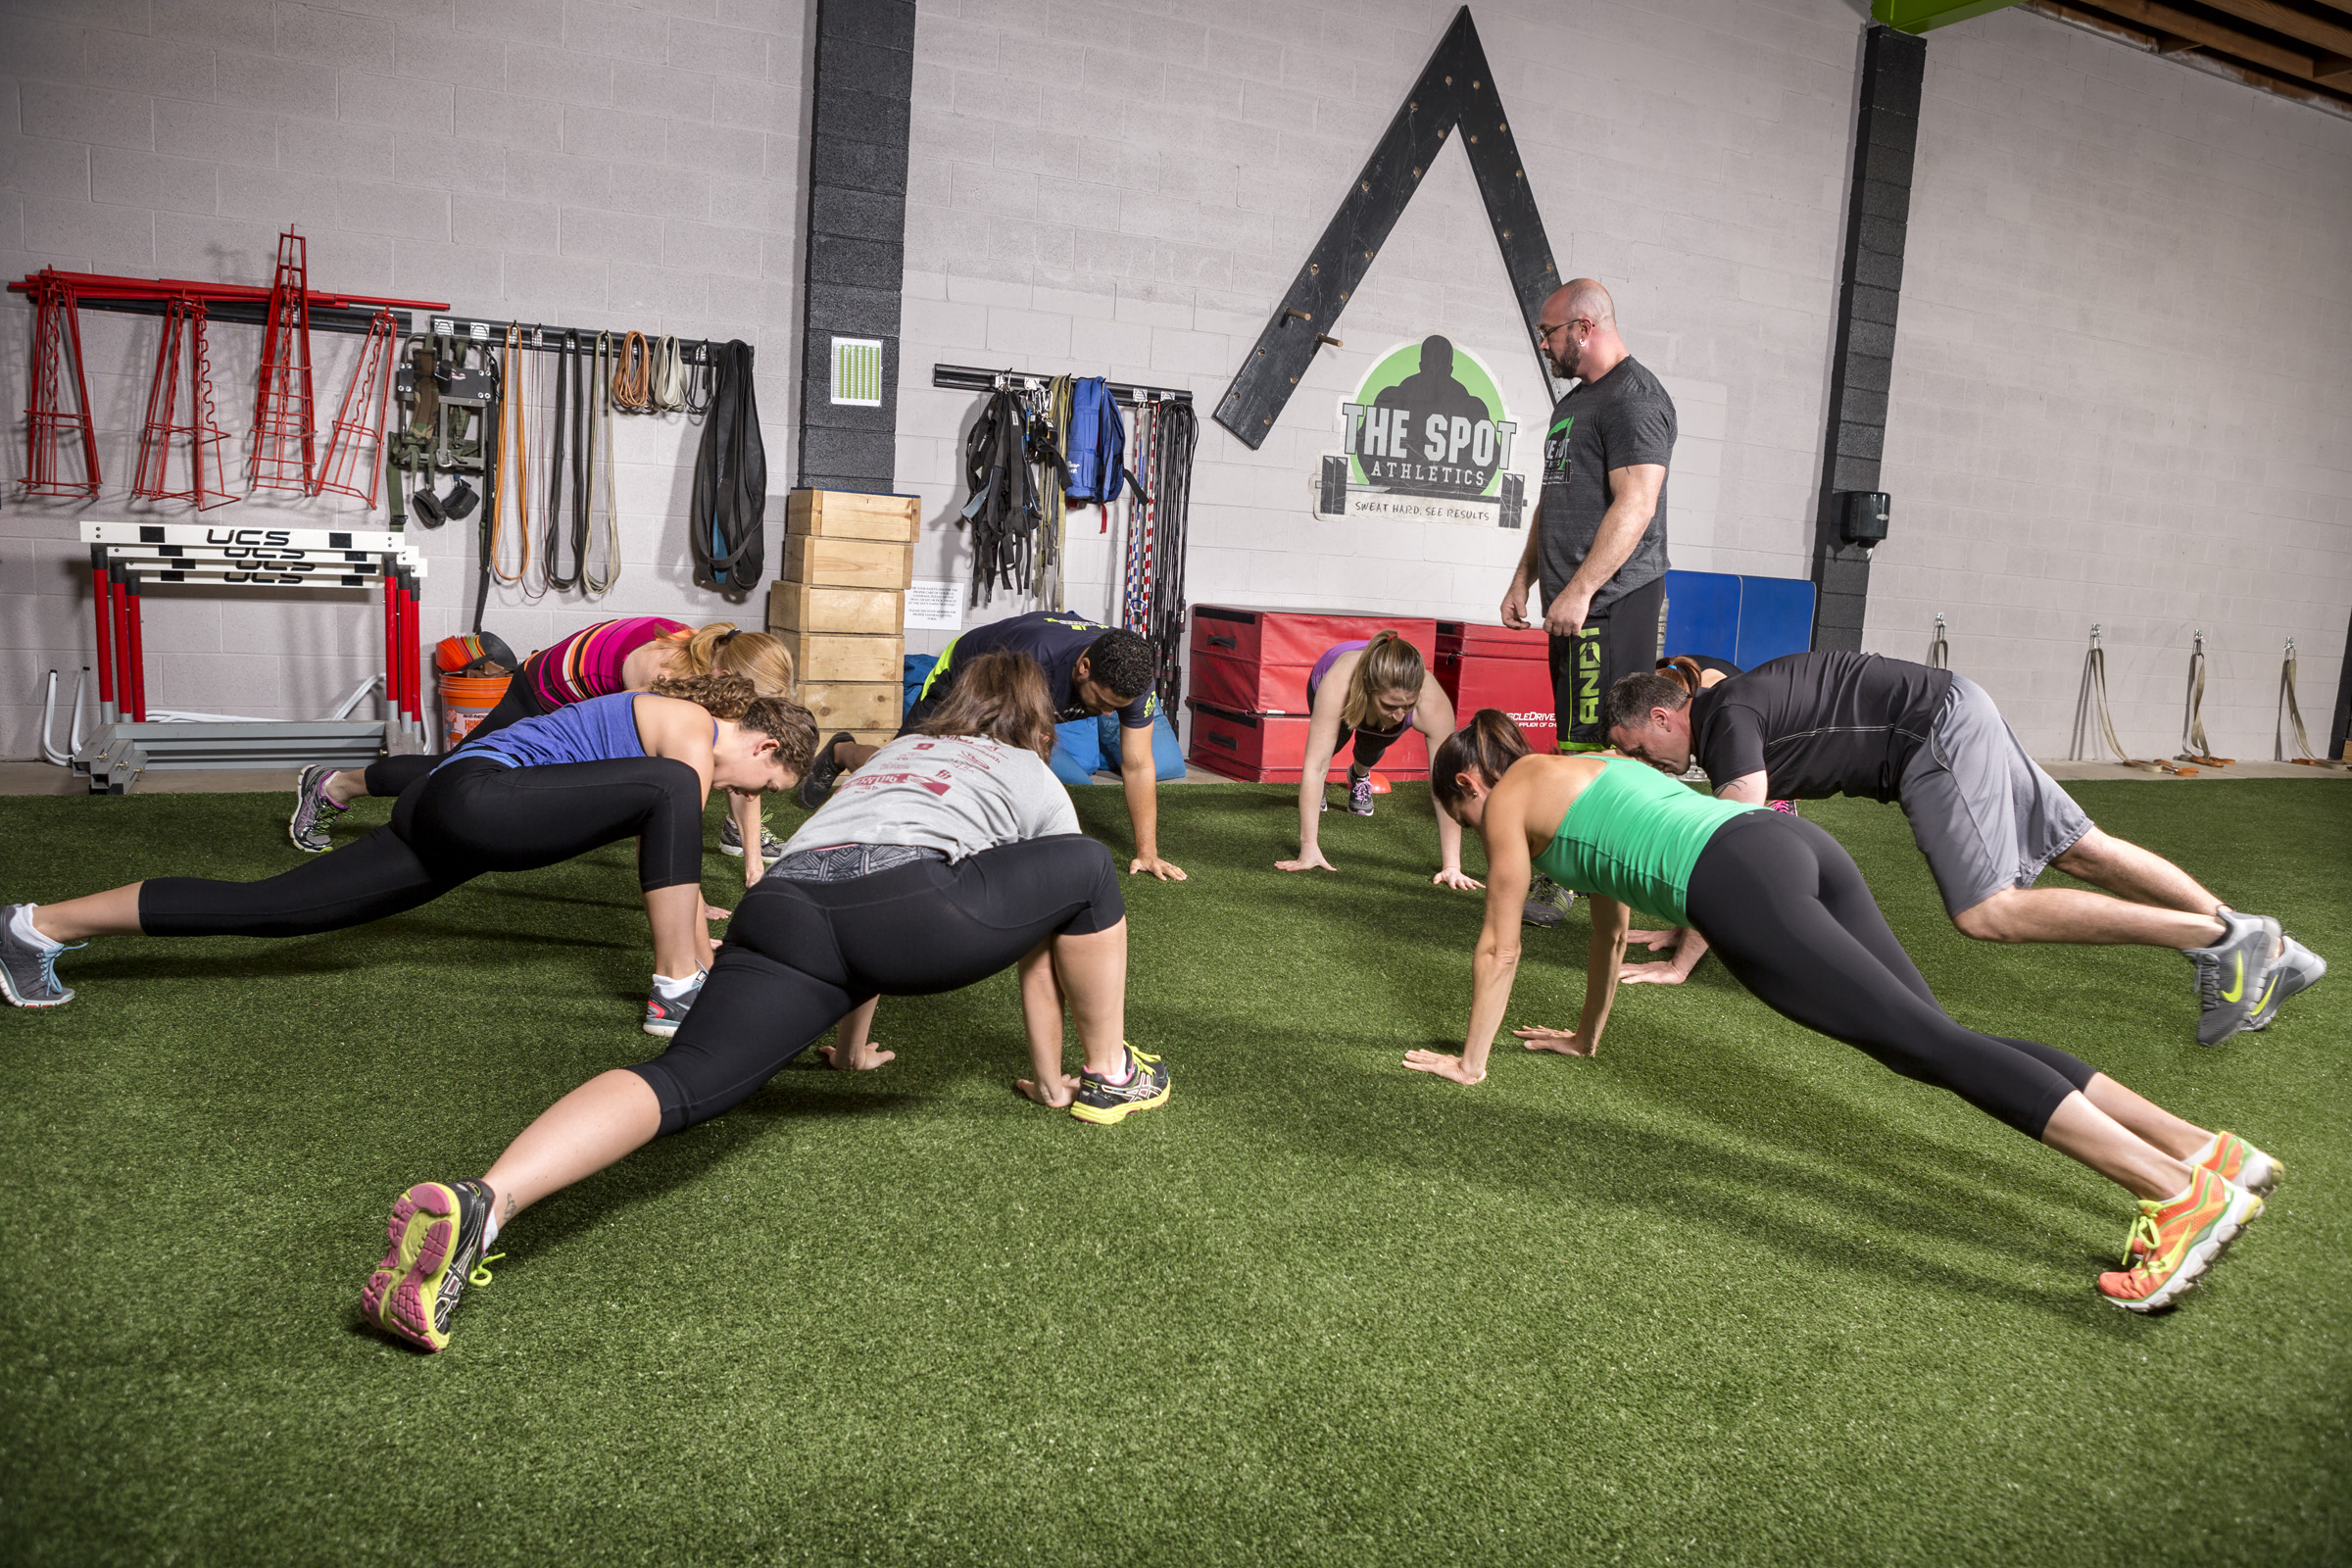
5B Mountain climber
Start in a top press-up position. Bring one knee towards your chest, then as that leg returns to the start position bring the other knee up towards your chest. Repeat this movement pattern pattern as quickly as possible. Ensure your core is engaged to keep your balance .

If you’re keen to give Tabata a go but don’t have the equipment needed for the workout above then try this bodyweight session from Ben Leonard-Kane, the founder of fitness studio Flykick, instead. The 20-minute workout hits muscles all over the body, and although you don’t need weights for it you should now have learned enough about Tabata to know that it’s not going to be easy.
After a warm-up the workout moves through four four-minute circuits following the Tabata protocol, with each set focusing on a different area. Circuit 1 targets the lower body with jump lunges and prisoner squat jumps, and circuit 2 the upper with dips and press-ups. Circuit 3 is all about ramping up your heart rate with burpees and high knees to work on your cardiovascular fitness, while circuit 4 hits the core, using a V-sit and single-leg jackknife combo.
It’s a simple but brutally effective season you can do almost anywhere (anywhere you won’t disturb the people downstairs with four minutes of jumping, that is), so next time you have 20 minutes and energy to spare, make sure to give it a go.
https://www.coachmag.co.uk/exercises/lose-weight/1699/tabata-training-protocol
Wednesday 18.03.20
SOCIAL DISTANCING = OPPORTUNITY
Since some of us (not me currently) are going into social distancing and as such now don’t have the ability to get to the gym. So why not take this time, seeing as we now have more of it, to get yourself fully f**king mobile. I’m pretty sure that most of us don’t understand how good you will physically feel if you spent 20 minutes a day over the next ‘x’ weeks that we aren’t supposed to be going out s much (or at all). Improved mobility, less aches and pains, improved joints (lower back, ankles, hips). What is there not to love about the idea of getting super duper mobile in the next couple of weeks/months. So lets do it, lets commit right now to morning (doesn’t have to be morning) mobility and we’ll see how far we can get until the world returns back to normal.
FORDY
Tuesday 17.03.20
LOWER BACK PAIN
So a few of you are experiencing a small amount of lower back pain, which isn’t surprising due to most of the population also having the same issue. So before it gets any worse then lets have a look at what it could be. A lot of the time it is actually connected to the Glute and not the back, so we are going to start our investigation there. Have a look at the video first and see if this applies to you.
FORDY
THE IMPORTANCE OF MOBILITY
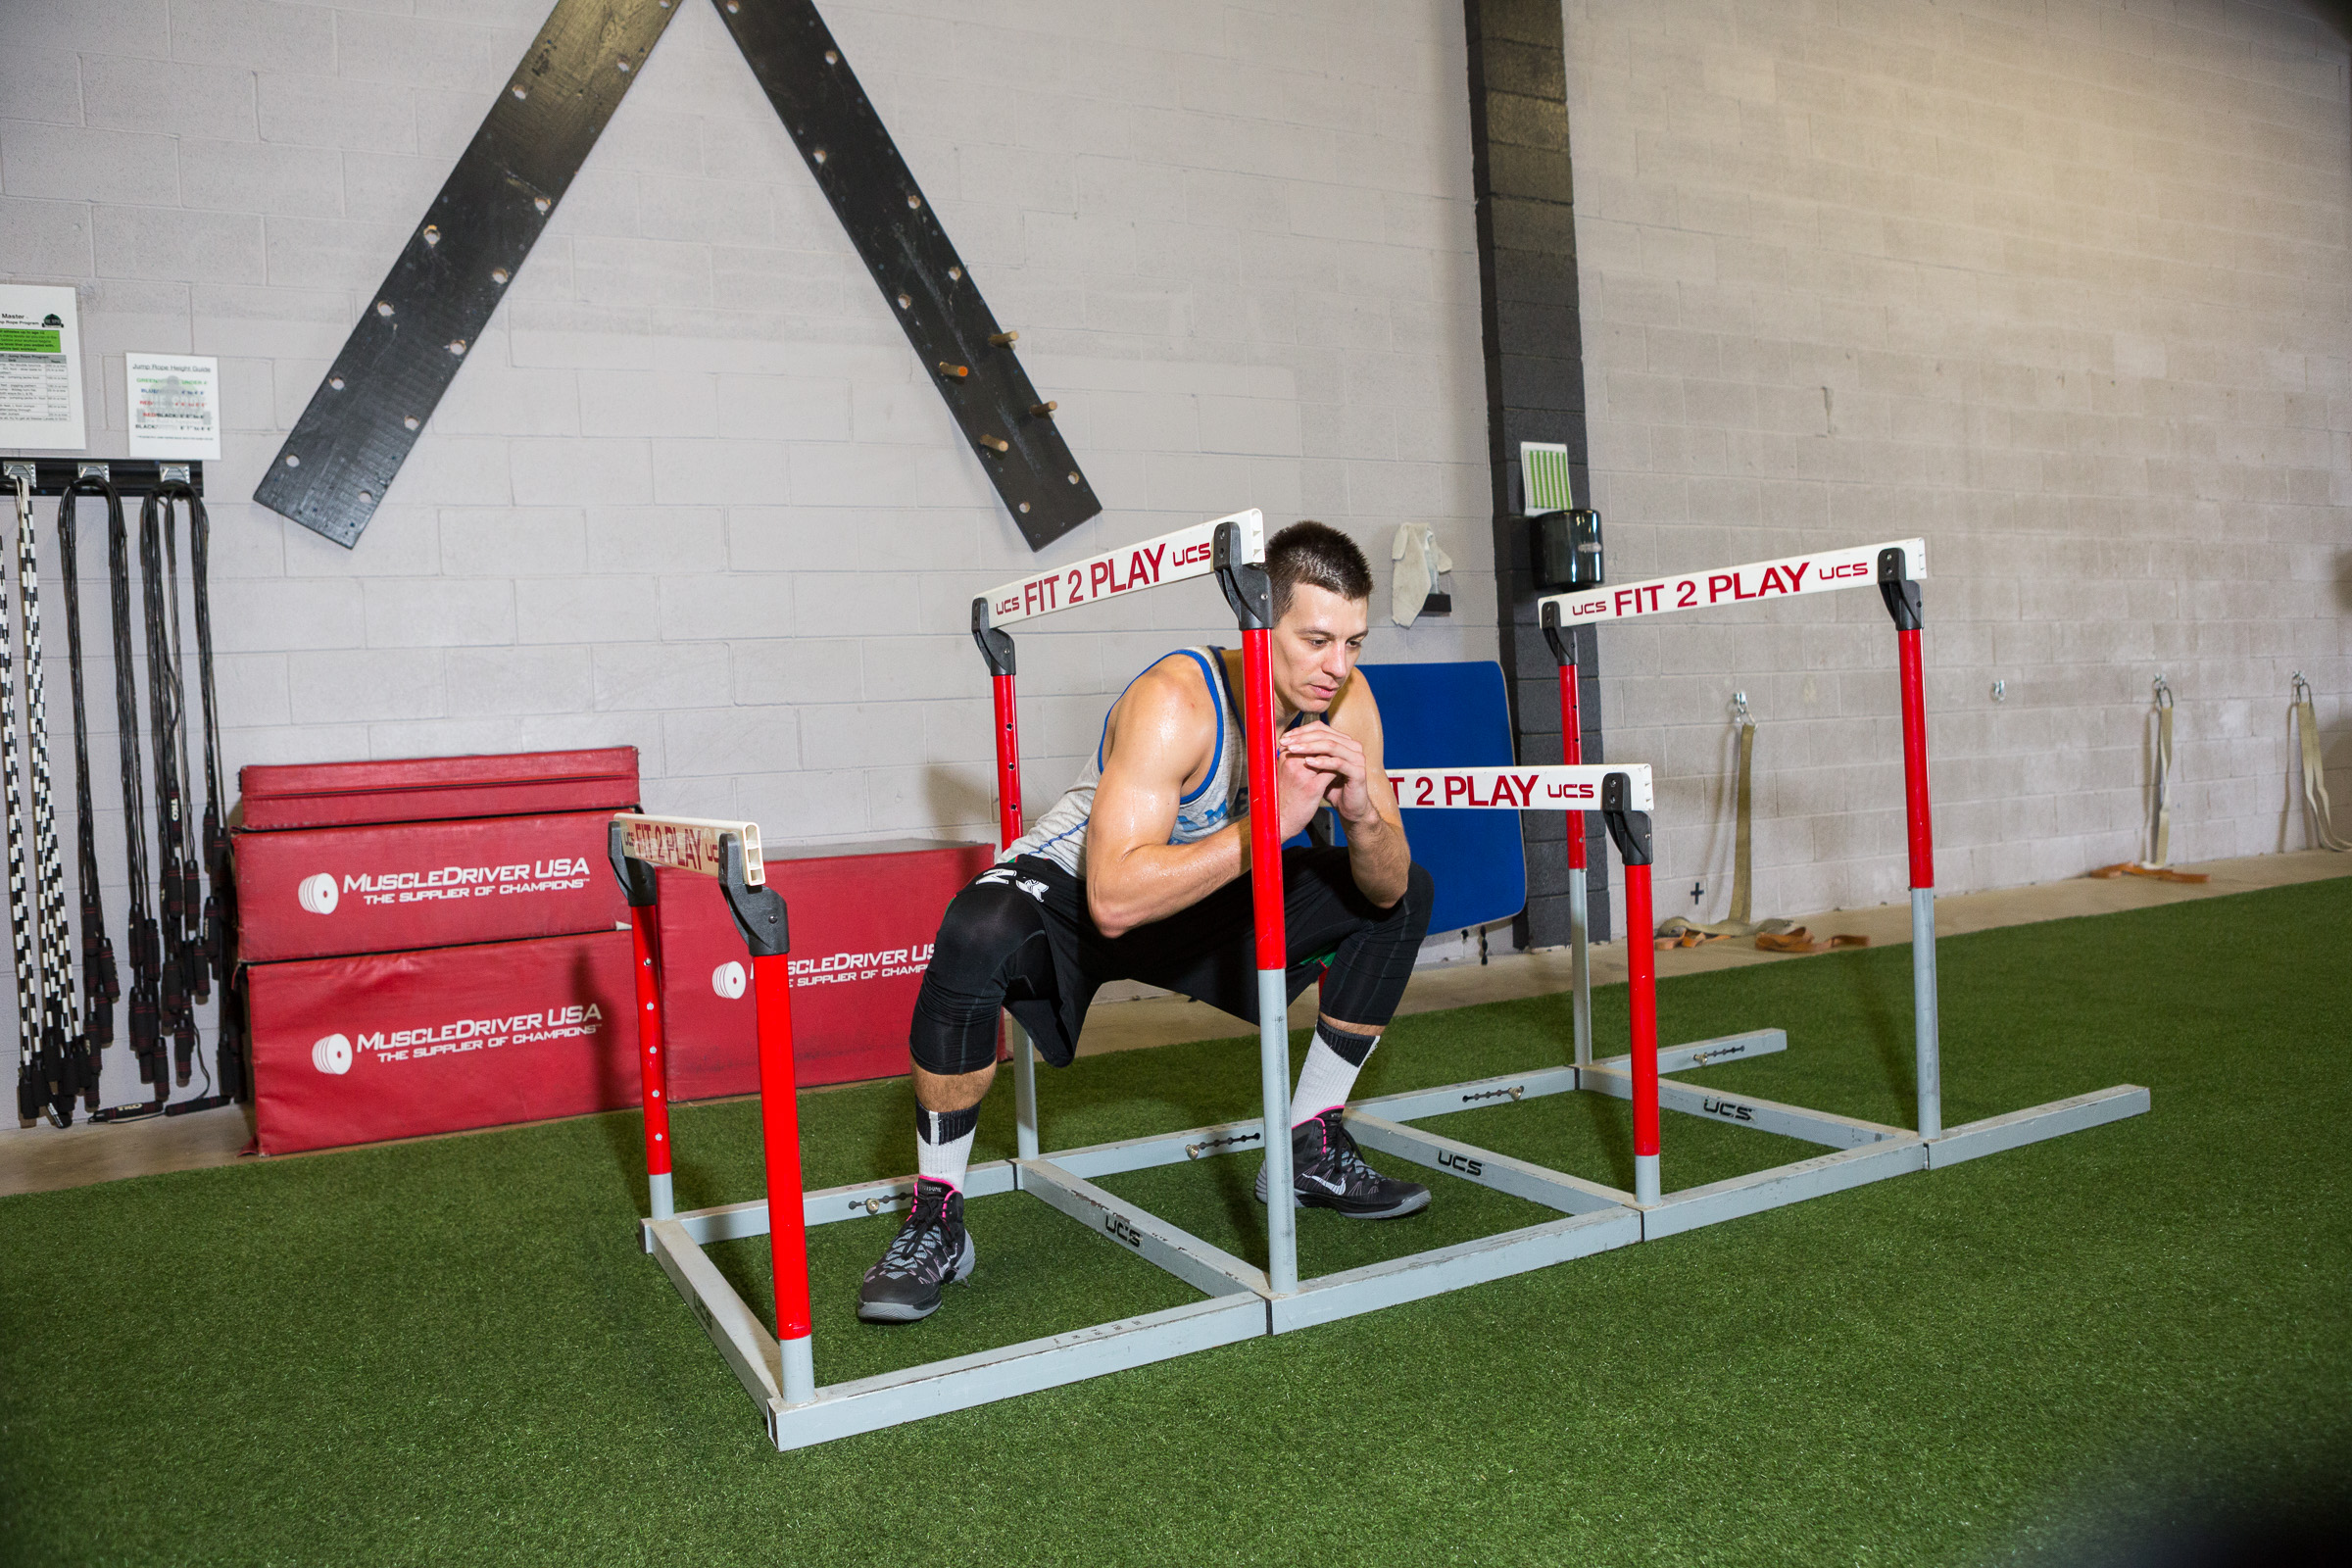
Being mobile is a crucial aspect of being healthy. If a person is not able to move a joint freely through its full range of motion, then they are already putting themselves at an increased risk of injury before even attempting to pick up a weight and load that range of motion. There should be a period of time either before/after training or even on a separate day that is dedicated to improving mobility. Something as little as 5-10 minutes daily can be enough to see progress. One of the most common reasons you feel unathletic is because you aren’t able to get into the positions and postures that you want. It’s much easier to do a little mobility work every day to preserve it than it is to lose it and have to work to get it back. 5 minutes a day goes a long way. In light of our seminar on mobility coming up, I think it is apt to go over a few reasons why mobility work should be (if it already is not) a crucial adjunct to any exercise program:

-
Decreases chance of injury– This should be a given and is by far the most important. Any restrictions to a freely moving joint pose a possible risk of injury. There are some exceptions such as a basketball player having tight ankles to prevent constant sprains from changing directions, but overall a free joint is a happy joint.
-
Keeps joints healthy- When doing mobility exercises, the joint being targeted is commonly referred to as being “warmed up.” What is actually happening is that blood is being moved to the surrounding tissues and synovial fluid (fluid in our joints which helps them glide) is shuttled into the working joint. For example, fire hydrants or hip circles are aiming to warm up the hips. Blood is then transported to the muscles working to move the leg (hip flexors, glutes, external rotators) and synovial fluid hydrates the hip joint in preparation for exercise.
-
Become stronger- If our movement is restricted in a squat and we can only go down to just above parallel, how strong would the squat be through its full range of motion if we are not able to train the bottom fourth of the movement? Not very strong at all. This logic can be applied to every exercise as well. If our mobility is limiting a full range of motion, then we cannot strengthen all parts of the movement.
-
Time efficient- Like I said earlier, mobility exercises are quick, easy, and effective by design. A full upper body or lower body routine can be completed in 5-10 minutes making it optimal as a warm-up or cool down. Full body routines can be implemented on non-training days as well and should take no more than 15-20 minutes either.
-
All you need is you- In addition to being time efficient; mobility exercises are also very portable. Many can be down with just body weight movements, and the most you would ever need are some bands and a light bar or dumbbells. There really is no excuse to not stay on top of mobility work.
These are just some basic and broad reasons why implementing mobility work into your routine should be done for a body maintenance perspective as well as a time/equipment viewpoint. To get the most out of your training, your body needs to be healthy. A healthy body leads to longevity and living a comfortable life. Living a comfortable life then leads to living a happy life. I think setting aside 5-10 minutes a day is a reasonable debt to pay for a happier life don’t you?
https://www.thespotathletics.com/blogpage//the-importance-of-mobility
Monday 16.03.20
BRACING VS HOLLOWING
If you know, you know. For years e have been looking at core conditioning and stability all wrong. We’ve all been hollowing (mainly to look good) rather than bracing. If you don’t know the difference then you need to spend the time finding out, and to save you a job we’ve found a great article below and a video as well. If you don’t change the way you start training your core after this then you need to start evaluating your programming. Get your foundation right and the other movement that we are asking you to do will be easy, or at least easier than before.
FORDY
How Are We Still Getting It Wrong: Abdominal Hollowing Vs. Bracing

Cassie Dionne
Coach
Kingston, Canada
Physical Therapy, Mobility & Recovery, Functional Movement Screen
If you’ve ever suffered a back injury, gone to a Pilates class, or worked with a fitness coach who tried to help you activate your core, then you’ve heard it already. The infamous “draw your belly button to your spine” cue.
Touted as a way to improve your core stability this technique, known as abdominal hollowing, has been a universally accepted, go-to exercise for physical therapists (PTs) and fitness coaches for the last decade. In fact, following any sort of low back injury, abdominal hollowing is usually the number one exercise physical therapists teach clients during rehabilitation. The therapists themselves are taught the technique in school, and it has been long accepted as the standard exercise for spinal stability.

But let me ask you something: just because something has always been done a certain way, does that make it the best way?
Some exercises become universal, but not because they are great, or even effective. People fall into a trap of teaching and doing what was taught to them. They rarely pause to question the movement, the anatomy, or the biomechanics. And this is exactly why abdominal hollowing has been taught all of these years.
Even with that being said, however, exactly how the entire PT community bought into this technique is beyond me.
Unfortunately, not only is there a complete lack of evidence to support its use, but it has also been shown that the technique in no way leads to a stable spine. In fact, abdominal hollowing does precisely the opposite and effectively ruins our spinal stability.
So, why was it ever thought to be a good idea?
The Background
The abdominal hollowing technique comes from a group of Australian researchers, including physiotherapist Paul Hodges, who published a study in 1999 that indicated that in healthy individuals the deep muscles of the core – specifically the transversus abdominis (TrA) – would activate a fraction of a second before any movement was performed.3
In other words, before participants would perform a movement, their TrA would fire.
When they tested individuals with low back pain, however, they found the TrA had a delayed reaction. This lead to trying to isolate the TrA in order to fix the altered motor pattern, and here is where abdominal hollowing was born.
The technique was meant to engage the deeper core muscles, including the TrA and multifidis, without causing the more superficial abdominal muscles (internal and external obliques and rectus abdominis) to contract.
The problem with this is that focusing on single muscles actually creates dysfunction in spines and is highly problematic.
Let’s Review Some Anatomy
Speaking very basically, we have three layers of abdominal muscles. The outer layer is our rectus abdominis (think six-pack muscle), which runs vertically from our ribcage to our pelvis. In the middle, we have our external and internal obliques, which run diagonally from our lower ribcage to our pelvis. And finally we have the TrA, which runs horizontally beneath the other layers.

This little anatomy review will prove helpful as I go though abdominal hollowing and bracing a bit more.
Back to Abdominal Hollowing
Though it is true that studies have shown there are perturbed motor patterns in the TrA in individuals with back pain, more recent studies have shown that perturbed patterns of activation are actually found in virtually all muscles in those with back pain.4,5 You see, our muscles work as teams to not only create joint torque, but to also (and more importantly) maintain core stability.
There is no single muscle responsible for this.
So instead of training muscles as a team and as they function in real life, hollowing aims to instead activate a single muscle in isolation. Now, research does show that hollowing will in fact produce increased activity in the TrA, but at what cost? Yes, you are getting a greater TrA activation, but you are also causing a weakening of the external and internal oblique muscles, as they must essentially be inactive in order for hollowing to occur.
This actually leads to a less stable spine, meaning a greater chance of injury – the exact opposite effect from what we want.

Enter Abdominal Bracing
Think about what you would do if you were to prepare yourself for someone to punch you in the gut.
You would immediately tense and stiffen you core to brace for the impact. This is exactly what abdominal bracing is, a term first coined by Dr. Stuart McGill of Canada, a leading expert in spine mechanics.
In abdominal bracing, you are simultaneously co-activating all layers of core muscles (remember the anatomy lesson?), in addition to activating your lats, quadratus lumborum, and back extensors.
This means the entire abdominal wall is activated from all angles, sides, and directions, causing the three layers of the muscles to actually physically bind together.
This binding enhances the stiffness and stability of the core to a much greater degree than what would otherwise be produced by the sum of each individual part.
This is what McGill refers to as superstiffness.
It is this stiffness that provides us with 360 degrees of spinal stability, making us injury resilient and helping us achieve optimal performance.
You see, stiffness is actually key for spinal stability and spine health.
Having a stiff core eliminates micro-movements in the joints that lead to spine and tissue degeneration.
Without stiffness, these micro-movements would gradually gnaw away on our nerves, eventually causing pain and even disability. Stiffness braces these micro-movements and takes away the pain, essentially building a spinal armor.
To visualize this a bit better, McGill gives the great example of a guy-wire system (like a ship mast).
Think of the obliques and the rectus abdominis as the supporting guy wires of the spine. They will be more effective at stabilizing the spine when the have a wider base, as they do when the core is braced. On the other hand, when the abdomen is drawn in, or hollowed, there is a much narrower base of support leading to significantly less stability.

Are Bracing and Hollowing Mutually Exclusive?
Some therapists and coaches will argue that abdominal bracing and hollowing do not need to be mutually exclusive exercises.
They say each technique is good and their use depends on what you’re doing.
For example, I’ve spoken to therapists who say abdominal hollowing is ideal for a Pilates class, during a physiotherapy session, or during day-to-day tasks, while bracing is ideal for more complex movements such as lifting weights.
This is flawed thinking. Why would we teach our body two completely different motor patterns?
If we teach abdominal hollowing for everyday tasks, we are essentially encouraging our rectus abdominis and oblique muscles to weaken and remain inactive. Furthermore, we are not allowing our core to maintain its stiffness, which means one unexpected bump, fall, or movement and we could be dealing with a significant back injury. Our bodies do not work in isolation, and we should not be training them as if they do.
In Conclusion
When it comes to spinal stability all of our muscles work together and play an important role. These muscles must be balanced in order to be able to withstand large loads placed upon them to keep us injury free.
Training single muscles leads to the exact opposite effect, instead causing an unstable, injury prone spine.
This is why when training core stability, whether immediately following an injury or during athletic performance training, we should never focus on isolating a single muscle. Instead, bracing and the activation of our entire abdominal wall should be practiced.
People, it’s time we stop getting this wrong.
Stop drawing in your belly button, and start working on improving your core stiffness. Your body will thank you for it!
Sunday 15.03.20
STABILITY, THE KEY TO A GOOD PRESS UP?
To allow your body to execute movements your body needs to have inherent stability, and this will ultimately come from your core. Now the best person in the world to understand this principle from, is Dr. Stuart McGill. He calls it proximal stiffness to create distal mobility. Watch the video for a great intro and then feel free to learn more from the man himself. Especially check out his work on ‘Super Stiffness‘, it will revolutionise how you view your core.
FORDY
Why Core Stiffness Matters More Than Core Strength
When it comes to building speed, coaches tend to focus on sprint mechanics, power-based training and plyometrics. Coaches think when we want to develop more powerful athletes, we default to Olympic lifts, medicine ball training, and much more. Yet, few ever look at core training as the solution for many of these performance-based measures.
Let’s face it, the idea of core training has been so poorly defined that many coaches have become cynical about the impact it can really make to training. Looking at the real research, we can dispel many myths about core training and help us see that core training can play a significant role in many of our performance-based goals.
Beyond the Abs
We can’t have a good discussion on the how and why of core training without first understanding that the core isn’t going to reference to any one muscle or even any one group of muscles. The reality is that the core is generally thought of as a combination of over 35 muscles that must work synergistically to accomplish the goal of strength, power, and speed. World renown spine expert, Dr. Stuart McGill, describes the muscles of the core being made up just partly of, “the lumbar spine, the muscles of the abdominal wall, the back extensors and quadratus lumborum. Also included are the multi-joint muscles, namely, latissimus dorsi and psoas that pass through the core, linking it to the pelvis, legs, shoulders and arms. Given the anatomic and biomechanical synergy with the pelvis, the gluteal muscles may also be considered to be essential components as primary power generators.”
As famed physical therapist Gary Gray states, the core is “from the toes to the nose.” Such a statement confirms that the core goes far beyond just the abs or any individual muscles. The problem as renown therapist Gray Cook points out is that we usually try to address training either by “part or performance” means.
Meaning, many coaches who aim to have a stronger core think about training the rectus abdominis with flexion, the obliques with “twisting,” etc. We think about the parts that can make up the core, but miss how the core actually functions. As Mr. Cook points out, the majority of issues with core stability and performance comes down to movement patterns, not parts.
This works in concert with what much of the research has found consistent with issues of low back pain. Motor control and proper sequencing of the core muscles are more important in reduction of low back pain than actual strength of the abdominals or any specific core muscles. Training the proper patterning of the core is a specific skill, and it needs to be addressed in training.
As Dr. Stuart McGill has stated, “Core stiffness is essential for injury prevention. Core stiffness is essential for performance enhancement. Core stiffness is not optimized in body building exercises. Core stiffness requires dedicated training.”
Why Core Stiffness Matters
What is core stiffness and why does it play such an essential role in our performance in sport, our ability to produce more force and our hopes of running faster? Core stiffness can be thought of as tension throughout the body that provides a stable platform for more movement to occur.
This is why research has shown that issues like shoulder pain in throwing athletes has a correlation with a lack of lower core stability. The “stiffness” of the core creates what the physical therapy system of PNF coined, “proximal stability for distal mobility.” In essence, when the body creates a stable platform for the extremities to perform from, the nervous system allows for greater force development to occur.
The question becomes HOW do we create proper core stiffness and teach the concepts that will make a difference for the athlete. While core stability training has a huge spectrum of approaches, we are going to focus on establishing a good foundation, proper progressions, and start to show where real core stability can go in a thoughtful strength training program.
The Bird Dog
The video above includes demonstrations and essential form cues for the Bird Dog movements below. Many of the drills in this article are based on the foundations of Dr. McGill’s “Big 3” core stability exercises. The Bird Dog being one of the most important because of how many qualities we teach at once. The Bird Dog is designed to teach:
- How to create core stiffness from the ground up. This means creating force into the ground with the hands and feet.
- How to resist extension and rotation of the core.
- How to keep the pelvis stable as the extremities create movement, like we see in running.
- How to connect the kinetic chains like the Posterior Oblique System (POS) which is the lats, trunk and glutes working in concert to create stability in the same manner during locomotion.
What you will see is two foundations of the familiar Bird Dog. Most people struggle with the resisting of movement because they don’t know how to create the core stiffness, nor how to connect the chains of the body.


As explained from :00-1:37 in the video above, foundational Bird Dog can be a great screen in pelvic control and how we create a foundation for the extremities to optimally perform.


As explained from 1:38-2:37 in the video above, keeping a stable upper body while we challenge the control of the lower body is a great place to start building success in the Bird Dog. This creates a push/pull pattern in the lower body like we have in running.


As explained from 2:38-4:11 in the video above, using the sandbag allows us to strengthen the core through friction and loading, but more importantly connects the lats, core and glutes (the Posterior Oblique System).


As explained from 4:12-5:45 in the video above, the action of rowing is to accentuate the challenge in both resisting multi-planar forces acting on the core and keeping proper ground contact.
Lateral Core Stability: The Missing Link
It can be argued that the most undertrained type of core training is lateral core strength. Yes, there are the token Side Planks, but this form of core training is far more important than the casual attention it often receives. Being able to stabilize the pelvis in the frontal plane as we move is important otherwise we create a disconnect in the connection of the muscles. Dr. McGill calls this a “leakage” of energy, and the knees and low backs generally pay the price.
As Dr. McGill describes, “Interestingly, when we measure world-class strongmen carrying weight, NFL footballers running planting the foot and cutting–neither of these are trained by the squat. This is because these exercises do not train the quadratus lumborum and abdominal obliques, which are so necessary for these tasks.”
Building lateral core stability will start with many side plank progressions, but as you will see, we want to gradually get into more upright positions where we navigate gravity from more practical positions.


As explained from :00-1:05 in the video above, the Side Plank should be the foundation to our lateral stability training. Proper progression is key and making sure we are connecting the chains and driving down into the ground should require us to start from proper body position levels. Using the band isn’t to create a strong upper back as much as to tie in the lat-core-glute connection with the lateral chain of the body.

As explained from 1:06-2:17 in the video above, a half-kneeling position makes us navigate gravity and lateral stability. Using an alternating Kettlebell Press teaches us how to have a stable pelvis while we have to resist extension and lateral forces acting on the core.

As explained from 2:20-4:02 in the video above, The MAX (multiple axis) Sandbag Lunge challenges our ability to maintain the integrity of alignment and movement while we have to produce and resist force of the moving weight at the same time. This reactive core strength is one of the highest we can teach.
The Future of Core Training
The goal of the core training discussed in this article isn’t to exhaust the number or variety of exercises we can create. Rather it is to demonstrate an understanding of how real core training is essential in enhancing performance and helping injury resiliency. Coaches should understand that core is far more than “ab exercises” and what the goal of each form of core training emphasizes in the overall function and connection building in the body.
References:
- McGill S, ed. Designing Back Exercise: From Rehabilitation to Enhancing Performance (2nd ed). Champaign, IL: Human Kinetics, 2007
- Silfies SP, Ebaugh D. Pontillo M, Butowicz CM. “Critical review of the impact of core stability on upper extremity athletic inquiry and performance.” Brz J Phys Ther. 2015:19(5):360-8.
- Hodges, P.W. and Richardson, C.A. “Inefficient muscular stabilization of the lumbar spine associated with low back pain. A motor control evaluation of transversus abdominis.” Spine. 1996; 21: 2640–2650
Saturday 14.03.20
TELL SOMEONE WHAT THEY NEED TO HEAR, NOT WHAT THEY WANT TO HEAR
I go back and forth with this video. On one hand I agree with some of the aspects/comments. Whilst on the other I disagree. It would be interesting to hear your views on the video and the content and if you think that he’s right or wrong.
FORDY
50 Workout Excuses: Lame First World Reasons Not To Train Today
We all have those days, ya know, the ones where we can think of an infinitesimal amount of paltry excuses to not stick to our training regimen. Well, frankly, if you want to succeed at improving your body and health, you’ll have to overcome the habit of making excuses and get your bum in the gym!
In light of this, here’s a brief list of some rather lame first-world excuses you likely have stashed away in your cerebrum for those “bleh” days. Alas, since these excuses all suck (for lack of a better term), I’ve included sarcastic, witty responses to them, but don’t be fooled as they all contain some concealed truth.
50 Lame Excuses Not To Workout
1. “My diet has been off today, might as well just skip the gym.”
a. “I like your logic, two negatives equal a positive.”
2. “Crap, I forgot my iPhone at home! Welp, no gym for me today.”
a. “…Because heaven forbid you spend an hour away from your phone for once.”
3. “My insulin sensitivity sucks, I think I have dia-beet-iss.”
a. “Come on man, you can dia-beat-this.”
4. “Damn, all the benches are taken and it’s Monday (AKA National Chest Day). I’m outta here”
a. “You know, there are other muscles in the human body besides the pectorals.”
5. “I ran out of my pre-workout supplement today.”
a. “Yea, I wonder what they did back in the 1970s when pre-workouts didn’t exist?”
6. “I’ve been on my feet all day doing chores.”
a. “Perfectly valid excuse, vacuuming and doing laundry is taxing for the central nervous system.”
7. “Got a bit of a sniffle going on today, I think I’ll just lie around.”
a. “Oh I’m sorry to hear that, should I make you some chicken noodle soup…honey buns?”
8. “My car is in the shop, screw walking/running/biking to the gym.”
a. “Want me to call you a cab, you lazy bum?”
9. “Shoot, I forgot my intra-workout BCAAs; I’ll go catabolic if I lift now.”
a. “Good point, science and anecdotes both agree that’s what happens when you train without drinking BCAAs.”
10. “It’s leg day. Meh, who needs ‘em anyway?”
a. “Yea, I saw a guy doing squats the other day…what an idiot!”
11. “It’s the Sabbath day; God doesn’t want me to train today.”
a. “It’s the 11th commandment right? Thou shalt not hoist on Sundays?”
12. “Great! That bro is curling in the squat rack, how will I squat now?!”
a. “Go squat in that curl rack.”
13. “Somebody is squatting in the curl rack, how will I train biceps now!?”
a. “Finally, redemption for all the years of wasteful bicep curls spent in the squat rack.”
14. “I didn’t get much sleep last night.”
a. “Having those boogey man nightmares again?”
15. “I’m feeling constipated today.”
a. “Thus they invented Metamucil.”
16. “I’m too exhausted from watching the kids all day.”
a. “I believe it, watching kids run around is tough on the retinas.”
17. “There’s always tomorrow.”
a. “Not according to Apollo Creed.”

18. “I’m still hung over from the bar last night.”
a. “Come on brah, just pop some Tylenol.” (NOTE: Don’t do this!)
19. “I just got done with a long day at the office, not feeling the gym tonight.”
a. “True, the glutes do take a beating sitting at a desk all day.”
20. [Overweight individual] “Cardio is overrated…”
a. “…Yea, the cardiovascular system isn’t even that important to humans.”
21. [Underweight individual] “Resistance training is overrated…”
a. “…Go run a few more marathons and let me know how yoked you are afterwards.”
22. “I’m out of whey protein, how will I recover after lifting today?”
a. “I don’t know, whole food maybe?”
23. “I’m fasting today; don’t want to burn off my muscles as ‘fuel’.”
a. “At least you have a solid understanding of how the body works.”
24. “I hate my training routine; I’ll just sit and research for a better one instead of exercising today.”
a. “I heard the secret of many pro bodybuilders is their exceptional ability to search Google all day for the perfect training routine.”
25. “It’s been 7 days already and I haven’t noticed any changes in my body.”
a. “It is unfair that years, possibly decades, of gluttony can’t be undone overnight, isn’t it?”
26. “I don’t know how to perform [insert exercise] and I don’t feel like learning.”
a. “Just hire a trainer to learn it for you.”
27. “It’s too expensive to join a gym.”
a. “You’re reading this article on a device that would cover the cost of many years at a gym.”
28. “Exercising is hard.”
a. “And that’s why you’re soft.”
29. “I think I ate too much gluten this morning.”
a. “There seems to be an epidemic of subclinical Celiac disease spreading exclusively in the US.”
30. “My genetics/metabolism suck; I was just born to be fat.”
a. “Yea, you keep telling yourself that…”
31. “I just took a shower and don’t want to get all sweaty.”
a. “Order of operations in full effect.”
32. “I’ll just eat less today and skip the cardio.”
a. “Same difference anyway.”
33. “Starbucks is closed and I haven’t had any coffee.”
a. “One does have to wonder how people operate without caffeine?”
34. “My training partner is sick, what will I do for a spot?”
a. “I don’t know, ask somebody for one?”
35. “I only have time to train before work this afternoon, but I’d rather sleep in.”
a. “Don’t let the bed bugs bite.”
36. “I haven’t had any carbs today; I’m too irritable to train.”
a. “Well whose fault is that?”
37. “I don’t want to miss my primetime television shows.”
a. “I always wondered why the gym is so quiet in the evening.”
38. “My thumbs are too sore from playing Call of Duty all day.”
a. “Your K-to-D ratio is more important than your health anyway.”
39. “I got a flat tire on the way to the gym.”
a. “Oh shucks, you should have called me; my little sister could have helped you.”
40. “I was told not to workout after 7PM because it interferes with sleep.”
a. “Interesting, so are athletes all insomniacs or something?”
41. “I forgot my wrist straps, how will I deadlift?”
a. “Build some forearms, it won’t kill ya.”
42. “I already walked to the water fountain at work a couple times today, that’s plenty of cardio.”
a. “That is a tiresome 50-foot trek isn’t it?”
43. [Hot weather] “There’s no AC in the gym.”
a. “Your body has a built-in mechanism to keep you cool, it’s called sweating.”
44. [Cold weather] “There’s no heat in the gym.”
a. “I think that’s why long clothing exists.”
45. “My car is low on gas.”
a. “Hmmmmm, what to do?”
46. “I stubbed my toe this morning.”
a. “Here, let me grab some tampons for you…”
47. “I just had sex and will lose all my gains if I train right now.”
a. “Hasn’t this been debunked like a million times already?”
48. [Female] “If I train with heavy weights I’ll just get bulky.”
a. [Shaking my head]
49. “My personal trainer won’t be in the gym today and I need someone to talk to.”
a. “Bummer, it’s tough not to pay someone to talk to you while you lift.”
50. “The gym is closed.”
a. “Rocky IV…watch it and get back to me.”
https://www.muscleandstrength.com/articles/50-lame-workout-excuses
Friday 13.03.20
BECAUSE PRESS UPS AREN’T HARD ENOUGH
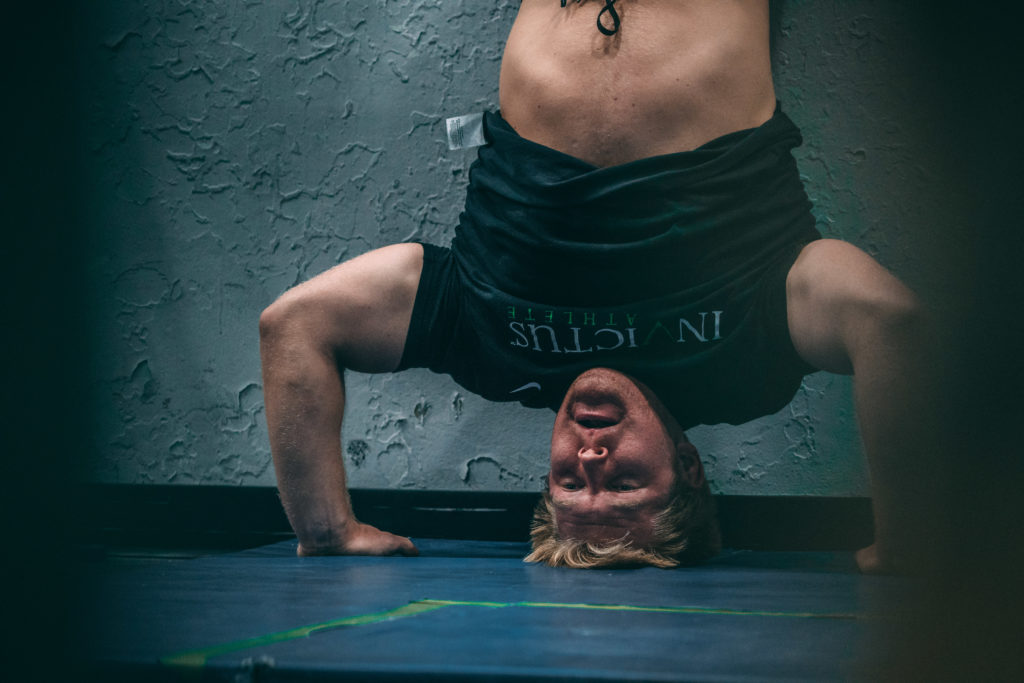
We’ve already looked at loads and loads of press ups and the variations. But there is one press up that most people find elusive, even some of the best athletes (and everyday athletes) really struggle with. Welcome ladies and gentlemen to the Hand Stand Push Up. Now, this isn’t for the faint hearted so lets be serious for a minute. DON’T try this unless you’re pretty comfortable upside down and you have some pretty good upper body (in particular shoulder) strength.
FORDY
Don’t Have Strict Handstand Pushups? Here’s the Plan…
Written by Nichole DeHart, Brittany Weiss & Michele Vieux
Do you have a hard time doing a proper handstand push-up? Just follow these tips from the coaches at Invictus Fitness to learn how to do them correctly.
Most of our readers would probably have thought, if asked about a year before they began CrossFit, that they would never do a handstand push-up, let alone even think about doing more than one! You’ve probably seen some athletes in the gym knocking out a few handstand push-ups, have seen athletes every year completing these at the CrossFit Games and saw Ryan Gosling (or at least his double) crank out effortless handstand push-ups in Crazy, Stupid Love. So, you might be asking, how can I attain a handstand push-up? Or, if you already have one, how can I improve my technique?
To start, let’s establish a few things you should have before you look to build your Handstand Push-Up (HSPU) prowess. First, you should be comfortable kicking into a handstand against the wall. Become comfortable with being upside down and maintaining a stable position. This stable position should look like the photo above…a straight, rigid line from wrists to ankles.
To obtain a good stable handstand push-up position, think about squeezing your butt and gut tight to maintain a firm midline. Once you have established this position, then you can move forward to the first training phase.
Why is the Strict Handstand Push-up so Important?
We are going to first work on developing a strict handstand push-up. There are many benefits to obtaining a strict handstand push-up. Not only are you making your shoulders stronger and more stable, but you are also forced to maintain a tight, braced midline/core throughout the movement. This piece transfers over to many other CrossFit movements where a strong midline is required to perform the movement efficiently.
Just like you wouldn’t want someone performing a ton of kipping pull-ups when they don’t have the strength to do one strict pull-up, we don’t want someone doing a ton of kipping handstand push-ups if they don’t have the strength to do a strict handstand push-up. The shoulder strength required to complete a handstand push-up is great, and some may not have that strength just yet. Have no fear, we have created a simple training program to help you build your upper body strength to reach the goal of obtaining a strict handstand push-up. With dedication, patience and hard work, you too can successfully attain a strict handstand push-up!
How to DO A Strict Handstand Push-Up:
- Hand placement: place hands about 6-12 inches away from the wall and slightly wider than shoulder width apart. Make sure palms are facing forward, or slightly turned out 5-10 degrees.
- Kick up into a handstand, with your heels touching the wall. If you have trouble kicking up into the handstand, try practicing this donkey kick drill.
- Once you have kicked up, establish a strong, rigid midline position. (see above photo)
- While maintaining this position, lower yourself until the top of your head touches the floor/mat. Try to keep your elbows at a 45 degree angle as you lower.
- Once your head touches the floor, press up with the same tightness you had lowering yourself, until your elbows reach full extension.
The 3 training phases for developing a strict HSPU is listed below. Follow this precisely and do not move onto the next training phase until you are able to complete all the reps and sets at the proper tempo.
First, the exercises:
HSUP Negatives: Kick up into your handstand position. Ensure that your hand placement is approximately 6-12 inches away from the wall and your midline/core is in a tight, stable position. Lower yourself at the assigned tempo until your head touches the floor. Kick off the wall and reset. Make sure to control the descent throughout the entire movement. The tempo should be the same from the start of the negative to the end of the negative. If you are hesitant about the distance you are traveling to the floor, then place an abmat underneath your head to lessen the distance of the descent. As you feel more confident with the negative, remove the abmat(s) until you are reaching the full range of motion.
Handstand Hold: Kick up into your handstand position. Hold for a specific amount of time, maintaining a neutral spine and stable midline/core. Once you feel yourself relax from that tight position, kick off the wall. You can also try a wall-facing hold, which is a little more challenging.
Handstand Push Up with Assist: This is best done with a partner. Have your partner hold onto your ankles. Lower yourself at the assigned tempo and press yourself up. The partner is there to help assist you as you press up, giving as much assistance as needed for you to press out of the handstand.
Wall Walks: Lay flat on the floor with your feet against the wall, hands by your side. Press up to the top of your push up position and take a big step up the wall. Take your other foot and step up the wall so that both feet are pressed into the wall. Ensure that you have a tight midline and, if a tight midline is established, walk your hands and feet up the wall until you make contact with your chest. Maintaining control, begin walking your hands out in front of you while simultaneously walking down the wall until your chest is on the floor. Common mistakes with this movement are generally lose of control on the way down from the wall walk and relaxing the midline. Only walk as far up the wall as your mechanics will allow. Increase the height of your wall climb as strength and mechanics improve.
Wall Runs: Wall runs are alternating, single-arm handstand holds and the time held with each arm can vary depending on the athlete’s ability. Wall runs can be performed facing either toward or away from the wall with the latter being the most difficult. Start in the handstand facing the wall. Keep your glutes and gut tight. You should be in a hollow position with your toes touching the wall, your wrists stacked below your shoulders and your shoulders packed tight into the joint. Slightly shift your weight to your right side and pick up your left hand. Your goal should be to touch your chest and put your hand back down on the ground with control. If you cannot maintain control, walk yourself away from the walk, even as far down as a plank or a pike. If you get to the point where you can easily perform 20 wall runs while facing the wall, you are ready to kick up into the handstand and face the world.

Training Phase 1
- Day 1 – Five Sets of: Handstand Push-Up Negatives x 5 reps @ 30A1; Rest 90 seconds
- Day 2: Four Sets of: Handstand Hold x Max Seconds; Rest 60-90 seconds
- Day 3: Five Sets of: Handstand Push-Up Negatives x 5 reps @ 30A1; Rest 90 seconds
Training Phase 2
- Day 1: Five Sets: Handstand Push-Up Negatives x 5 reps @ 40A1; Rest 90 seconds
- Day 2: Five Sets: Wall Climbs x 3 reps; Rest 90 seconds
- Day 3: Five Sets of: Handstand Push-Up Negatives w/partner assist x 5 reps @ 40A1
Training Phase 3
- Day 1: Five Sets of: Handstand Push-Up Negatives x 5 reps @ 50A1; Rest 90 seconds
- Day 2: Four Sets of: Wall Runs x 5-6 reps; Rest as needed
- Day 3: Five Sets of: Handstand Push-Ups w/partner assist x 5 reps @ 50A1
Be patient with yourself as you work towards your goal of a handstand push-up, and stay consistent on this program!
How to Modify the Handstand Push-up in Workouts
Bottom line, this is a movement you either have or you don’t. The only way to get them is modifying in ways that are putting you in a strict motion, instead of just always reverting to kipping as a scaling option when they come up in workouts.
Here are some modifications you can incorporate in your training/workouts to help build the strength and muscle endurance to start knocking these out like a champ.
HSPU Negatives: Kick up into your handstand position. Ensure that your hand placement is approximately 6-12 inches away from the wall and your midline/core is in a tight, stable position. Lower yourself at the assigned tempo until your head touches the floor. Kick off the wall and reset. Make sure to control the descent throughout the entire movement. The tempo should be the same from the start of the negative to the end of the negative. If you are hesitant about the distance you are traveling to the floor, then place an abmat underneath your head to lessen the distance of the descent. As you feel more confident with the negative, remove the abmat(s) until you are reaching the full range of motion.
When to use them: Since we are working on a slow and controlled tempo with negatives, they are best NOT used in workouts for “time” rather in gymnastics skill sessions or if HSPU come up in the strength part (usually Part A) of the workout. You might need to start by scaling the number of reps by half, or even more, until you can accumulate longer time under tension and a higher number of reps per set. A goal is HSPU Negatives x 5 @ 51A1 tempo. So that’s a 5-second negative descent; touch your head to the ground for 1 second while maintaining control and not dropping to the head; (A)ssist up which will be either a kick up or a partner assist; and a 1-second hold in the handstand position, maintaining control.
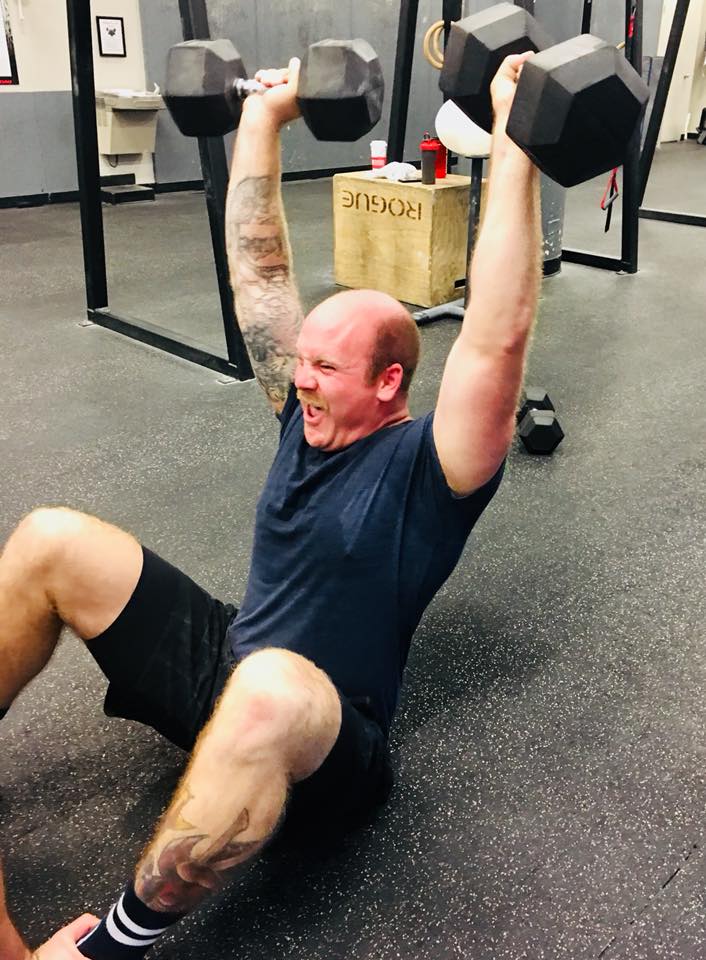
Seated Dumbbell or Barbell Press: Sit yourself down in a “L” position. Your legs should be straight, chest proud, and back is flat. Place the dumbbells in each hand with the top of the bell on the shoulder and palms facing each other. If you are using a barbell, take the same seated position but hold a barbell in a front rack position. From here you fill your belly with air and engage your midline then begin to press. Your finishing position should be arms locked out overhead with bicep by the ear. If mobility is an issue try placing a 25-45lb plate underneath your butt. This will help you find more of a neutral position of you are tight in your hamstrings, hips, T-spine, etc. You can even play around with doing the barbell press with the hands out front – the same position they would be in at the bottom of the HSPU.
When to use them: This modification is great for both strength AND conditioning workouts because they can safely be done at tempo and for speed without getting too sloppy. Either way, pick a weight that you can do for the prescribed number of reps. When deciding how much weight to use, think about a fairly high-level athlete and how many HSPU they might be able to knock out in a row for the workout (usually anywhere from 5-15 reps for most top level athletes in a group coaching class). Pick a weight that allows you to do sets with that number of reps. For example, if the workout calls for 15 HSPU, pick a DB weight that will allow you to do 3 sets of 5 reps with you just squeezing out that 5th rep which will look similar to what someone doing that number of HSPU is doing.
Pike HSPU/ Box HSPU: Place your body in a pike position either with your feet on the floor or with your feet on top of a box. The closer your hands are to your feet the more challenging it is going to be and the further they are away the easier it will feel. As you go for your HSPU, think about creating a tripod position. Your head should land in front of the fingertips which creates a triangle in the bottom. Keeping your elbows in and not letting them flare out, you will then press your head off the floor, drive your head through your shoulders finishing with the chest and head through at the top of the rep. You can modify this even further by putting your knees on the boxinstead of your feet.
When to use them: This is another modification that is great for both strength AND conditioning workouts. Just take caution when doing it for “time” so that you don’t get sloppy and fall off your box. Another thing that tends to happen when doing this modification for time is that the reps start to look more like a decline push-up rather than a HSPU. If you get partway through your workout and find that you are struggling to maintain the upside down “overhead” position, then switch to the seated press for the rest of the workout.
Place A Mat Underneath Your Head: Placing a mat underneath your head to shorten your range of motion is always an option. That being said, if you are using a mat that is only allowing your elbows to move an inch, consider choosing a different modification option from above that is going to let you achieve more range of motion. The goal here is to continue decreasing the height of the mat, over time, until you can lower your head to the floor with control.
When to use them: This modification can be mixed in at times, but shouldn’t be your go-to due it not allowing you to train the full range of motion for the HSPU. If you just want to practice lowering yourself in a negative and you can’t quite make it all the way down with control, this is a good option for you to use in the strength portion of the workout. Or, if you can lower all the way with control but can’t quite press out of the bottom, this will give you that stimulus while taking out some of the difficult range of motion. Please note though, you are TAKING OUT range of motion which means you are not getting stronger in that area which is why you should mostly focus on other modifications and use this as more of a test to see how close you are to performing HSPU with full ROM. That way, you set yourself up for success instead of injury.
The more confident you feel upside-down, the easier high volume handstand push-ups will feel as long as you have the strength. If being upside-down is something you struggle with try incorporating more handstand work in your everyday training. All of the above options will help your transition in being upside down for long periods of time easier.
Thursday 12.03.20
DON’T TRY THIS AT HOME
The video shows just how good you can get when it comes to press ups. I think whoever you are you will find this pretty impressive, in fact, I’m pretty sure that if you went to the gym and started busting out half of these press ups in the middle of the gym you would get a lot of admiring looks. I think people look at squatting a huge weight and think its impossible and so therefore impressive, but they look at body weight as being easy. Well, I’m pretty sure that there are not to many people that could manipulate their body like this guy can.
But as the title says, this kind of thing is pretty advanced so please don’t try some of the movements in the video until you have a pretty good grasp of the basics. But if any of you can do them, then you have to send in a video as we’d be all over it.
FORDY
The Best Push Up Workout For Chest Gains
As one of the most common chest exercises for men and women, push-ups have become synonymous with working out. For serious athletes, they’re a benchmark of fitness.
If you can’t do them, you’re falling behind – so get training.
Being able to perform a certain amount is the entry standard for various military and sport programs. Most gym users can do repetitions of normal press ups easily. Clearly, an extra challenge is needed.
Luckily, the standard push-up (also called a press-up) can be adapted in lots of ways, creating intense chest-boosting workouts that are not for the faint hearted.
What Muscles Do Push-Ups Work?
The standard push-up targets the following muscles:
- Pectoralis
- Abdominals
- Serratus anterior
- Triceps brachii
- Brachialis
- Deltoid
However, the adaptions we’ll be discussing target all kinds of muscle groups to give you a punishing all over workout.
The Best Push-Up Workout Possible
Build a powerful upper body with a press-up routine that takes you out of the ordinary and launches you into the ranks of beast. Even the toughest athletes will struggle with some of these variations.
It’s time to embrace the challenge and increase your pushing power with these eight press-up progressions.
Push Up Technique
You can make big improvements to your push-ups by having the best practice technique.
- Place your hands shoulder-width apart.
- Bend your arms lowering your chest to the floor but keeping your body straight.
- Once your chest is near to the floor.
- Push yourself back to the start position.
<
Wide-Arm Press-Ups
Build a strong back and chest by placing your grip as wide as possible and performing reps. Adding additional strain to the standard press-up, this exercise targets the outer pectoral.
Close Grip Push-Ups
Turn your hands slightly inwards, place them together so your thumbs and forefingers form a triangle. Perform a press-up with your arms tucked. This focuses on the inner pectoral and tricep.
Weighted Push-Ups
With either a weighted vest or a weights plate placed on your upper back, you can add a huge amount of resistance to your standard press up. Adding resistance causes more muscle recruitment and more micro-tears, helping to build more mass as a result.
Resistance Band Push-Ups
Get a resistance band, hold the handles in each hand with the strap looped over your back and perform push-ups. This will create tension that forces you to control each rep.
Plyometric Push-Ups
A simple but rewarding way to add resistance to your push-up is to perform plyometric push ups. Explode upwards on your press so your hands leave the floor. Perform a clap to measure how far off the floor you get.
Dropping Push-Ups
Place two objects (usually a small workout step, but can be replaced with books) that can take your weight on each side of you, then perform the downwards portion of a push up on them.
Drop your hands in the middle, to the floor, and then press up and ‘jump’ back up to the objects with your hands.
One arm push-ups
For the true mavericks amongst you, the one arm press- up is a terrific way to build mass in the arms and chest and also prove your strength. Place your feet wider than normal and keep your elbows close to your body.
Handstand Push-Up
The ‘elite’ variation of the push-up, handstand press-ups can first be trained against a wall. They’re amazing for shoulder strength and building your chest, arms and wrists. Perform them by kicking up into a handstand and resting your feet against a wall, then press down so your head is almost touching the floor before pressing back up.
Once you’ve trained against a wall, you can experiment with free standing handstand press ups by learning to balance. If you’re overbalancing with your feet falling forward, dig in with your fingers. When under balancing, back towards your feet, you’ll need to dig in with the ‘heel’ of your hand.
Push Up Workout Routine
To fit these variations in, build a routine that incorporates three or four of the exercises at a time. Include them in your barbell and dumb-bell chest workouts as a finisher or dedicate a session to them.
Example ‘A’ day:
- 3 x 20 Plyometric push up
- 3 x 6 Dumbbell bench press
- 3 x 10 Wide grip push ups
- 3 x 10 close grip push ups
Example ‘B’ day:
- 3 x 6 barbell bench press
- 3 x 6 dropping push ups
- 3 x 10 one arm press ups (5 on each side)
- 3 x 5 handstand press ups
https://www.maximuscle.com/training/body-parts/The-Best-Push-Up-Workout-for-Chest-Gains/
Wednesday 11.03.20
INVERTED ROW
Balance is the key to your training, and with so much work on the anterior (front) doing press ups, we need to make sure that we don’t neglect the posterior (rear). We don’t want to affect our posture and so lets have a look at the inverted row, pretty much regarded as the reverse press up.
FORDY
Tuesday 10.03.20
I GOT THE POWER
Plyometrics and power go hand in hand, and the more powerful you are the better you should be at your press ups. So with that in mind, lets have a look at how we can achieve power in terms of our press ups.
FORDY

Push ups have been around for ages, and are a widely embraced movement to test upper body strength and fitness. Plyometric training has been shown to offer some amazing benefits (discussed below), yet are typically done with lower body training only.
While plyometric push-ups are mainly seen in ego-driven push up contest, they do actually serve a physiological and strength and power performance purpose…and here’s why.
Muscles Worked
The below muscle groups are the same ones targeted when performing standard push ups, however physiological and neurological adaptations due to the plyometric nature of this exercise lead to different contraction speeds, force outputs, and more (see below).
- Pectorals
- Triceps
- Anterior Shoulder (Delts)
- Scapular Stabilizers (Rhomboids, Rear Delts)
- Abdominals
- Obliques
Plyometric Push Up Prerequisites
Like any plyometric movement, muscle coordination, proper joint mechanics, and absorption capacities are key to increase muscle force outputs and preventing injury. Plyometric training works to increase the ability of the muscle fibers to fire in succession, at high velocities, over and over again. The summation of those impulses results in greater forces being absorbed and exploited by the body, therefore increasing joint, tendon, ligament, and muscle stress (all good, unless you have bad force or cannot handle that much stress).
Plyometric Push Up Exercise Demo
Plyometric push ups can be done with a wide variety of arm movement (clapping, touching in front of body, etc), however they key emphasis is explosive pressing into the group, elevation, and coordinated absorption by the body to absorb force as the lifters hands return to the ground and instantly go into another plyometric push up. Any other hand movements and gestures are for show or to simply increase the amount of power needed to perform the hand movement (generally, clapping push ups require greater force outputs than standard non-clapping push ups due to a lifter needing more time in the air). The below video is a generalized exercise demo of the plyometric push up.
Plyometric Push Up Benefits
Below are some of the key benefits one can expect from performing plyometric push ups, many of which are specifically inherent to the plyometric training aspect. It goes without saying that the muscles worked in the standard push up are targeted here, just to a higher degree (specifically for the physiological adaptations below).
Increased Rate of Force Production
Plyometric exercises force the muscle units to contract at faster rates in order to promote enough force to propel the body into space (off the floor). This fast twist muscular response occurs at the motor unit level by nervous system adaptations. The benefit of developing this capacity is that the body will then learn to promote force more explosively, which can benefit even slow speed movements (such as 1RM bench presses).
Increased Motor Unit Recruitment
When we perform a certain exercises or movement tasks, many of our muscle units are firing, however some take a more preference to particular movements. If you fail to train explosively using plyometrics and other high velocity based movements, you could be missing out on increasing the innervation of extremely fast twitch muscle fiber types, which do not get called into action as much as slower fibers. By performing more plyometric movements for the upper body you can get similar benefits as if you were to perform jump squats and lower body plyometrics, resulting in a very explosive athlete.
Enhanced Pressing Performance
Increased rate of force development and motor unit firing patterns will often result in increased force outputs as a whole. For most movements the ability to press faster, and use more muscle fibers, will result in heavier lifts all around, and the ability to break through sticking points in a lift (provided the specific angles at which those occur are specifically targeted).
Shoulder and Pectoral Injury Prevention
When performing plyometrics we often think of the cool tricks we can do and how it will help us jump higher, punch harder, or move weights more explosively. Often forgotten is the impact it has on joint and connective tissue health and motor movement patterning at high speeds. Increased stress placed upon these joints and tissues during explosive movements and sports must be met with adaptation processes brought about through specialized training exercises (such as this one).
Monday 09.03.20
BEN GREENFIELD
I want to introduce you to Mr. Ben Greenfield. I think he is one of, if not the most fascinating men on the planet. Don’t get me wrong, he does a lot of questionable things to his body (for science) which I’m not sure we could all do, BUT, I think we could all take a lot from his learnings. The video is LOOOOONNNNGG but so worth it and his podcast is great to. Like I say, he’s not everyones cup of tea but if he can add an extra few years to your life then I’m all in.
FORDY
Biohacking Your Ancestral Lifestyle, with Ben Greenfield
Trying to balance ancestral health with your modern lifestyle can be challenging, but that’s where biohacking comes in. In this episode of Revolution Health Radio, I talk with health performance expert Ben Greenfield about the best ways to use technology to enhance your health and support your ancestral lifestyle.

Page Contents: [hide]
In this episode, we discuss:
- What brought Ben to exercise science
- Ancestral living and biohacking
- The top four biohacks for ancestral living
- What ancestral fitness looks like
- How to track and improve your sleep
- Boosting your cognitive performance
- Ben’s upcoming book
Show notes:
- Ben Greenfield Fitness
- “Deep Sleep Decoded: Everything You Need to Know to Increase Your Deep Sleep Percentages,” by Ben Greenfield

Hey, everybody, welcome to Revolution Health Radio. I’m Chris Kresser. This week I’m going to be interviewing Ben Greenfield, a biohacker, health performance and longevity coach, ex-bodybuilder, 13-time Ironman triathlete, professional Spartan competitor, speaker, and author of the New York Times best-seller Beyond Training: Mastering Endurance, Health & Life.
So we’re going to be talking with Ben about the intersection of biohacking and the ancestral lifestyle and diet. And some simple strategies and maybe some not so simple strategies that you can apply to mimic the ancestral pattern by using current technologies. So hope you enjoy the interview. Let’s dive in.
Chris Kresser: Ben, welcome to the show. Pleasure to have you.
Ben Greenfield: Hi, Chris. It’s good to be here.
What Brought Ben to Exercise Science
Chris Kresser: So, I always like to start with a backstory. We all, I’ve found in this field of ours, have a path that got us here to why we chose to get into this type of work in the first place. So, I’d love to hear more about what brought you to this type of work.
Ben Greenfield: I got dropped off by an alien spaceship and found myself shuttled into an exercise science lab.
Chris Kresser: I’m halfway believing that.
Ben Greenfield: I know. There are many who would believe that with the crazy laser lights I’m seeing on social media wearing on my head and tubes and needles coming out of my arms. I have always loved fitness and nature and the outdoors. I grew up, I was homeschooled in Idaho. And so I would generally finish schooling by about 11 a.m. and just play outside the rest of the day hiking and catching rattlesnakes and making forts and digging holes and finding plants and even messing around with cooking a little bit, which I love to do now. And it’s a topic relevant to my heart because I just gave my boys—my twin boys, where I can see them out my window, they’re playing outside right now with their friends—and I just gave them the option to drop out of sixth grade, which would normally begin next year, and start homeschooling.
And so they’ll kind of follow a similar path as I had when I was a boy. And I really wasn’t that interested in exercise science or anything of the nature until I discovered the sport of tennis. My parents really wanted to build kind of a cool place for the kids to grow up, and we wound up laying asphalt for a tennis court. And my dad and I painted lines and put up a tennis net, and they hired an instructor, and I began to play tennis and just really loved that sport. And I started to delve into ways I could make myself better at tennis.
Up until that point, I was very much into reading and writing fantasy fiction, and I was president of our local chess club and played a lot of World of Warcraft. And I took apart computers and really wanted to be a computer programmer and design video games. That was my dream.
Chris Kresser: Right, right.
Ben Greenfield: And I began to run up the hills back behind the house and my dad brought me down to the sporting goods store and bought me my first little pair of 10-pound dumbbells that I didn’t have any clue how to use. I remember my first exercise. I’d lay on my stomach on my bed and do dumbbell curls. And that seemed to work to make my arms stronger.
Chris Kresser: No YouTube yet at this point.
Are you struggling to get enough sleep, spend time outdoors, or follow other aspects of ancestral health? Biohacking could help. Check out this episode of RHR for the best ways to biohack your lifestyle. #optimalhealth #wellness #chriskresser
Ben Greenfield: Yeah, there was no YouTube, nothing like that. I had a little TV in my room and that was about it. And I even wound up purchasing one of those as-seen-on-TV exercise devices at one point, this old-school ab device that you’d put up against your abs. Kind of an isometric crunch against, which actually is kind of a good idea and it worked. My forays to the library in Lewiston, Idaho, kind of progressed from me grabbing Arthur Conan Doyle and Grimm’s fairy tales and all these fiction books I’d voraciously buy and bring home to Tudor Bompa’s book on periodization and all manner of different exercise physiology and exercise manuals. And I kind of began to collect equipment and build my own little home gym.
I met a few mentors along the way—the Washington state powerlifting champion, who was a friend of my father’s, and he kind of taught me a few moves. And then my brother’s best friend was a professional bodybuilder, and he taught me a lot of things, too, about caring for my body and recovery. And eventually I decided I wanted to study exercise science. So I attended University of Idaho and got a degree in kinesiology, which is basically just glorified PE.
And along the way, I actually got very interested in medicine too. And so I took all the pre-med curriculum and worked my way up through microbiology and biochemistry and o-chem, and I even took the MCATs and got accepted to a few different medical schools. But I opted to stay in school and get a master’s degree in exercise science and kind of study human nutrition and pharmacology and biomechanics at a graduate level and wound up not attending medical school.
I kind of saw dollar signs and got offered a job in hip and knee surgical sales, so I took that up with the idea that I’d work in the private sector for a little while and then go to medical school after I had gotten some money and maybe traveled the world a little bit. And I wound up becoming very dis-infatuated, actually, with medicine during my six months at that company, which was a biomet. Spent a lot of time shadowing orthopedic surgeons. And up until that point, I’d spent a lot of time in ERs and things like that, kind of preparing myself for medical school.
But, really, just being with doctors all day long and seeing that none of them seemed to enjoy their jobs that much. And at that point, I wasn’t that aware of alternative medicine or naturopathic medicine or other alternatives. But nobody told me that it was a good idea to go to medical school, and frankly they all, despite having big cars and houses and boats, seemed kind of displeased with life and didn’t seem to have much time to spend with their families or playing with their toys.
So I really made a decision that I didn’t want to be a doctor at that point. And after I quit that job, which I did do, I just quit it. I didn’t enjoy standing around in scrubs pointing a laser pointer at overpriced hips being put into obese patients who probably could’ve been managed via other methods prior to overpriced knee or hip replacement. I wandered across the street to the gym, which was next to the apartment that I was living in, and asked for a job and kind of slapped my resume down on the front desk. And at that point, I was already a certified personal trainer and a nutritionist, and I’d worked for four years as a trainer, kind of moonlighting during my college career. And I even had the privilege of being able to manage the wellness program at University of Idaho. So I’d done a lot up to that point.
So they gave me the job of fitness manager, and so almost immediately, I kind of had a full plate of clients to train and spent a couple years working at that facility. And then I eventually met a sports medicine doctor there named P. Z. Pearce, who was the head doctor for Ironman, which was kind of cool for me because I was really getting into Ironman triathlon at the time.
Up until that point, I’d been very immersed in bodybuilding and also played collegiate tennis. So I was, like, a power strength athlete and was really, really getting into endurance sports. And already doing triathlons and had done my first Ironman triathlon. And he presented to me this idea of, like, a one-stop shop for sports medicine where we would have physical therapists and massage therapists, chiropractic docs, a whole suite of medical professionals, and I would manage the sports performance laboratory doing exercise physiology tests on athletes and high-speed video camera analysis of gait and do bike fits. And also continue to train folks, as I had been doing as a personal trainer, and kind of be the nutritionist for the facility as well. And so we launched that facility about a year later.
I partnered up with him, and we launched that facility, called Champion Sports Medicine, in Spokane, Washington. And I operated that facility for five years and did very well. I actually used all of the materials from the exercise medicine initiative and partnered up with a lot of local docs, and they would send their patients over to our facility, and we were kind of the people to go to when nothing else was working for weight loss or even for sports performance. Because we had all this pretty cool equipment you wouldn’t find in a normal gym, like the high-speed camera, indirect calorimetry equipment, VO2 max. We had one of the first PRP machines, and so we were doing injections into joints and just a lot of kind of cool, cutting-edge stuff, or what was cutting edge 10 years ago.
And so I did that for a while, and a couple of the docs actually nominated me for the National Strength and Conditioning Association’s Personal Trainer of the Year Award. And I actually received that. And so I was named as … basically, it’s kind of like being named America’s top personal trainer. And that kind of thrust me into the limelight, and I started getting calls from ACE and the ACSM and NSCA and all these different fitness organizations that wanted me to come speak at their locations on how to operate a profitable business, a profitable brick-and-mortar, gym-based business. And so I started to travel and kind of get on the speaking circuit. And around that time I’d also launched a health podcast and kind of started my own little blog and newsletter, and I was dabbling online kind of using what I’d learned in computer programming back in my early days to code my own websites and design a newsletter form, and I was just basically doing it all myself.
And I remember I was sitting at one of these conferences I was speaking at, and somebody got up and started to talk about the online industry. Selling information products online and making PDFs and affiliate marketing and all of the stuff that was completely new to me. And at the time, I remember I was sitting at this conference with my wife, who was pregnant with our twin boys at the time, and I thought, “Well, geez, if I could do a lot of this, take a lot of this, this IP and studying that I’m doing and kind of put it out there on the internet and begin to operate a business that way, that would be a cool way for me to be at home with my family, spend more time with my kids.
And so I spent about six months working on a triathlon training product. It was called The Triathlon Dominator, and it was my idea to take what I was doing at the time, which was training for the Ironman triathlon with a minimalist approach, a lot of high-intensity interval training and weight training and plyometrics versus the traditional beat-you-into-the-ground, four-hour-a-day endurance training protocols that were and still are very popular among the endurance crowd. And I kind of put together this package that allowed people to train for an Ironman without neglecting their family or their friends or their career, their other hobbies. And I launched this program and it was very successful. And I made, like, $50,000 over the course of a week just selling this program online to triathletes, triathlon coaches, and triathlon clubs, and it worked out so well. I thought, “Well, geez, I—”
Chris Kresser: This, yeah. This probably could be a thing.
Ben Greenfield: Yeah, I mean, I was doing well as a personal trainer. I was making six figures-plus a year as a trainer, but I was also working my ass off. I’d show up at the gym at 5 a.m. and I’d get home at, like, 9 p.m. And that wasn’t really sustainable to family life. And I certainly could’ve just hired a bunch of employees and kind of outsourced a lot of the work, but I instead opted to kind of fire all my clients or move them on to other trainers, and I stepped down from my position at Champion Sports Medicine and began to do largely what I do now—podcasting, writing articles, and doing books.
Chris Kresser: Nice.
Ben Greenfield: That’s kind of what I do now.
Chris Kresser: That’s quite a journey. Thanks for laying that all out. It’s always fascinating to me to see where people came from and how they ended up where they are.
Ancestral Living and Biohacking
Chris Kresser: So, I want to dive in a little bit to some of the topics that I want to explore with you, and one is ancestral living versus biohacking. And the way I said that almost makes it sound like those are diametrically opposed, which I don’t necessarily think is true. But we might think of it kind of as a spectrum, and some people perhaps are very interested in biohacking and not so much in ancestral living. Others are really interested in ancestral living and not so much in biohacking. I’d probably put myself closer to that end of the spectrum. And then others are very interested in both. So where would you put yourself on that spectrum, and how do you identify in both of those categories?
Ben Greenfield: Yeah, biohacking, I kind of grit my teeth on that word a little bit nowadays because it’s gotten a bit silly. People, whatever, jumping on trampolines and wearing their training masks and shining laser lights on their balls all at the same time or using their vibration platform to get six-pack abs. Or whatever the case may be.
Chris Kresser: Right.
Ben Greenfield: And I think that term has been bastardized, to a certain extent. I simply view biohacking as using technology to a certain extent to enhance biology or even to simulate what ancestral living can give us. For example, like I mentioned, I’m looking out the window of my office at my kids playing outside in the sunshine, and I’m in here blogging and podcasting and doing what I do during the day. And so, to a certain extent, I find ways to simulate some of this ancestral living. Like, I use these photobiomodulation panels in my office to get near infrared light that I am not getting from the sunlight during the day because I’m indoors.
Chris Kresser: Yeah.
Ben Greenfield: Or when I’m traveling and I know I have access to the Spokane River, this ice-cold river I can go and jump into near my home. When I’m at home I will go into a cryotherapy chamber and do a quick burst of cold. Or I sleep on a grounding mat to simulate, I just got back from a weeklong hunting trip on an island in Hawaii. And I’ve spent the past week just sleeping on the ground on the beach. No sleeping pad or anything. My sleeping bag in the sand and slept wonderfully. As I know a lot of people do in our sector, I wear, like, a self-quantification device to quantify my sleep, and sleep scores were just amazing, just sleeping outside on the ground, especially deep sleep, at levels of 20 to 25 percent, and I can simulate that at home by using essentially pulsed electromagnetic field therapy, or PMF, on my bed. And I would consider that to be a biohack as well.
Or doing something like instead of going outdoors in the afternoon heat and sweating to upregulate heat shock proteins or to induce more nitric oxide, I’ll get into an infrared sauna in the mornings a lot of times and do my sweating that way. And so there are so many examples of ancestral living, many of them based on hormesis, right?
Chris Kresser: Yeah.
Ben Greenfield: Like,, some radiation and cold exposure and heat exposure and the low-level radiation that we get when we’re outdoors barefoot or sleeping on the ground. And you can simulate a lot of those hormetic stressors or other effects that we would get from being outdoors or living ancestrally by using a lot of these biohacks. Because we do live in a postindustrial era where it can be difficult in many cases to tap into a lot of these things outdoors or simply relegate it to being indoors because of the lifestyle that we’ve chosen.
Chris Kresser: Absolutely. Yeah, I mean, it sounds like you’re interested in using technology or biohacking of using technology to kind of get some of the benefits of an ancestral lifestyle that are difficult to obtain in our modern lifestyle.
Ben Greenfield: Right. And I think you always need to have a base foundation. Like, stem cells are very popular right now. Going out and getting the adipose tissue extracted from your fat or the marrow pulled from your bone and have your stem cells concentrated and reinjected. Or we’re using things like exosomes or amniotic or umbilical or placental cells to do the same thing. But I don’t think anybody has any business spending $5,000 or $8,000 or $10,000, doing one of those procedures before they’ve adopted more simplistic methods of enhancing stem cell health. Probably the biggest elephant in the room in that respect being fasting.
Chris Kresser: Yeah.
Ben Greenfield: And so, there are so many things that we can accomplish getting out in the sunshine, fasting, going on a walk in cold weather, etc., that we should be adopting as lifestyle habits before we begin to hop onto Amazon and order a light panel or buy a membership to a cryotherapy facility.
The Top Four Biohacks for Ancestral Living
Chris Kresser: Right. And even those might come before stem cell treatment. But I agree with you a hundred percent. There’s so many things we can do just with our diet and our lifestyle and making even relatively small turns of the dial that can have a really big impact on our overall health.
So, with that in mind, what are those, the, let’s say, three or four top tweaks of the dial, so to speak? You mentioned fasting. We’ve talked a lot about fasting on the show. We can go into that. But if you were to just pick three or four of these biohacks that get us closer to emulate the effects of a truly ancestral lifestyle, what would those be?
Ben Greenfield: Yeah, I’d say a lot of them would be based on things that would enhance the health of the mitochondria or have some type of a hormetic effect. Enhance autophagy, for example. I would say the biggies that come to mind would be cold and heat. Some form of earthing or grounding. Some type of way to simulate what we’d get if we were drinking natural spring water rich in minerals. And then some form of light, like in the form of near-infrared light or the light spectrum that we get from the sun. So using that type of logic, you could say some of the best biohacks, so to speak, would be like an infrared and cold tub set up, which I know is becoming very popular nowadays, and I certainly like that idea. I have an infrared sauna and a cold pool. And going back and forth between those two, I absolutely consider that to be an essential part of my week. I’m doing that almost every day. So cold and heat would be two.
The light, like I mentioned, getting some type of a red-light panel that you can use, like a near-infrared light panel. And then for the grounding or the earthing, some type of grounding mat or earthing mat or pulsed electromagnetic field unit, which would simulate what you’d get if you were walking outdoors barefoot or sleeping outside. And then for the water piece, there’s a lot of different ways to hack your water, so to speak. But what I do is I have a well here. I live on about 10 acres of forested land up in Washington and we’re pretty off grid. But I have a well, and even after the water’s passed from the well up through the pipes and gone through a couple of filters that I have—because people think well water is pristine, but, for example, I have very high levels of manganese and iron in my well water. So the water passes through a manganese and an iron filter, and by the time it gets into my home, it’s been somewhat bastardized from its original underground spring. And so it passes through a structured water filter, which kind of creates something a little bit like the easy water that Dr. Gerald Pollack has made popular in his book The Fourth Phase of Water, the University of Washington researcher.
And so I think drinking some form of structured water or hydrogen-rich water, preferably enriched with minerals, or supplementing that with some type of mineral intake or sea salt intake would be another good move. And once you’ve done that, you’ve kind of got your cold, your heat, your light, your earthing, your grounding, your water, your minerals, and I would say that those would all be very good places to start if you were going to kind of outfit your home with some basic biohacks.
What Ancestral Fitness Looks Like
Chris Kresser: Yeah. Yeah, that makes sense, and I like the way you framed that in terms of the elements that are important in an ancestral environment. I want to shift and talk a little bit about fitness. That’s a huge part of your background, where you came from, and still you’re focused today, I know. And I haven’t had a lot of people on the show, a lot of experts in fitness on the show, so I want to take advantage of that and pick your brain a little bit.
What are, from your perspective, some of the biggest fitness and performance mistakes that you see people making today?
Ben Greenfield: Well, I mean, if you look at, for example, the blue zones where you have a disproportionately high number of people living a long period of time and having relatively good health span during that time as well, you don’t see a lot of structured exercise. You see a lot of low-level physical activity, typically outdoors in nature. As our friend Mark Sisson would say, kind of moving and then lifting heavy objects like rocks or pushing wheelbarrows or building fences or gardening or things like that during the day. And then occasionally sprinting, whether that be a pick-up game of soccer or tennis or in some cases, some hunter–gatherer societies, or even what I experienced during my recent hunt in Hawaii, those brief forays where your heart rate is very high. You’re racing to the top of a hill because the herd of wild goats or sheep or deer or whatever you might happen to be hunting has disappeared over the other side and you have to do a very fast stalk. And so you’re moving very quickly and so you’ve got this interval-based training worked in throughout the day as well.
And so you don’t see CrossFit boxes everywhere or this idea that in order to feel good about having exercised at the end of the day, you must have suffered in the gym for 30 or 45 or 60 minutes. And in fact we do know, based on research, that once you exceed about 60 minutes of intense exercise or even 90 minutes of the typical aerobic exercise that a triathlete or a marathoner or a cyclist or swimmer would be doing, kind of not aerobic exercise like walking, but kind of that mid-level aerobic exercise where it’s burning a little bit and you’re suffering just slightly, we know that once you exceed 60 minutes of the former, 90 minutes of the latter, your risk of mortality actually increases. And so we’re kind of in this situation where people are often sitting down for long periods of time during the day doing a hard workout at the beginning or the end of the day or both, and that’s how exercise is viewed, as this thing that’s separate from just life, versus incorporating low-level physical activity during the day.
You and I had the video on just before we started recording, and you probably saw me on my treadmill. And I’ll typically walk at a very, very low pace, whether I’m dictating emails or dictating an article or speaking on a podcast like this or doing a consult. I save all my phone calls for between 4 and 6 p.m. in the afternoon and duck up to a farm road back behind the house and walk more. And so by the end of the day I’ll typically walk a good five to seven miles. Low-level physical activity during my day that doesn’t involve me going to the YMCA or a 24-hour fitness and getting on the treadmill.
Chris Kresser: Yep.
Ben Greenfield: In addition to that, I have in the room next door to the office here, a hex bar that’s loaded up with weights. And I’ll just drop into there every once in while kind of in between calls or during my Pomodoro breaks and I’ll just lift the hex bar five to ten times. I have a kettlebell on the floor of my office, and same thing. During some of my breaks, I’ll stop and I’ll do 30 kettlebell swings to get my heart rate up and simulate that intense interval training. When I go to check the mail, we have about a quarter-mile long driveway. So, I’ll walk down to the mailbox but then I’ll, assuming no one’s delivered an enormous package, in which case I’m walking up the driveway, I’ll sprint up the driveway kind of clutching the mail to my chest.
And so, my kind of rule and what I encourage people to do is to change your environment, especially your working environment or your lifestyle environment to the extent where you’re engaged in low-level physical activity during the day, you’ve got a few things that you can lift or swing, or I especially like the idea of—I believe the technical term is brachiating—but hanging. Like, having a pull-up bar installed on the door or your office or in the kitchen so that you can hang. And I have a yoga trapeze in the living room and a pull-up bar in the office and a rope hanging outside the tree that’s near the front door. And so I have these objects I can hang from and climb on and pull from as well. So, by the end of the day, exercising, in the way that we tend to think of exercise, is this packaged hard-core exercise session as an option, not a necessity.
And of course I should clarify that if you have chosen to do, let’s say, a Spartan race or a CrossFit competition or a figure competition or some type of what we would probably consider to be an unnatural form of physical activity, but maybe that scratches your itch, maybe that’s your personal Mount Everest that you want to climb or the dragon you want to slay. Yeah, you do have to do more. You do have to probably go to the gym and do a formal exercise session that involves you training for that particular activity. But when you think about it, that type of training traditionally has been relegated to the realm of gladiators and athletes and warriors and Olympians, and it’s not synonymous with longevity. You shouldn’t fool yourself that going out and doing an Ironman or one of these longer Spartan races or bodybuilding or figure fitness competition is going to help you live a long time or is natural.
If that’s what you’ve chosen to do, though, and you’ve accepted the fact that you’re sacrificing some amount of health or longevity for performance, yeah, you’re going to need to hit the gym. You’re going to need to have some of those suffer-fests. But ultimately, in my opinion, the biggest mistake people make is that they don’t adjust their life and their working environment and their home environment to allow them to simulate what we would see in a more traditional kind of ancestral movement format, and instead sit in a chair, work out at the beginning of the day or work out at the end of the day or both, and that’s just not a healthy exercise scenario or mental approach to exercise.
Chris Kresser: No, we know so much about that now from research, where even if you meet the government guidelines for exercise, if you’re sedentary the rest of the time, you’re still going to be at an increased risk of disease. It’s funny, my setup is pretty similar to yours. I have a treadmill desk and a kind of a split desk. So I’m standing and sitting on one side, treadmill on the other. I’ve got kettlebells and weights and straps and a bunch of stuff like that. And I alternate, I go back and forth between that, doing those kinds. Most days are like that. But I found personally that sometimes I like … for me, a distinct period of exercise is as much about getting away from my work and my computer and all of that stuff as it is about physical activity.
Ben Greenfield: That’s the dangerous part, too, is a lot of people will use it to just, like, check out, almost as their form of moving meditation or form of catharsis. And I get that too. I understand if going out and doing a, whatever, a hard weight training workout at the end of the day to blow off some steam or going for a relatively difficult lunchtime run to just get your mind off of work, I get it. But at the same time, I think people just need to understand that there can be some danger there in terms of chronic low-grade inflammation or excess wear and tear on the body or just adding more stress points to the day. Or if you’re tracking your heart rate variability, as a lot of folks do, I’ll look at the HRV of a lot of my clients who are training heavily and it’s just kind of relatively suppressed the entire week, showing that the nervous system is simply not getting a chance to repair and recover, which can affect sleep cycles and can affect again, your inflammation, your movement, the quality of your movement.
So it’s just something you need to be careful with. And what I encourage people to do is find as many ways to scratch that cathartic itch or that movement-as-meditation itch as possible that don’t necessarily involve, especially, like, eccentric exercise, that tears muscle fibers, like weight training or like running, for example. Sauna sessions, cold therapy, I’m huge on walking. And so I probably exercise about a third the amount that I used to, but I’m still doing a lot of things. I’m still hitting the sauna and the cold pool in the mornings and walking for an hour in the afternoons. And it’s just as enjoyable and fulfilling, and almost just as cathartic as well, and gives me that form of moving meditation. Because I love to move. I just can’t sit still most of the time. But it’s not, it doesn’t have to be the elliptical trainer or the rowing machine at the gym, or just like doing multiple sets of reps over and over again until you’re sore and you can’t move the next day.
Go out and find things that scratch that movement itch that don’t necessarily involve beating up the body. And you’d be surprised at how fulfilling that can be. And if you do want to lift or sprint or do workouts, you can get away with a couple of decent weight training workouts per week, which is what I do. I do a full-body weight training session twice a week to keep your VO2 max elevated. You only need to do a hard, very hard cardiovascular workout once every two weeks to keep your mitochondria health maintained. Or to even get mitochondrial biogenesis, you only need one like high-intensity interval training workout per week.
And then to maintain your muscular endurance, or what we would call your lactic acid tolerance in exercise physiology, if you’re doing a weight training session a couple times a week and you start and/or end that workout with something like a Tabata set of 20 seconds hard, 10 seconds easy, you’ve all of a sudden checked the mark of strength training, lactic acid tolerance, VO2 max, and mitochondrial training, assuming you’re engaged in low-level physical activity during the day. You’ve got the aerobic piece managed, and all of a sudden you’re checking all the boxes of fitness with what might amount to an average of perhaps 30 to 40 minutes of formal exercise per day without the amount of body wear and tear that a lot of people are getting by, you know, kind of hitting the gym for an hour every day.
How to Track and Improve Your Sleep
Chris Kresser: Yeah, it makes sense. So let’s talk a little bit about sleep. You’ve written a lot about this over the years and sleep tracking with various devices. And I’m just curious where you’re at now, what you’re finding to be most helpful in terms of tracking for sleep and getting the most out of the sleep tracking data. Because it’s one thing to collect the data and it’s another thing to actually put it to use.
Ben Greenfield: Yeah. I actually did just publish an article recently on, a 10,000 word article on deep sleep over on my website because that seems to be the thing that’s the most problematic for people—
Chris Kresser: Yeah.
Ben Greenfield: Is having very low percentage of deep sleep, like 2 to 5 percent, when in fact something closer to 15 to 20 percent seems to be better for nervous system repair and recovery and for good sleep architecture. And as far as the tracking component goes, I personally just use the Oura ring. There are other better ways to track.
Some of these newer headbands that track actual brain waves like the, there’s one called the Dreem headband. Those work even better. The problem is that unless you’re a back sleeper, the headbands tend to kind of move around during the night and they’re difficult to keep on. So I haven’t been able to get good data from those. And then some of these mats and newer mattresses. I know at CES they showcased a few different mattresses that kind of track your sleep cycles for you during the night. And the problem with those is they tend to often be accompanied by high amounts of dirty electricity. You usually have to have Wi-Fi switched on or you’re sleeping with Bluetooth on during the night.
I tend to keep the bedroom relatively electricity free as much as possible. I actually have a kill switch installed in my kids’ bedroom and in my bedroom where you can just turn off all electricity during the night. And the only thing that I have plugged in during the night is that PMF mat that I sleep on that has a little dirty electricity filter built into it. And then an essential oil diffuser. And those are all plugged in to a dirty electricity filter in the bedroom. So I try to limit the amount of EMF, especially in the bedroom. And we also don’t have Wi-Fi. I just plug everything in via ethernet cables in the house. So if you want to connect to Wi-Fi, it’s kind of annoying until you get used to it. But you just have an ethernet cable and an ethernet-to-FireWire adapter or ethernet-to-USB adapter, and you just plug in your laptop or your computer in whatever room of the house that you happen to be in.
But back to the sleep tracking. Right now, I just use the Oura ring. It gives me pretty decent data. A few of the interesting things that I’ve found are temperature affects it very dramatically. And so most people are aware of normal sleep hygiene, right? Sleep in a quiet room, sleep in a dark room. Avoid especially blue light exposure at night and don’t do business in bed, right? The bed is for sex or for sleep. So you have your temperature, your light, your sound, and your sleep environment kind of dialed in. But when it comes to temperature, I found that going beyond just lowering the temperature of the room to 64 to 66 degrees and instead getting some form of cold exposure in the evening, a lot of folks, and I like this approach because it works well, especially when I’m traveling.
And also when I don’t have access to, say, like a sauna and a cold pool, although that regimen helps tremendously with deep sleep. Just a simple, hot/cold contrast shower, which involves five minutes of 20 seconds of cold and then 10 seconds of hot. And you do that 10 times through for a total of five minutes. That dramatically affects deep sleep if you do that sometime in a couple of hours leading up to bed. If you wear socks when you go to bed to keep the feet warm so that more blood is shunted to the core, it enhances that effect even more. And so if you take a hot/cold contrast shower, then you put on socks and you go to bed, and the room is already at a relatively cool temperature, 64 to 66 degrees, that’s one thing that amps up my deep sleep cycles dramatically.
This might not be something accessible or affordable for a lot of people, but I also have one of these chilly pads under my top sheet of my mattresses. And so that circulates about, I have it set as low as it can go, which I think is 55 degrees.
Chris Kresser: Yeah.
Ben Greenfield: So it circulates 55-degree cold water under my top sheet while I’m asleep. And that enhances it even more. So that’s one thing. Another is CBD, and there’s been a lot of research on CBD for anxiety and for sleep. The problem I’ve found is that a lot of these CBD oils and tinctures, the dosage is about five to 10 milligrams. When you look at the research, most of the research is 100 up to 900 milligrams for sleep. And I find when I approach that 100 milligram mark with CBD oil, it dramatically increases my deep sleep quality. And you wake in the morning just slightly groggy, very similar to if you’d taken a lot of melatonin.
But if you just get up, it wears off. You have your cup of coffee within about 20 minutes, you feel just fine. And whereas I’ve found THC to actually decrease deep sleep percentages, CBD and isolation, especially these higher doses, seems to help out quite a bit. So that’s another protocol that’ll do in addition to the cold, is I have a little CBD dropper. I’m kind of brand agnostic because there’s so many different brands out there now. But I’ll use whatever brand of CBD I happen to have around the house and take a higher dose of that, and that also seems to help out quite a bit.
And then if I could throw one more at you, I have replaced all the bulbs in my home. For awhile I was kind of into the whole biological LED thing, which there are companies out there that will make bulbs, LED bulbs, that can be either high amounts of blue light for areas where you want to be more awake and alert like a gym or an office, and then bulbs that have lower amounts of blue light for areas of rest, like the master bathroom and bedroom, or the kids’ bedrooms. But the problem is, I actually had a building biologist visit my home and kind of walk through with not only things that the tech, the amount of microwaves or the amount of radio waves or signals coming in from cell phone towers or other forms of electricity that could be disrupting your physiology during the day or your sleep during the night. He tested the flicker from two of these LEDs and very similar to a computer monitor flicker, they all produce quite a bit of flicker which is irritating to the eyes and can be damaging to the retina long term and can also affect sleep architecture.
So I’ve replaced all the bulbs in my home with incandescent. Just full-spectrum incandescent, but in particular in the bedroom, replaced all the bulbs in the bedroom and the master bathroom, should I turn on the light when I get up to use the restroom during the night, with red incandescent bulbs. And that had a pretty big impact on sleep cycles as well. I can still see, but it’s pretty much the same as firelight. And so, in the bedroom it’s red incandescent bulbs, and that bulb replacement seemed to help out quite a bit as well. So those are a few of the discoveries I’ve made of late when tracking my sleep cycles, is the hot/cold contrast shower or some type of sauna, cold pool, back-and-forth therapy sometime in the few hours leading to bed, like after dinner, for example; the use of higher-dose CBD; and then also installing red incandescent bulbs in the bedroom.
Chris Kresser: Nice. Yeah, those are all tips that I think will be helpful for people. I’ve found, as I imagine you have, in working with clients, like certain ones will make a bigger difference for some people than others. So it pays to experiment a little bit and see what really leads to the biggest shift. For me, temperature is one of the biggest. Like, that’s one of the things that I don’t like about travel is less control over the temperature of my environment. And not having, like, the cooling pad. And if the HVAC system in the hotel or whatever is not working properly, that will torpedo my sleep more than anything else.
Ben Greenfield: Yeah. The air pollution one is an especially tough one when you travel. There’s not a lot you can do about it. So I found that some hotels, in a similar manner as when I travel, I always have my little Whole Foods shopping list and have the Uber drop me off at Whole Foods. And I’ll typically buy them a little snack in Whole Foods while they wait outside. And I’ll go in and grab my Pellegrino and a few cans of sardines, a couple of avocados, some coconut yogurt and a few of the things for the hotel room. But I always call ahead and make sure they have a mini fridge. And if when you call ahead, you also ask if they have an air filter. A lot of hotels have a few extra HEPA air filters that they’ll actually have available for you in your room if you want.
Chris Kresser: Yeah.
Ben Greenfield: That’s always an option as well, unless you’re staying in a place a long time. If you have a Costco membership or you shop at Walmart or whatever, someplace with a decent return policy, you can go that route too. But yeah, the air quality one is pretty tough when you travel.
Boosting Your Cognitive Performance
Chris Kresser: So how about the cognitive performance? Let’s finish up with this. I mean, sleep is obviously a huge contributor to cognitive performance, and exercise and fitness, which we’ve already talked about. What else have you found to be the biggest levers for cognitive performance?
Ben Greenfield: There’s a few things that maybe fly under the radar, because I know neurogenesis is talked about a lot. The idea of learning new things and protecting inflammation of the brain by limiting sugar and vegetable oils. There’s a lot of, of course, nootropics out there, from Ciltep to Qualia to Alpha Brain. A lot of people are aware of many of the things that are out there. But if I could give you a few that folks might not be aware of, one is this idea of using low-level laser therapy or some form of infrared light at a specific frequency in the form of, like, a head cap for the head during the day. There’s a company called Vielight, V-i-e light. And they initially were developing these head-worn devices for Alzheimer’s and dementia that have a signal emitted in the range of 10 hertz. And then another device that has a signal range of 30 or 40 hertz. And that newer device is called The Gamma.
I recently got my hands on one, and I’ve been using that in the mornings. It can, because it enhances the activity of cytochrome c oxidase in the mitochondria neural tissue, and whenever you upregulate mitochondrial activity like that, you do create reactive oxygen species. In the same way, you wouldn’t want to use an infrared light panel all day long. You would only want to use this about once every 24 to 48 hours. But when I use it in the morning, I’ll often put it on while I’m sitting with my cup of coffee in the morning reading through research or replying to emails. It really gives me a big boost of cognitive energy for about four to five hours, I’ve found. You wear it for about, I think it automatically turns off after about 25 minutes. It’s called a Vielight. I want to say the price point is somewhere between like $600 and $1,000. So it’s not an inexpensive device. But that’s one I’ve been toying around with that seems to give pretty good results.
Another would be, I don’t know if any people are familiar with peptides. But there is kind of a growing interest in peptides. I was recently at the American Academy of Anti-Aging Medicine, and there were many, many kinds of peptide breakouts and conferences there. And peptides are just these strings of amino acids designed to elicit specific functions. Like, two that are popular in the sporting world are BPC-157 and TB-500. The former works on decreasing inflammation, the latter on improving healing of myosin and actin fibers. And these are all injectables. Other popular ones would be, like, there’s one called epitalon, that’s one that would be used as kind of like an anti-aging peptide. Another two similar peptides that are kind of mitochondrial drive peptides are humanin and MOTS-c. So this world of peptides is very interesting. You need to be very careful because a lot of websites are popping up that are selling kind of bastardized versions of peptides. Typically, you want to work with a physician who has access to a good compounding company, like, Tailor Made Compounding is one very good one for peptides.
But there is a newer peptide of late that enhances neurogenesis and decreases inflammation. Might improve the integrity of the blood–brain barrier and is also kind of, acts very similar to a nootropic for cognition and for memory. That one’s called Semax, s-e-m-a-x. That’s another one I started to play around with in the past month. It involves injecting it, just like with an insulin syringe in the skin, around the abdomen during the day. And that works very well, again, for a very good clean boost of cognitive energy that seems to last about six to eight hours without producing any kind of drop in energy afterwards or a crash like you’d get from something like, say, modafinil or something like that. But that seems to work very well, this peptide Semax. So that’s another one.
And if there is, let me see if I can think of one more. That’s kind of interesting in the world of nootropics or smart drugs. I guess another one, and I’m trying to come up with some things that folks may not have heard of.
Chris Kresser: Yeah, thanks.
Ben Greenfield: Lysergamides, probably the most popular being LSD, are kind of popular now in terms of things that one would microdose with. And LSD can cause kind of a merging of the left and right hemispheres of the brain and allow for you to engage in creative and analytical thinking simultaneously. And, for example, I actually, when I kind of wanted to experiment a little bit with microdosing with LSD, I used it about a year and a half ago for about eight months. Every Friday, I would use it because I was writing a fiction book, and I found that it seemed to help quite a bit with me being able to organize thoughts and still be able to tap into my creative brain. And so I just used it every Friday to write fiction. It worked very well.
The problem with it being that it’s a little bit difficult to get your hands on, LSD. But there’s a new analog of it called 1P-LSD, which is also a lysergamide, that’s a little less expensive and easier to find. And there’s a website called Lysergi, I think it’s just L-y-s-e-r-g-i, where you can buy this stuff called 1P-LSD and in very small amounts. And you want to be careful because you do get a little rush of serotonin and dopamine, and you don’t want to create some kind of a neurotransmitter imbalance with frequent use. But used every so often for a day in which you want some really good kind of creative/analytical thinking, using a very small amount, like 10 to 20 micrograms, which is nowhere near like a trip dose of LSD, that also seems to really help with things like creative writing, creativity, problem-solving, etc. And it’s not LSD, it’s called 1P-LSD. I forget what the P stands for.
Chris Kresser: What is the legality of 1P-LSD?
Ben Greenfield: I actually don’t know. It’s one of those things, not sold for human consumption. Probably questionable in terms of legality. But as something that acts as a pretty powerful nootropic, it seems to work pretty well. So if anything, I just advise everyone to go out and use illegal drugs, so my apologies. But that’s one that came to mind.
Chris Kresser: Yeah, yeah. No, I was just curious. I haven’t heard of that, and since you mentioned you could order it online, I was, I mean, I know you can order a lot of stuff online now that …
Ben’s Upcoming Book
Chris Kresser: So cool, this has been really fascinating and I know listeners are going to get a lot out of it. Just in closing, what’s on your radar these days? What are you exploring next? What are you up to?
Ben Greenfield: Besides working really hard on developing a curriculum for my kids, which involves sitting them down and picking their brains over and over again about their passions and what they want to learn from gardening to graphic design to how to dissect a wild animal, I am kind of deep in the throes of finishing up a book called Superhuman RX or Superhuman Prescription. It’s kind of a beast. It’s about 600 pages long on this big eight-and-a-half-by-eleven hardcover. And it’ll be, probably won’t come out until January of 2020, but it’s almost like a sequel to my former book, Beyond Training.
I wanted to work in a lot more spiritual healing, gratitude, sound healing, vibrational therapy. There’s a lot of quantum physics in there. A lot more of what some people might consider to be woo-woo. But things that I’ve found to be very helpful. And there’s even chapters that take a pretty deep dive into things like sexual enhancement and libido, etc. And then a lot on the brain and cognitive enhancement. And about 10 chapters on the body as well, especially in terms of using a lot of the type of longevity topics that we talked about.
And the chapter on anti-aging is, like, 90 pages alone, just delving into everything from peptides to injections to stem cells to just kind of like the new world of anti-aging and what works and what doesn’t. So that book has been kind of a beast, but it’s turned into the publisher, and so that’s what I’ve busy with as of late.
Chris Kresser: Congrats.
Ben Greenfield: Thanks.
Chris Kresser: That’s a lot of work. Well, Ben, thanks so much for joining me, and it’s been a pleasure to chat with you. And I’ll see you at Paleo f(x) as we do every year.
Ben Greenfield: I’m looking forward to it, man. I’ll see you at the speaker’s dinner.
Chris Kresser: All right, take care. Bye-bye.
Sunday 08.03.20
LOVE A BIT OF SCIENCE
The main article below discusses how much of your weight you are actually lifting when you do a press up. You REALLY need to read the whole thing and digest it as it will give you a great insight into what a press up is actually doing as part of your workout. Always look at the science behind a movement pattern or exercise where you can as it will go a long way for your understanding on how and when to program it into your workout.
FORDY
How Much Weight Do You Actually Push Up During a Push-Up?

How much weight are you lifting during a push-up?
I’m sure many of you fitness gurus out there have asked yourself this question after doing a few hundred push-ups. Us non-fitness gurus have had the same aching question for quite a while too. “How much weight did I just lift?” you might ask yourself after a good round of push-ups. Was it 90% of my body weight? No, maybe it was 50%? Well, in this article I will calculate the percentage of your body weight that you would expect to “push up” during both regular and inclined push-ups.
Proper Push-Ups
Before I begin with the math, let’s define what a push-up is. More specifically, let’s discuss proper form and technique. First, get onto the ground. Elevate your body using your arms. Your back must be straight like a board. Don’t let your gluteus maximus stick into the air or hang low. There should be a 90-degree angle between your arms and the floor. Your hands should be placed about one and a half times your shoulder width apart and pointed parallel to your body. Your body should be raised on the balls of your feet. Your feet should also be touching or no more than shoulder width apart. When you go downward, only bend your elbows. You can come back up once the elbows break the plane of your back.

Mathematical Assumptions
I will calculate the percentage of body weight resisted during a push-up for an average sized person (I used Leonardo Da Vinci’s “Vitruvian Man” to properly scale the human structure because there was no other source of body measurements I could find). Since the resulting number will be a percentage, it will be correct for any person who has the same dimensions or ratio of dimensions as the average person calculated here. However, if you have abnormally short or long legs or arms compared to your height, the calculation will not necessarily be valid for you. For the purpose of the calculations, the center of gravity for a human is assumed to act through the hips.
The characteristics of an average 25-year-old American male are:
- Height: 70 inches (1.778 m)
- Palm to Shoulder length: 23 inches (0.5842 m)
- Shoulder to Hip Length: 24.75 inches (0.62865 m)
- Hip to Ankle Length: 31.5 inches (0.800 m)
For inclined push-ups, the following objects will be used for the calculations:
- Standard Chair Height: 18 inches (0.457 m)
- Standard Counter Top Height: 32 inches (0.813 m)
Method/Calculations
I will calculate the resultant forces in the hand (e.g. arms) of a human using the principles of engineering statics, Newton’s Second Law of Motion, and the assumptions stated above.. The metric system will also be used to simplify the calculations.
Regular Push-Ups
 is equal to the mass of an object multiplied by the acceleration of gravity. We don't need to know the person's weight in this example because we are only computing a ratio (percentage)")
Using trigonometry, the angle between the floor and the plane of the back is 24.1218 degrees. The horizontal distance from the foot to the hip is 0.7301 meters and to the hand is 1.304 meters.
The forces in the Horizontal Direction are zero. Fx = 0
The sum of the forces in the vertical direction are: FY = FHand + FFoot – W = 0
The sum of the moments about the foot is MFoot = (0.730m)×W – (1.304m)×FHand = 0
Because we have cleverly chosen where to place our moment equation, it is the only one we need to solve to determine the force in your hand.
1.304FHand = 0.730W
Therefore, FHand = 0.5598W
Inclined Push-Ups on a Chair
Here, an inclined push-up is performed on a standard chair with a seat 18 inches above the ground.

Using trigonometry and the Pythagorean theorem, the horizontal distance from the feet to the hands is 1.475 meters. The angle between the plane of the back and the floor is 39.24 degrees. The horizontal distance from the feet to the hip is 0.620 meters.
The net force in the horizontal direction is zero: FX = 0
The sum of the forces in the vertical direction are: FY = FHand + FFoot – W = 0
The sum of the moments about the foot is MFoot = (0.620m)×W – (1.475m)×FHand = 0
Rearranging the last equation, we can relate the force in the hand to the weight:
1.475FHand = 0.620W
FHand = 0.420W
Therefore, the upward force in the hands is 42% of your body weight.
Inclined Push-Ups on a Countertop
Here, an inclined pushup is performed on a standard countertop with the work surface 32 inches above the ground.

Using trigonometry and the Pythagorean theorem, the horizontal distance from the feet to the hands is 1.311 meters. The angle between the plane of the back and the floor is 53.96 degrees. The horizontal distance from the feet to the hip is 0.470 meters.
The net force in the horizontal direction is zero: FX = 0
The sum of the forces in the vertical direction are: FY = FHand + FFoot – W = 0
The sum of the moments about the foot is MFoot = (0.470m)×W – (1.311m)×FHand = 0
Rearranging the last equation, we can relate the force in the hand to the weight:
1.311FHand = 0.470W
FHand = 0.360W
Therefore, the upward force in the hands is 36% of your body weight.
Conclusion
Based on these calculations, we can say when you are doing a push-up, you are “lifting” about 56% of your body weight (the other 44% is held up by your feet). In other words, for an average 200-pound person, doing one pushup is similar to (but not exactly the same as) doing one repetition on a bench press with about 112 pounds of weight. Now you know about how much weight your body is pushing up during this awesome exercise.
Additionally, we can definitely say that inclined push-ups require significantly less force to perform than a regular push-up. For an inclined push-up on a standard 18-inch high chair, you will lift about 42% of your body weight. For an inclined push-up with your hands placed on a standard 32-inch high countertop, it is estimated that you will lift roughly 36% of your body weight.
Verification of Results
To verify this calculation I weighed myself on a scale in both the regular and inclined push-up positions as well as the standing position. I did my best to measure the forces in my arms in the above configurations using a standard bathroom scale. It was actually pretty hard to capture the measurements with the scale on the countertop because it kept trying to slide away from me, but I eventually got it (and a good abdominal workout too!). The table below summarizes my measurements and the calculations.
|
|
Weight (Standing)
|
Weight (Push-Up)
|
Measured Ratio
|
Calculated Ratio
|
|---|---|---|---|---|
|
|
(lbs)
|
(lbs)
|
(%)
|
(%)
|
|
Regular
|
211
|
125
|
59%
|
56%
|
|
Incline 18″
|
211
|
100
|
47%
|
42%
|
|
Incline 32″
|
211
|
80
|
38%
|
36%
|
Here is a Graph to help you visualize and compare the results of the calculations versus the measured values.

These calculations also agree with the currently published research on the matter which says that anywhere from 50 to 75% of your body weight is lifted during a standard push-up. Since everyone’s body shape and weight distribution differs, the actual percentage of your weight that you lift during a push-up will vary.
Saturday 07.03.20
PRESS UPS AS PART OF A WORKOUT
Here we look at when press ups become a vital part of a workout, and what workout is more famous for having press ups in than ‘Murph’. I like Murph, I think its a great test of strategy as well as endurance so if you haven’t tried it then give it a go and feel free to video it and post your score/time. The video shows you some tips which are really good for completing Murph and chipping away at your time to see some serious improvements. The really nice bit is how much he stresses recovery, Murph will take it out of you and so your recovery will need to be on point.
Good luck
FORDY
MEMORIAL DAY MURPH: WHO? WHAT? WHY?
Memorial Day is just a couple of weeks away (May 28th if you’ve forgotten), and whether you’re new to CrossFit or not, you’ve probably heard about Murph at some point.
In case you’re unfamiliar, “Murph” is a classic CrossFit workout known as a Hero WOD. Hero WOD’s are made by CrossFit to honor the men and women that have fallen in the line of duty. This one is specifically to honor Navy Lieutenant Michael Murphy, who was killed in action in Afghanistan on June 28th, 2005.
1 mile Run
100 Pull-Ups
200 Push-Ups
300 Air Squats
1 mile Run
*With a 20 lb Vest or Body Armor
This workout itself was Michael’s favorite workout to do, which at the time referred to it as “Body Armor”, hence the 20 lb vest or body armor as part of the workout prescription. So, every year, CrossFitters synonymously around the world pay special tribute to Lieutenant Murphy by joining together and suffering through this workout.
WHY DO WE DO MURPH?
Hero WOD’s are not uncommon in the CrossFit community. Besides the story of an amazing human being who gave his courage and ultimate sacrifice for his team and country (which we’re about to get to), it also gives us a chance to pay tribute to all the other Hero WOD’s such as J.T., Michael, Randy, and Nate. CrossFit still makes new Hero workouts to this day.
“These men were fathers, husbands and sons. They were brothers to their fellow SEALs. They were also CrossFitters. In their actions, these men embodied the values and spirit of true heroes, and to immortalize their courage, bravery and self-sacrifice, the CrossFit Hero workouts were created.”
–Russel Berger, CrossFit
So what made Lieutenant Murphy’s story so impactful? Here’s an excerpt about what went down in Afghanistan in June 2005:
On June 28, 2005, Lt. Murphy was the officer-in-charge of a four-man SEAL element in support of Operation Red Wing tasked with finding key anti-coalition militia commander near Asadabad, Afghanistan. Shortly after inserting into the objective area, the SEALs were spotted by three goat herders who were initially detained and then released. It is believed the goat herders immediately reported the SEALs’ presence to Taliban fighters.
–
A fierce gun battle ensued on the steep face of the mountain between the SEALs and a much larger enemy force. Despite the intensity of the firefight and suffering grave gunshot wounds himself, Murphy is credited with risking his own life to save the lives of his teammates. Murphy, intent on making contact with headquarters, but realizing this would be impossible in the extreme terrain where they were fighting, unhesitatingly and with complete disregard for his own life moved into the open, where he could gain a better position to transmit a call to get help for his men.
–
Moving away from the protective mountain rocks, he knowingly exposed himself to increased enemy gunfire. This deliberate and heroic act deprived him of cover and made him a target for the enemy. While continuing to be fired upon, Murphy made contact with the SOF Quick Reaction Force at Bagram Air Base and requested assistance. He calmly provided his unit’s location and the size of the enemy force while requesting immediate support for his team. At one point, he was shot in the back causing him to drop the transmitter. Murphy picked it back up, completed the call and continued firing at the enemy who was closing in. Severely wounded, Lt. Murphy returned to his cover position with his men and continued the battle.
–
As a result of Murphy’s call, an MH-47 Chinook helicopter, with eight additional SEALs and eight Army Night Stalkers aboard, was sent in as part of the QRF to extract the four embattled SEALs. As the Chinook drew nearer to the fight, a rocket-propelled grenade hit the helicopter, causing it to crash and killing all 16 men aboard.
–
On the ground and nearly out of ammunition, the four SEALs, continued to fight. By the end of a two-hour gunfight that careened through the hills and over cliffs, Murphy, Gunner’s Mate 2nd Class (SEAL) Danny Dietz and Sonar Technician 2nd Class (SEAL) Matthew Axelson had fallen. An estimated 35 Taliban were also dead. The fourth SEAL, Hospital Corpsman 2nd Class (SEAL) Marcus Luttrell, was blasted over a ridge by a rocket-propelled grenade and knocked unconscious. Though severely wounded, the fourth SEAL and sole survivor, Luttrell, was able to evade the enemy for nearly a day; after which local nationals came to his aide, carrying him to a nearby village where they kept him for three more days. Luttrell was rescued by U.S. Forces on July 2, 2005.
–
By his undaunted courage, intrepid fighting spirit and inspirational devotion to his men in the face of certain death, Lt. Murphy was able to relay the position of his unit, an act that ultimately led to the rescue of Luttrell and the recovery of the remains of the three who were killed in the battle.
—Murph Foundation “Biography”
Crazy story right? Now it’s all starting to make a little more sense on why CrossFitters make a big deal out of Memorial Day and Murph. It’s the least we can do to honor the courage and selfless sacrifice that was made that day.
HOW DIFFICULT IS MURPH?
On paper, it might not look TOO bad. It might take most people awhile to finish, but it can slowly be chipped away at compared to a workout with ridiculously heavy weights, complicated skill required movements, etc. In fact, we did a post not too long ago about the most difficult Hero workouts which you can see here. “Murph” is the 2nd most popular Hero workout on BTWB, second to “DT”.
First, there’s two methods of finishing Murph. While you have to start and finish with a 1 mile run, the 100 pull-ups, 200 push-ups, and 300 air squats can either be done in order, or partitioned. The most common strategy is to partition the reps into 20 rounds of “Cindy” or 5 pull-ups, 10 push-ups, and 15 air squats. If you’re really trying to maximize your time and don’t think you can do 20 rounds of 10 push-ups unbroken, you can split the push-ups around the air squats. So you would do 20 rounds of: 5 pull-ups, 5 push-ups, 15 air squats, 5 push-ups. Performing “Murph” in the un-partitioned manner is the more difficult of the strategies, as the push-ups will be the part that will have lots of rest in between sets. The partitioned way lets you chip away at the other movements while your push-ups take a break.
The other variation about Murph is that it’s performed either with a weight vest, or without. The prescription hints to use one if you have one, but, if you don’t have one, then you don’t have a choice. There’s a ton of variation in completion time between the two options. Below is roughly the average time of completion without a weight vest. The average time being around 48 minutes for Men and 52 minutes for Women.

Now, add a weight vest, and this workout is a whole different beast. Take a look at the 2016 CrossFit Games athletes. They literally had to do Murph in weight vests, and needless to say, it did not look easy.

MURPH’S HISTORY IN CROSSFIT
Murph was first programmed on CrossFit’s Main Site on August 18th, 2005. It’s hard to say when exactly it became a tradition for gyms to program Murph on Memorial Day. In 2007, Josh Appel, an Air Force pararescue jumper who led the team that jumped to rescue Lt. Murphy’s team, brought the idea to his gym, Albany CrossFit, and the rest of the CrossFit community followed suit. 10 years later it’s an honored tradition for gyms to close on Memorial Day, running only Murph as their workout, often followed by a barbecue or other community bonding event.
In 2015, Murph made the leap from gym tradition to a CrossFit Games event and made history once again. Dave Castro programmed the grueling workout (UNPARTITIONED) to celebrate the 10th anniversary of the Games, and it happened to fall during midday in the California heat. 2015 Murph was notable on many levels, but none more than the impact it had on the competitors- Annie Thorisdottir and Kara Webb were both visibly beaten by the workout, with Annie having to withdraw from competition, and Kara Webb passing out directly after the event and receiving treatment for heatstroke. Sam Briggs won the Women’s side with a time of 39:10, while Björgvin Karl Guðmundsson was the Men’s winner, with a time of 38:36.
Castro programmed Murph AGAIN in 2016 and both vindicated his programming methodology and showed the amazing adaptability and resilience of CrossFit Games athletes. (It also helped that it was held earlier in the day to avoid the glaring midday sun.) The 2nd go around for Murph went off without a hitch with the athletes looking far better prepared and mentally ready for the long haul. Kari Pearce took the top women’s spot with a time of 36:42, while former SEAL Josh Bridges won the men’s side with a time of 34:38.
Friday 06.03.20
WRIST PAIN, WE’VE ALL BEEN THERE
So, as quite a few of you are already finding, press-ups are harder than you thought they were. Some of you are even starting to experience a little bit of wrist pain, which is pretty normal if you haven’t been doing press-ups for a while or you’re just a beginner. This is normally due to a few things, but most commonly it’s down to lack of mobility in the wrist, in particular a lack of extension. So the video is there to look at that and some other reason why you might be getting pain. Make sure that you address any pain or discomfort, but if it is down to lack of mobility (like it so often is in most things) then take it as a message to sort it out, and while you’re at it, sort the rest of your mobility out in general, you will thank yourself int he long run.
FORDY
4 Ways to Keep Pushups From Hurting Your Wrists

Pushups are, undeniably, one of the best exercises for building a rock-hard core and improving total-body conditioning. But as any military grunt or CrossFit devotee can tell you, if you’re going big on pushups, you need to take care of your wrists or you could be in for a world of pain.
Here are four ways to keep aching wrists from ruining your pushup regimen.
1. Check your form
If you don’t have carpal tunnel or an acute injury yet doing pushups causes wrist pain, form may be the culprit. Here’s how to fix it.
● Assume the proper position: hands (flat, not tented) under the shoulders at the top of the pushup and alongside the pecs at the bottom.
● As you lower, pitch your chest forward and keep your elbows tucked in, making an A-frame with your head.
● As you come down, press into the ground and slightly shift your knuckles toward your thumb. This rotates the forearms and creates room in the wrist joint for flexion.
2. Use dumbbells
If your form is correct but your wrists still hurt, place a pair of dumbbells (kettlebells also work) shoulder-width apart on the floor and grip them as your “base.” This holds your wrists straight rather than bent, taking the onus off the wrists.
The elevated hand position also lets you dip lower, working your chest and triceps even harder.
3. Switch to knuckle pushups
No ’bells nearby? Make fists and push up on your knuckles instead, which strengthens your wrists and improves the bone density in your hands.
4. Up your wrist mobility
Finish with these moves to make your wrists more flexible:
● Wrist circles: Rotate 20 sec. in each direction.
● All-fours flexion: While on your hands and knees, lean forward into your hands and hold for 30 sec. Then rotate your hands—fingers pointing toward your legs—and lean back for another 30 sec.
● Counter-stretch: Still kneeling, place backs of hands on floor, fingers toward legs; lean back slightly for 30 sec.
Thursday 05.03.20
NOT EVERYTHING IS AS GOOD AS IT SEEMS
Bodyweight training has a lot of benefits, we talked about those yesterday, but it also has some disadvantages. We often look at gymnasts and bodyweight specialists who can move so well and have great physiques and think that surely then all we need to do is use our body and the environment around us and we can achieve similar results. Not so fast. The article below looks at some of the disadvantages to bodyweight training and we will be looking more and more into calisthenics over the coming weeks, so stay tuned.
FORDY
WHAT ARE THE DISADVANTAGES OF BODYWEIGHT TRAINING
Like any form of resistance training bodyweight exercise is a great method of burning fat, building lean muscle and improving strength. Is it the holy grail of strength training? Nope, but nothing is. Resistance is resistance whether it comes in the form of weight plates, kettlebells, bands or your own bodyweight. The magnitude of resistance applied to the muscles, the number of muscles stimulated and how the resistance is moved will determine the training effect derived.
PROGRESS IS NON-LINEAR
When using barbells and dumbbells you can progressively overload any given exercise with small, incremental increases in weight. This makes it easy to stay in the desired rep ranges of a particular workout as you get stronger. Using bodyweight exercises you can achieve a similar overload effect by adjusting the biomechanics of a certain movement. A simple example would be performing a push up on a progressively shallower incline. The lower you go, the greater the load on your working muscles. In theory this sounds good, but in reality it is far from perfect. Progress tends to be non-linear which basically means the leap from one exercise variation to the next can be bigger than your current strength levels allow. For sure you can use things like weighted vests to help bridge these gaps but its certainly not as simple as adding plates to a bar.
BODY DIMENSIONS CAN WORK AGAINST YOU
When you start using more advanced bodyweight progressions the difficulty stems from putting joints and muscles into disadvantageous positions. For certain individuals with long levers this reduction in biomechanical advantage makes some bodyweight exercise progressions extraordinarily difficult. Granted this is not a problem unique to bodyweight training as even when lifting weights different body types will tend to excel at different movements but it is a challenge nonetheless.
LIMITED LOWER BODY STRENGTH CHALLENGE
It is perfectly possible to maintain strong, fit and healthy legs using nothing but your own bodyweight. However if you are interested in maximising your lower body strength potential you are probably going to have to look beyond bodyweight training. This is where bars, dumbbells, and kettlebells can come into play.
MOVEMENTS ARE HARDER IF YOU ARE HEAVY
Fairly obvious. Performing a pull up is going to be a lot harder if you are carrying too much extra timber. Of course, there are easier progressions of every exercise which even the heaviest among us can perform effectively but for certain individuals other forms of resistance training might be a better entry point, particularly in the realm of upper body exercise.
END GOAL CONFUSION
Would you train like Rafael Nadal if you wanted to enjoy a weekly game of tennis with your friends? Probably not. It would be overkill and you would likely hurt yourself. Sounds ridiculous yet in the world of bodyweight training this is exactly what many people end up doing. I love watching elite gymnasts at work, the feats these folks perform are simply insane. However, lets not forget a lifetime of dedicated training has gone into producing these skills under the guidance of world class coaches. Like any elite athlete they take their body to the edge of its capabilities and flirt with injury on a regular basis. If performing these skills is your end-goal then absolutely go for it. But for those of us who just want to look good and feel good pursuing advanced gymnastic moves may not be the wisest (or safest) course of action when a diet of simpler bodyweight exercises and progressive overload will do.
That’s it for the negatives, in the follow up article I will counter this one with the positives!
https://www.gymless.training/questions/what-are-the-disadvantages-of-bodyweight-training
Wednesday 04.03.20
PROBLEM PRESS UPS
A lot of people do press ups, like a lot. Now, you’d think with such a simple exercise it would be hard to get it wrong wouldn’t you? But there are so many things that can go wrong with such a simple movement. So here is a pretty good video that explains most of the things that are done badly and if you make sure you aren’t doing them then you’ll of got yourself a pretty decent push up. Remember ages ago when we talked about Bob Knight and his philosophy of coach out all the bad points and the only option that remains is to do it right? This is the perfect example of that.
FORDY
5 BENEFITS OF BODYWEIGHT TRAINING
By David (Jacko) Jackson
Anyone who has been training for a period of time will have a philosophy. Their individual approach to how they want to workout, the physique they desire and what they want to do with their body. For most, philosophies are not fixed but is something that evolves over time.
Personally, we have been on that journey. Hypertrophy, strength training, sports performance and everything in-between. Regardless, the philosophy was fairly similar despite how much weight was on the bar or how many reps we did. But when we started calisthenics we found a new philosophy; Play.
5 Benefits of Bodyweight Training
1 Einstein said that play is the highest form of research.
In calisthenics our goal is to explore our physical potential and combine the human body’s natural capacity for movement with its ability to get strong. The result is an athlete who is mastering their own bodyweight and learning to move in new ways. To do that you have to embrace play.
With this being a big part of our training philosophy, we need to seek out the best playgrounds, so the School of Calisthenics planned a field trip to Mike’s Gym – Marbella. There is no other way to describe the incredible training camp environment Mike has created other than just that; an adult playground. There is everything you need from a crossfit box, exercise studio, a dojo and ninja alley to the jewel in the crown; a 100-feature obstacle course basking in the Spanish sunshine. Some would probably describe it as more like a ‘diamond in the rough’ but either way, whatever your philosophy about training and movement, Mike’s Gym has you covered, and it will be almost impossible to get bored.
Mike has built the gym with his own hands based on the training he likes to do. Or put differently, based on his philosophy, and what he has created is a spectacular training environment that he is sharing with others. It’s important to understand this because when you find yourself blowing a gasket as you run through the obstacle course on a hot, dusty afternoon you’re experiencing something quite special. The opportunity to have physical and emotional contact with someone else’s unique and personal vision of how the human body should be trained, but most importantly, what the human body is capable of doing.
5 Benefits of Bodyweight Training
2 Humans vs. History
Given the trials and tribulations that the human race has endured since our arrival on the planet, it’s safe to say that our ancestors did not rely on barbells to get strong, which evidence suggests were only invented around 1910.
In the developed world, the last 80 years has seen man and woman-kind become more and more sedentary. Void of the need to navigate challenging terrain, climb trees to set traps or gather food, we no longer need to explore our physical potential in the primal ways which were once essential for survival.
Human history tells of wars that have been won, extreme conditions survived and new lands explored, all without the machinery and equipment that has become common place in strength and fitness. Those who went before us also didn’t have the science we now lean on. But they did have a philosophy; they needed to master their own bodyweight. These now often forgotten benefits were extensive. Whilst society and culture has changed, the human body hasn’t, and the benefits of calisthenics and bodyweight training are as alive today as they ever were.
Bodyweight Benefit #1: Complete movement
Your body is an extremely well designed machine; it is intricate and complex; it provides you with all the movement options you will ever need, and whilst it has the capacity to perform in isolation, its most optimal configuration is found when the systems within it work together.
Broadly speaking, the muscles in our bodies have one of two jobs; stability or strength. In complete movements, which feature heavily in calisthenics, both systems work simultaneously. For example, in a handstand push up. Having the hand on the floor creates an upper body closed chain which increases joint compression, muscle co-contraction, neuromuscular control and dynamic stability. To perform the push up you need to stabilise the entire kinetic chain from hands to feet and produce significant force simultaneously. These are all good things for the shoulder joint which has a huge capacity for movement, but it comes at the expense of stability.
Your central nervous system will also only allow you to produce as much force as the joints involved are able to stabilise. So, if your goal is to increase strength, promoting stability through complete movements will also help you to increase your ability to produce force. You don’t have to shift completely to bodyweight training but include some of it in your programme.
Bodyweight Benefit #2: Strength outside the gym
If you’re going to excel on the obstacle course at Mike’s Gym, you’re going to need strength and skill that you can use in a varied environment. Calisthenics and bodyweight training exposes you to movement challenges and therefore creates movement options.
A training programme limited primarily to exercises like squats, bench press, military press and bicep curls gets you strong in those positions. However, if in Mike’s presence you don’t fancy taking on a big concrete pipe in the dirt, you can expect to be bombarded with a torrent of ‘encouragement’ which includes how it took him a week to put it there and you better go back and run over it!
Calisthenics comes from two Greek words, ‘Kallos’ and ‘Sthenos’ meaning beauty and strength. When movement is effortless, diverse and adaptable we see a picture of what bodyweight mastery looks like. It’s also a lot of fun.
Bodyweight Benefit #3: Embrace your physique
Whilst we can be anything we want to be, our natural genetics will predispose us to be more successful in certain training endeavours than others. For example, some people excel in endurance activities, some in power, while others in developing extreme strength. The world is full of different types of athletes.
Research has shown that humans have a physical limitation on the amount of muscle mass they are able to develop. In men, each kilogram of bone mass can support a maximum of around 5 kilograms of muscle, while women max out at about 4.2 kilograms. Our bodies are setup to handle a certain level of mass and therefore load, so not everyone is designed to squat 200kg. Shifting your own bodyweight will mean you are exposing yourself to loads which are appropriate to your natural physique.
Free yourself from the perception that you have to lift weights. Your body doesn’t know the difference between a dumbbell, barbell or its own weight. Resistance is resistance. And don’t be fooled. Bodyweight training is not an inferior form of exercise for beginners. Calisthenics never stops giving and there is always a new, more difficult challenge waiting that will ensure your ego stays in check.
Bodyweight Benefit #4: Longevity
Bodyweight movements will give you a longer lifespan as an athlete. We should want to keep physically active our whole lives and calisthenics enables us to train in a way which will promote the chances of this. Think of it as an investment in your physical pension. Mastering your own bodyweight will maintain joint function and mobility, increase stability and develop strength.
It’s not just about human flags and muscle ups. The lower body benefits from jumping and plyometric activity as it is more effective at increasing bone density than squatting. It also develops and maintains fast twitch muscle fibres that decline as we age. Why do people tend to fall over more as they get older? Because they lose joint stability, muscular strength and the ability to fire muscles quickly.
Bodyweight Benefit #5: Neural Plasticity
The brain is designed to learn and like any muscle it needs flexing. When we practice new skills and movements with regular repetition, the brain gets a workout and this stimulation causes positive adaptation.
Not only is this good for our mental wellbeing but it also exposes a side of training that is exciting. Given the opportunity your central nervous system learns at an alarming rate and you see rapid progress from session to session. It’s addictive! We want our brains to stay sharp, so taking on new challenges and learning to move in new ways is not just about physical health but mental health as well.
5 Benefits of Bodyweight Training
The take home message is pretty simple. Learn to balance on your hands. Hang from things. Jump. Climb. Sprint. Train single leg movements. Be explosive. Most of all, challenge yourself to learn something new. Become a more complete athlete.
Tuesday 03.03.20
CHRIS HERIA – Take a bow
If you don’t know Chris Heria, he’s serious when it comes to bodyweight training and also has a pretty knarly neck tattoo. Some of the things that he can do with his body is just, well, it’s impressive. There is so much more to training than lifting things up and putting them back down again. Being able to manipulate your own bodyweight first before putting a load onto it is pretty important. You will become much more aware of what your own body can do and then when you look to add weight into the equation good things will happen. So if you’re a gym junkie or you’re just at the start of your training journey, make sure to not bypass bodyweight before heading to the rack or grabbing the nearest barbell.
Fordy
Here’s how
5 Steps to Hollow Rock
The Hollow Rock is a core exercise often found in CrossFit and gymnastic workouts. It is also beneficial for endurance athletes, but I rarely see it used by runners, cyclists or triathletes. The movement recruits muscles deep in the core which are often missed during traditional ab workouts. Training these muscles will increase core stability during pretty much any sport, or strength training program. That increase in stability will reduce your risk of injury and give you a stronger foundation to build power from.
Read on and you will learn:
- How to Hollow Rock correctly
- If you cannot Hollow Rock, where to start without getting injured
- What exercises to use and when to progress to train your core to Rock like a champion!
All good things. Here’s the downside… It is HARD  Most anyone who has not pre-trained the specific muscles used in the Hollow Rock will struggle with this movement at first. If we can conquer it abdominal glory awaits. Where do we mere mortals start? At the beginning.
“It hurts my back.”
When I first added the Hollow Rock to clients’ routines I got lots of negative feedback. “It hurts”, and “I’m getting stiff in the back” were regular reactions. Not the result I, or they, wanted. After digging deeper I found most weekend warriors and seasoned athletes alike, cannot do this movement correctly. Why? Their cores were not strong enough. This is a tough position to hold without targeting the deep abdominal muscles needed to complete it.
AWESOME!
We have identified a limiter that once conquered will benefit us in everyday life and lead the way for performance gains in lots of sports. Jackpot!
In my eyes if you can hold this position for even 3-4 rocks you are ahead of the crowd.
If your core is not prepared to fully extend your arms and legs Hollow Rocking will probably be too much for your back to handle. You will probably end up so fatigued you cannot hold the proper form and the result will most likely be a sore lower back. I do not like feeling older than I am. I’m guessing you don’t either.
So….
We have an exercise that if done correctly will provide us with great results. If done incorrectly it could cause soreness or injury. Don’t let that scare you off. Follow along to start safe, gradually build your core strength and progress to being able to do the real thing.
Goal: Strengthen our core well enough to do the Hollow Rock correctly.
How do you get to the top of a ladder? One step at a time.
Where does the journey begin? With the first step.
Start at the beginning.
If you are unable to correctly hold the Hollow Rock position modify it. Start with a position you can hold with less risk and skip the back pain. Test yourself starting with Step 1. It is the simplest and easiest version of the exercise.
If you can perform the graduation workout of a step with proper form then move on to the next step. Progressing this way will help you make your way up our proverbial ladder of abdominal excellence with less aches and pains.
Give yourself at least 24 hours between workouts. 48 hours is better to let your muscles fully recover.


Key Points:
-
IMPORTANT-Lower back remains pushed down into the floor engaging the core
-
No rocking
-
Lift shoulders off the ground
-
Be sure to push the back down first as this will engrain safe habits for the harder exercises to come
There are two things that drastically increase the difficulty of the Hollow Rock. Leverage or extending the arms and legs as far away from the core as possible, and movement. The rocking motion.
We take both of those out of the equation and start with the Static Chair Hold.
Start with 1 Set of, 5x 5 second holds
(20 seconds rest between reps, 1 minute between sets).
Once you can do the set above add another set at the next workout. Add sets of 5 reps until you can do the Graduation Workout below.
CLICK for STEP 1 Graduation Workout
MOVE TO STEP 2 IF YOU CAN DO,
5 sets of 5 second Holds
(20″ rest between reps, 1′ between sets)
STEP 2: ROCKING CHAIR


Key Points:
-
Start by pushing the lower back into the floor
-
Get in the Static Chair Hold from step one (above)
-
Add the rocking motion
-
Hip and knee angles stay consistent even while rocking
-
Think of your joints as frozen
-
Look at feet
Now that we have mastered the basic hold it is time to raise the bar. Enter movement.
For this step I suggest you work with a buddy for visual feedback. For some people it is hard to tell whether or not they are moving the hips. Having someone at your side watching will keep you from cheating and on track to ingraining safe and proper form.
Start with 1 Set of, 5x 5 rocks
(20 seconds rest between reps, 1 minute between sets).
Once you can do the set above add another set at your next workout. Add sets of 5 reps until you can do the Graduation Workout below.
CLICK for STEP 2 Graduation Workout
MOVE TO STEP 3 IF YOU CAN DO,
5 sets of 5 Rocks
(10″ rest between reps, 1′ between sets)
STEP 3: Alternate Days of SINGLE LEG EXTENSION HOLDS & ROCKS
In Step 2 we started moving. Time to add some leverage, so go ahead and extend a leg. Start with the Holds.
*Once you are able to complete 5 Holds you can start alternating workouts using the Rocks as well.*

Day 1: Single Leg Extension Hold
Hold Key Points:
-
Start by pushing the lower back into the floor and assume the Static Chair Hold from Step 1
-
Fully extend one leg, pointing the toes
-
Hold 5 seconds, rest, and repeat on other side
-
Look at feet


Day 2: Single Leg Extension Rock
Rock Key Points:
-
Start by pushing the lower back into the floor and assume the Static Chair Hold from Step 1
-
Fully extend one leg, pointing the toes
-
Rock 5 seconds, rest, and repeat on other side
-
Look at feet
Once you are able to do both Holds and Rocks…
Alternate days of 1 Set of, 5x 5 rocks with,
1 Set of, 5x 5 holds
(10 seconds rest between reps, 1 minute between sets).
Once you can do 5x 5 add another set. Add sets as doable until you can do the Graduation Workouts below.
CLICK for STEP 3 Graduation Workout
MOVE TO STEP 4 IF YOU CAN DO,
3 Sets of 5x 10 Rocks
(10″ rest between reps, 1′ between sets)
STEP 4: Alternate Days of TORTURE TWIST + HOLLOW HOLDS
This step is another combo of two exercises. You are going to alternate between the two each time you do an ab session.
For example:
Day 1 ab work includes the Torture Twist.
48 hours recovery.
Day 2 ab work includes the Hollow Hold
48 hours recovery.
Repeat until you can complete the graduation workout for both exercises.


Day 1: Torture Twist
Twist Key Points:
-
Anchor feet
-
Engage the core as practiced in previous steps, then lean back into starting position
-
Twist left and hold 3 seconds
Twist right and hold 3 seconds
Repeat up to 4 times -
Look at feet


Day 2: Hollow Hold
Hold Key Points:
-
Start by pushing the Lower back into the floor and getting in the Static Chair Hold from step one
-
Fully extend both legs, pointing the toes
-
Keeping back pushed down, extend arms overhead
-
Hold 5-10 seconds
Torture Twist:
1 Set = [twist left, hold 3 seconds. Twist right, hold 3 seconds.]
Start with 1 set.
Add 1 Set per week, or as core strength allows, until able to complete the Graduation Workout.
(Take 30 seconds rest between sets.)
Hollow Hold:
Start with 5 second holds.
Each week add another hold until you can do the Graduation Workout below.
(30 seconds rest between reps)
CLICK for STEP 4 Graduation Workout
MOVE TO STEP 5 IF YOU CAN DO,
Torture Twist: 3 sets with 3 second holds (30 seconds rest between sets)
Hollow Holds: 3 sets of, 5x five second holds (20 seconds rest between holds)
Step 5: HOLLOW ROCK!
This is it! The big day. You are about to become ab-mazing!


Key Points:
-
Start by pushing the Lower back into the floor and getting in the Static Chair Hold from step one
-
Fully extend arms and legs
-
Start rocking by leaning towards your feet while trying not to move any joints
-
The body should stay rigid in the half moon shape
CLICK for STEP 5 Graduation Workout
YOU ARE ON THE WAY TO AB GREATNESS SHOULD YOU COMPLETE,
3x 10 Rocks
(1 minute rest between sets)
WRAPPING IT UP
Now that you have got it use it. Keep on rocking to maintain core strength. With a solid core foundation you are ready to build strength in compound exercises like the squat, deadlift, pull up, and more. I am curious to see where you see the biggest changes and benefits. Please take a minute and drop me a note to see how this progression has helped you. LESSONS TO CARRY OVER
- Engage the core for stability (push the back down)
- When all is lost start with the basics
- Build towards your goal in manageable steps
“How do you eat an elephant? One bite at a time.”
Monday 02.03.20
40 YARDS (36.58m) – 5.11 SECONDS
OH MY WORD. This is a 364lb, 6ft 7inch grown man running 40 yards in 5.11 seconds. Can you imagine this dude getting his hands on you? You would never, ever get past him. But thats not the point, the point is that he is an athlete. It doesn’t matter how you look at it this guy is an athlete. Does he look like one? That depends. If you think someone is an athlete just because he or she has abs then you’re wrong. Athletes come in all shapes and sizes and the sooner we all recognise that the better. This is why people have body dysmorphia, they have a distorted view of what is considered by the rest of society as good or bad, when in fact there isn’t a good or a bad, there’s just you. We want to redefine what athletic means and this is our way of doing it, so the next time you even think about looking in the mirror think about why you are looking in it in the first place and instead spend the time looking on the inside, rather than the outside.
Fordy
Push-Ups: How To Best Use Them For Growth (4 Science-Based Tips)
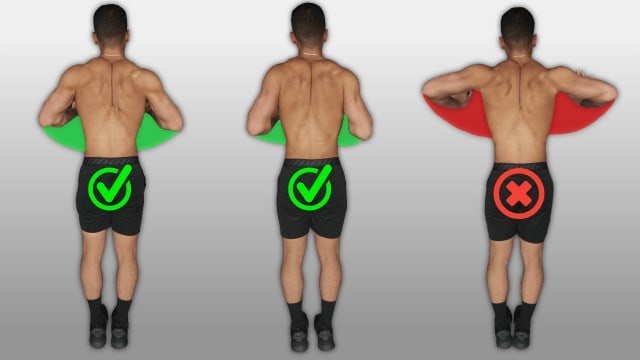
If you want to learn how to really build muscle with push ups… Then you need to read this article.
The push up is one of the best bodyweight exercises for the upper body. It’s convenient, relatively easy to learn, and can be performed virtually anywhere.
The main muscles worked during the push up will be the chest, triceps, and anterior deltoids as shown below:
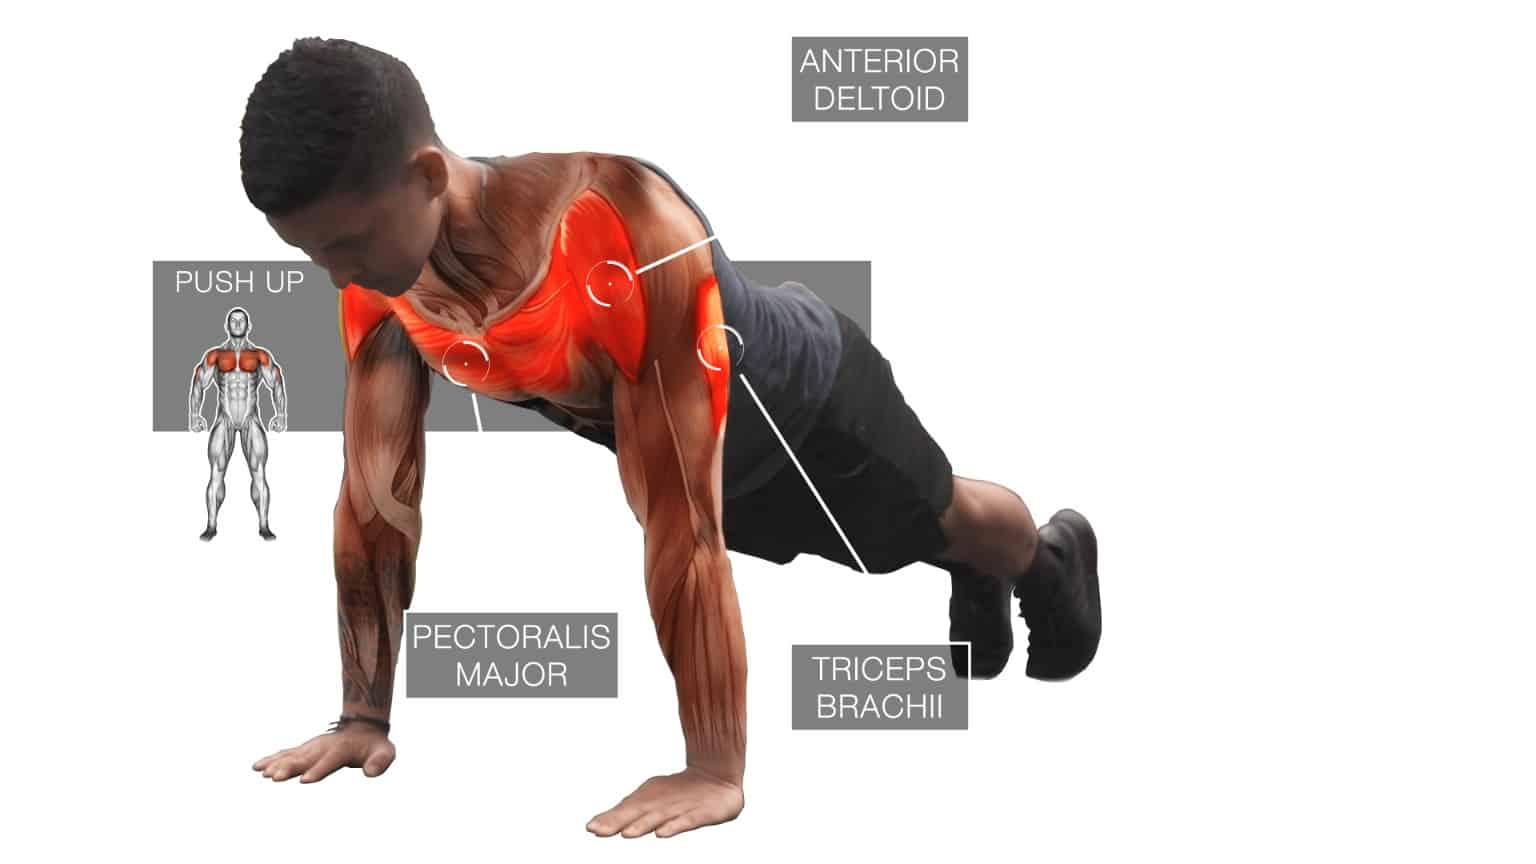
Do Push Ups Build Muscle?
Typically people are under the impression that they can’t build much muscle with bodyweight exercises.
Well, research indicates that this isn’t necessarily true.
For beginners at least, it’s been shown in the literature to provide size and strength gains that are comparable to that of the barbell bench press.
Illustrating this, a 2017 paper found similar chest and triceps growth and strength between push-ups and the bench press over a period of 8 weeks:
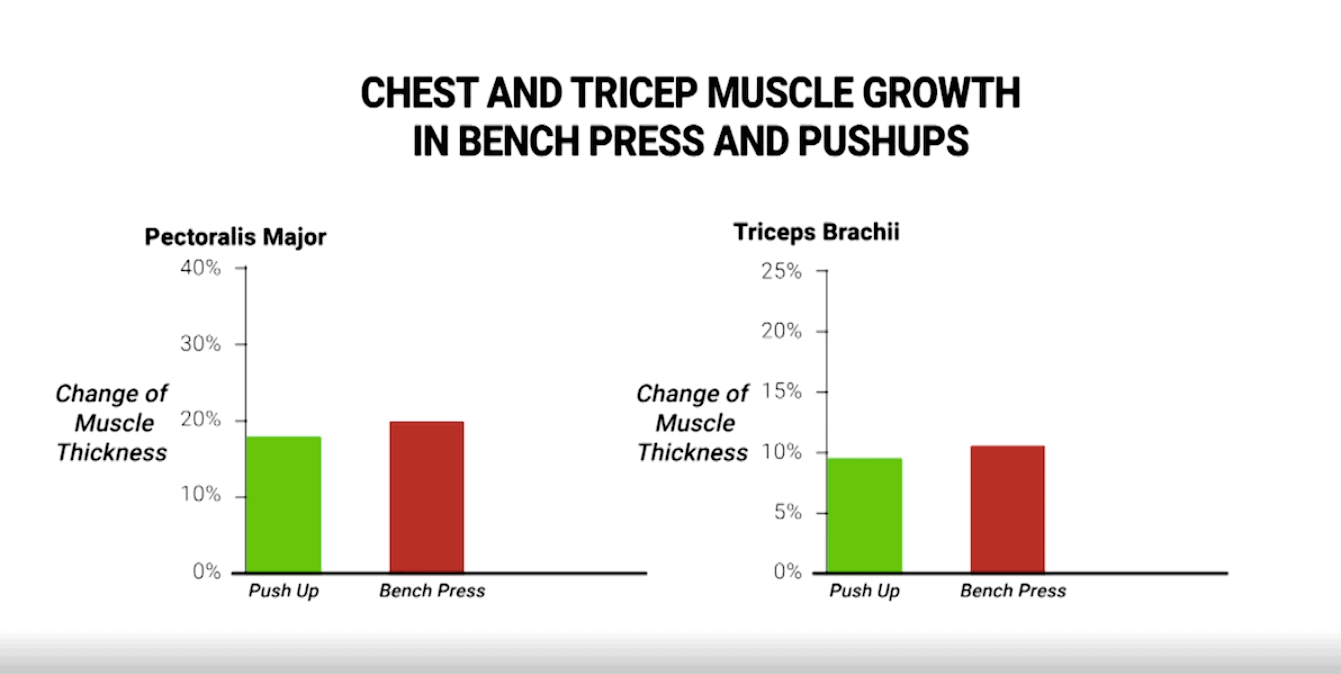
Simply meaning that push-ups are an effective exercise you should definitely be incorporating. This can be done with a total bodyweight workout routine or to compliment your existing weightlifting workouts.
But, in order to build muscle effectively with push ups, it’s vital that you perform them and implement them correctly. Something that most people unfortunately just don’t do.
Luckily, in this article, that’s exactly what I’ll show you how to do.
So to get started, let’s dive into the first tip.
1. Choose The Right Variations.
Although there’s countless push up variations out there, they’re not all created equally.
If your main goal is to build muscle with push ups, then it’s best that you stick with the variations that both:
- Best activate the target muscles (mainly the chest and triceps)
- Easiest to progress overtime
The standard push-up is a great starting point that can easily be progressed overtime. However, it’s vital that you perform them optimally.
Narrow vs Shoulder-Width vs Wide Push Ups
Most people are under the impression that wide grip push-ups commonly performed with the elbows flared are best for the chest. Whereas narrower grip push-ups with the elbows tucked are best for the triceps.
However, research indicates otherwise.
For instance, this 2016 paper from the Journal of Physical Therapy Science compared shoulder-width, wider, and narrow grip push ups:
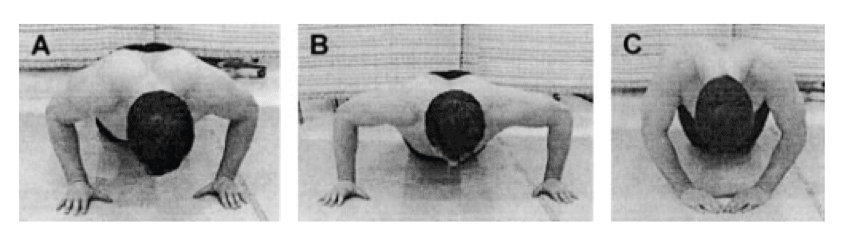
And as shown in the below graph…
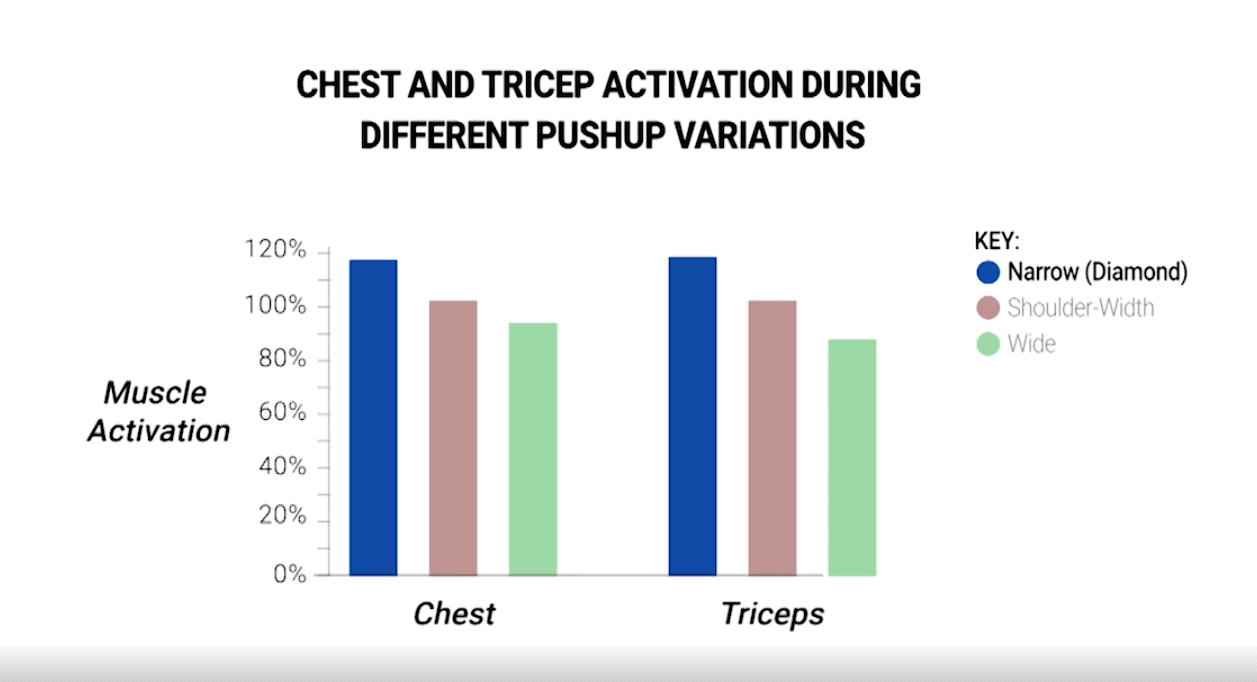
…the narrow grip push-ups with the hands placed in a diamond shape elicited significantly higher triceps AND chest activation than the other hand widths.
Two other studies have confirmed as well, and speculate that this is likely due to the greater horizontal adduction you can achieve with a narrow grip.
Thus, the diamond push-up is a great variation to incorporate and progress. The shoulder-width push-up is also a great alternative as well in the event that the narrow grip causes discomfort on your wrists and/or elbows.
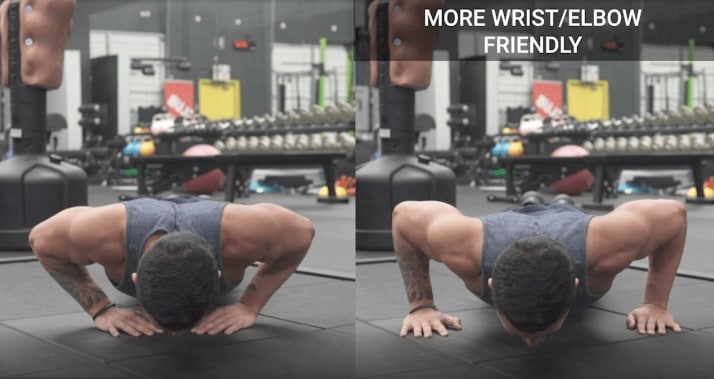
And if you wanted to prioritize the triceps more, then as shown in this 2006 paper by Lehman and colleagues:
Performing the push-up on a medicine ball or swiss ball will significantly increase triceps activation due to the unstable surface.
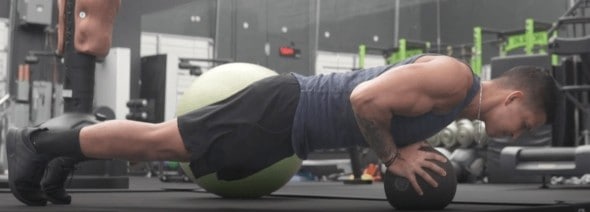
Thus, medicine ball and/or swiss ball push ups are good options to hit the triceps more.
But regardless of what push up variation you choose to incorporate, what’s more important to build muscle is that you apply the next tip.
2. Progress Your Push Ups!
In order to continuously build muscle with bodyweight movements like the push-up, you need to progress them overtime.
It’s the exact same concept as adding more weight to a chest exercise like the bench press for example. Otherwise, you won’t be providing your muscles with the adequate stimulus it needs to continue growing.
And to do so, there’s endless options available to you.
Resistance banded push-ups are a great option where you gradually use stronger bands overtime as you progress:
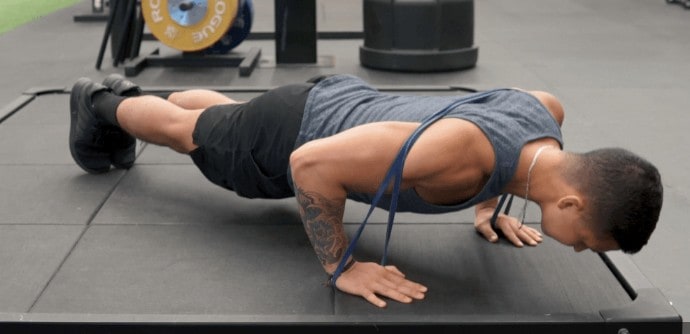
Adding weight to your back is another simple yet effective option but does have its limitations when you work with heavy weight:
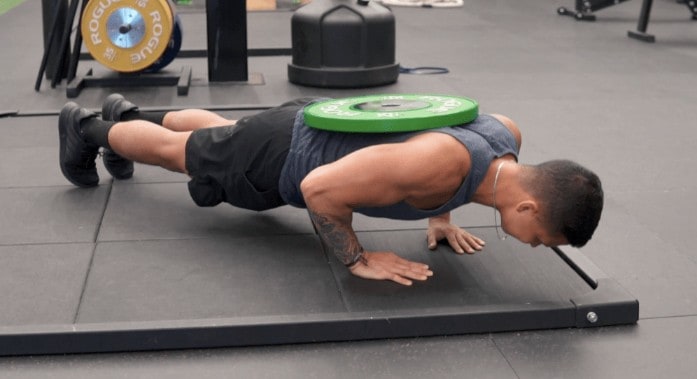
Shortening rest times, doing more reps, incorporating pause reps, and slowing down the tempo are all great options as well.
What I’d recommend you do however is:
If you’re able to do more than around 20 push ups per set, it’s likely best that you then overload it with one or more of the methods I mentioned.
This is necessary to increase the intensity of your sets and better stimulate growth. And just like any other exercise, keep track of how exactly you’re progressing it overtime and then simply repeat this throughout the weeks.
3. Exert Enough Effort!
As I’ve mentioned in my light vs heavy weights debate, recent research has indicated that:
When volume is equated, similar muscle growth can be achieved with the use of light loads and heavier loads.
However, with lighter loads this only seems to apply if sets are taken to failure or very close to it.
So what does this mean in terms of building muscle with push ups?
It simply means that during your sets of push-ups, you’ll want to push each set close to failure rather than stopping well short of it.
Thus, by pushing hard enough, you’ll still be able to fully activate the target muscles and provide enough stimulus for growth.
This is essential to build muscle with push ups since you’ll likely be working with much lighter loads when compared to something like the bench press.
4. Implement Them Properly.
Lastly, you want to ensure that you’re properly implementing push-ups into your current routine.
But how you do this will depend on the situation.
For example, if you’re currently using bodyweight workouts, then:
- Incorporate a few push-up variations 2-3 times per week to target your chest and triceps
- Perform each set close to failure and some to failure (e.g. at the end of the workout)
- Focus on progressing these variations overtime
On the contrary, if you’re currently working out at the gym with weights, then simply:
- Incorporate one or two push-up variations towards the end of your workouts as a finishing exercise.
- This will likely compliment your bench press strength since they allow the scapulae to move through their normal range of motion. It will also add more metabolic stress to your workout and enables you to effectively accumulate more volume for your chest and triceps.
- Simply adding in a few sets of diamond push-ups or medicine ball push-ups at the end of a push workout is a good way of doing this.
- Again, focus on progressing these sets overtime using the methods I went through earlier.
And finally, if you’re away on holidays or for some reason your gym is closed on Monday (also known as international chest day) then:
- You can rest assured that you won’t lose any of your hard earned gains by incorporating various push-up exercises as a substitute…
